

This article was written in October 2025. In February 2026 Okta added Docker support to the official GitHub repository, so you can now use the official Docker image instead of building your own. I will keep this article as it can be useful for learning how to set up the MCP Server in different environments, and for testing the HTTP Gateway, which is not available in the official image.
Introduction #
Okta recently released a beta version of their Model Context Protocol (MCP) Server, which enables AI assistants and Large Language Models (LLMs) to interact with Okta APIs using natural language commands. The MCP Server acts as a bridge between AI agents and Okta’s management APIs, allowing you to perform administrative tasks through conversational interfaces.
In this article, I’ll show you how to quickly set up the Okta MCP Server for testing and development using two different approaches:
- Docker/Docker Compose for container-based deployment with HTTP gateway
- Manual native installation on Ubuntu 24.04 LTS for direct system integration
The Dockerfile and Docker-compose are available in my okta-lab-mcp GitHub repository, which aims to simplify the MCP Server setup process for demo and test environments.
Note: This article covers the first version of my lab setup - I will update it in the following days/weeks with more examples and use cases.
What is the Model Context Protocol (MCP)? #
The Model Context Protocol (MCP) is an open protocol introduced by Anthropic that standardizes how Large Language Models communicate with external tools, resources, and remote services. It enables AI assistants to:
- Access external data sources and APIs in real-time
- Execute actions on behalf of users through natural language
- Maintain context across multiple interactions
- Integrate seamlessly with existing tools and workflows
flowchart LR
 subgraph AI["AI applications"]
        Chat["Chat interface
(Claude Desktop, LibreChat)"]
        IDE["IDEs and code editors
(Claude Code, Goose)"]
        Other["Other AI applications
(5ire, Superinterface)"]
  end
 subgraph Data["Data sources and tools"]
        Files["Data and file systems
(PostgreSQL, SQLite, GDrive)"]
        DevTools["Development tools
(Git, Sentry, etc.)"]
        ProdTools["Productivity tools
(Slack, Google Maps, etc.)"]
  end
    Chat L_Chat_MCP_0@<--> MCP["MCP
Standardized protocol"]
    IDE L_IDE_MCP_0@<--> MCP
    MCP L_MCP_Files_0@<--> Files & DevTools & ProdTools
    Other L_Other_MCP_0@<--> MCP

    style Chat stroke-width:2px
    style IDE stroke-width:2px
    style Other stroke-width:2px
    style Files stroke-width:2px
    style DevTools stroke-width:2px
    style ProdTools stroke-width:2px
    style MCP fill:#e6f3ff,stroke:#6699cc,stroke-width:2px
    style AI fill:#FFE0B2,color:#000000
    style Data fill:#C8E6C9

    L_Chat_MCP_0@{ animation: slow }
    L_IDE_MCP_0@{ animation: slow }
    L_MCP_Files_0@{ animation: slow }
    L_MCP_DevTools_0@{ animation: slow }
    L_MCP_ProdTools_0@{ animation: slow }
    L_Other_MCP_0@{ animation: slow }
What is the Okta MCP Server? #
The Okta MCP Server integrates with LLMs and AI agents, allowing you to perform various Okta management operations using natural language. For instance, you could simply ask Claude Desktop, VS Code Copilot, or Gemini to perform Okta management operations:
- “Create a new user and add them to the Engineering group”
- “Show me all failed login attempts from the last 24 hours”
- “List all applications that haven’t been used in the past month”
- “Deactivate users who haven’t logged in for 90 days”
The server provides comprehensive tool support including:
- User Management: Create, update, deactivate, and manage user profiles
- Group Operations: Manage groups and memberships
- Application Management: Configure and manage SSO applications
- Policy Administration: Handle security policies and rules
- Audit and Logging: Access system logs and authentication data
---
config:
  layout: dagre
---
flowchart LR
    agent["AI Agent"] L_agent_server_0@-- MCP Protocol --> server["Okta MCP Server"]
    server L_server_apis_0@-- API Calls --> apis["Okta APIs"]
     agent:::Sky
     server:::Rose
     apis:::Peach
    classDef Sky stroke-width:1px, stroke-dasharray:none, stroke:#374D7C, fill:#E2EBFF, color:#374D7C
    classDef Rose stroke-width:1px, stroke-dasharray:none, stroke:#FF5978, fill:#FFDFE5, color:#8E2236
    classDef Peach stroke-width:1px, stroke-dasharray:none, stroke:#FBB35A, fill:#FFEFDB, color:#8F632D
    L_agent_server_0@{ animation: slow }
    L_server_apis_0@{ animation: slow }
Official Resources #
Before diving into the installation methods, I recommend checking out the following resources:
- Okta’s official MCP Server repository - The source code and official documentation
- Introducing the Okta MCP Server - Okta’s blog post with configuration details
- Model Context Protocol Documentation - Learn about the MCP standard
Okta Setup #
The MCP Server supports two authentication methods:
-
Device Authorization Grant (Interactive)
- Create a new App Integration in your Okta org
- Select OIDC - OpenID Connect and Native Application
- Under Grant type, ensure Device Authorization is checked
- Go to Okta API Scopes tab and grant permissions (e.g.,
okta.users.read,okta.groups.manage) - Save and copy the Client ID
-
Private Key JWT (Browserless) - Recommended
- Create App: Select API Services and save
- Configure Client Authentication:
- Disable Require Demonstrating Proof of Possession (DPoP)
- Select Public key / Private key authentication
- Add Public Key: Generate in Okta or upload your own
- Grant API Scopes: Add required permissions (e.g.,
okta.users.read,okta.groups.manage) - Assign Admin Roles: Select an appropriate admin role:
- Super Administrator: Full access (recommended for testing)
- Read-Only Administrator: View-only access
- Custom Admin Role: Granular permissions for production use
Okta Scopes and Permissions #
The capabilities of the MCP Server depend on the scopes granted to your Okta OIDC application. Scopes determine which operations the server can perform in your Okta tenant, and are defined on both the Okta OIDC application and the OKTA_SCOPES environment variable.
Important: Scopes alone are not sufficient when using Private Key JWT authentication. You must also assign an admin role to the OIDC application. Without an admin role assignment, the server will receive a valid token with the requested scopes, but API calls will fail or return empty results due to missing permissions.
Without proper admin role assignment, you’ll encounter issues like:
- User queries returning empty results despite valid tokens
- API calls failing with insufficient permissions errors
- Scopes appearing valid but operations being blocked
Common Scopes #
| Scope | Operations | Use Case |
|---|---|---|
okta.users.read |
View user profiles, list users | User queries |
okta.users.manage |
Create, update, deactivate users | User lifecycle management |
okta.groups.read |
View groups and memberships | Group queries |
okta.groups.manage |
Create groups, manage memberships | Group administration |
okta.apps.read |
List applications and assignments | Application auditing |
okta.apps.manage |
Configure applications and assignments | Application management |
okta.logs.read |
Access system and authentication logs | Security monitoring and compliance |
okta.policies.read |
View security policies | Policy auditing |
okta.policies.manage |
Configure security policies | Policy administration |
Recommended Scope Combinations #
- For Testing and Development:
okta.users.read okta.users.manage okta.groups.read okta.groups.manage okta.apps.read okta.logs.read - For Production (Read-Only):
okta.users.read okta.groups.read okta.apps.read okta.logs.read okta.policies.read - For Full Administration:
okta.users.manage okta.groups.manage okta.apps.manage okta.logs.read okta.policies.manage
Additional Resources #
- Okta OAuth 2.0 Scopes
- Implement OAuth for Okta with a service app
- Assign admin roles to the OAuth 2.0 service app
- Okta Blog - Introducing the Okta MCP Server
Lab Environment Overview #
My okta-lab-mcp project provides a comprehensive Docker-based lab environment with the Okta MCP Server, an HTTP Gateway and gemini-cli for testing. You can find also sample configurations files for other MCP Client such as VS Code and Claude Desktop.
Docker Components #
| Component | Purpose | Access Method |
|---|---|---|
| Okta MCP Server | Core server for Okta API operations | stdio (direct) |
| MCP + HTTP Gateway | Network access for local and remote clients | HTTP on port 8000 |
| Gemini CLI | Google’s AI-powered CLI for testing | Via gateway |
| Sample Configurations | Ready-to-use configs for Gemini, VS Code, Claude Desktop | Multiple options |
Why Use the HTTP Gateway? #
The MCP protocol defines two standard transport mechanisms for client-server communication:
- stdio, communication over standard in and standard out
- Streamable HTTP
The first release of the Okta MCP Server supports only stdio, which works perfectly for direct, local client-server communication. However, stdio has limitations:
- Single Connection: Only one client can connect at a time
- Local Only: No network access capability
- Docker Compose Incompatibility: Cannot directly interact with stdio in detached containers
The HTTP Gateway solves these limitations by creating a bridge that enables:
- Remote Access: Connect from anywhere via HTTP
- Multiple Clients: Support concurrent connections
- Docker Compose Support: Perfect for containerized environments
flowchart LR
    agent["AI Agent"] L_agent_gateway_0@-- HTTP --> gateway["Gateway"]
    gateway L_gateway_server_0@-- stdio --> server["Okta MCP Server"]
    server L_server_apis_0@-- API Calls --> apis["Okta APIs"]

     agent:::Sky
     gateway:::Aqua
     gateway:::Ash
     server:::Rose
     apis:::Peach
    classDef Sky stroke-width:1px, stroke-dasharray:none, stroke:#374D7C, fill:#E2EBFF, color:#374D7C
    classDef Rose stroke-width:1px, stroke-dasharray:none, stroke:#FF5978, fill:#FFDFE5, color:#8E2236
    classDef Peach stroke-width:1px, stroke-dasharray:none, stroke:#FBB35A, fill:#FFEFDB, color:#8F632D
    classDef Aqua stroke-width:1px, stroke-dasharray:none, stroke:#46EDC8, fill:#DEFFF8, color:#378E7A
    classDef Ash stroke-width:1px, stroke-dasharray:none, stroke:#999999, fill:#EEEEEE, color:#000000

    L_agent_gateway_0@{ animation: slow }
    L_gateway_server_0@{ animation: slow }
    L_server_apis_0@{ animation: slow }
When to Use Gateway vs Direct stdio #
| Use Case | Recommended Approach |
|---|---|
| Docker Compose setup | HTTP Gateway (required) |
| Local MCP Client (i.e. VS Code or Claude Desktop) | Direct stdio (Docker run without Compose) or HTTP Gateway (runinng in Compose) |
| Remote Access | HTTP Gateway + SSH tunnel |
| Web application integration | HTTP Gateway |
| API testing with Postman | HTTP Gateway + SSH tunnel |
Docker/Docker Compose Setup #
Using Docker is the simplest way to get started with the MCP Server without having to set up the development environment manually.
Prerequisites #
- Docker Engine + Docker Compose or Docker Desktop
- Git
- TCP Port 8000 available (configurable)
- Gemini API Key (Optional, to use the Gemini CLI)
- Free tier: 100 requests/day
- Generate at aistudio.google.com/apikey
- Okta tenant with appropriate permissions
Installation Steps #
- Clone the repository with submodules:
git clone --recurse-submodules https://github.com/fabiograsso/okta-lab-mcp.git
cd okta-lab-mcp- Initial setup:
make setup- Configure environment variables:
# Create .env from template
cp example.env .env
# Edit with your Okta credentials
vi .env   # or `nano .env`
Required variables in .env:
OKTA_ORG_URL=https://my-tenant.okta.com
OKTA_CLIENT_ID=my-client-id
OKTA_KEY_ID=my-key-id
OKTA_PRIVATE_KEY=-----BEGIN PRIVATE KEY-----\nmy-pem-private-key...\n-----END PRIVATE KEY-----
OKTA_SCOPES=okta.users.read okta.groups.read okta.apps.read
GEMINI_API_KEY=your-gemini-api-key

# OPTIONAL
# OKTA_LOG_LEVEL=DEBUG
# OKTA_TIMEOUT=30
# OKTA_MAX_RETRIES=3
# OKTA_RATE_LIMIT=600
# GATEWAY_LOG_LEVEL=debug
# GEMINI_CLI_VERSION=sandbox:0.7.0
The private key must be formatted as a single line with \n for newlines:
# Original format
-----BEGIN PRIVATE KEY-----
MIIEvQIBADANBgkqhkiG9w0BAQEFAASCBKcwggSjAgEAAoIBAQC...
more_key_content_here...
-----END PRIVATE KEY-----

# Formatted for environment variable
-----BEGIN PRIVATE KEY-----\n..\n..\n-----END PRIVATE KEY-----
You can convert it using:
awk 'NF {sub(/\r/, ""); printf "%s\\n",$0;}' private_key.pem- Build and start services:
# Build Docker images
make build

# Start all services
make start

# Verify health
make health
Docker Deployment Options #
The lab provides multiple deployment options:
-
Full Stack (Recommended for Testing)
# Start both MCP Server + Gateway and Gemini CLI make start -
Gateway Only
# Start just the HTTP gateway for remote access make start-gateway -
Standalone MCP Server
# For direct stdio access (VS Code, Claude Desktop)
docker run -i --rm \
--name okta-mcp-server
-e OKTA_ORG_URL="https://my-tenant.okta.com" \
-e OKTA_CLIENT_ID="your_client_id" \
-e OKTA_KEY_ID="your_key_id" \
-e OKTA_PRIVATE_KEY="-----BEGIN PRIVATE KEY-----\n...\n-----END PRIVATE KEY-----" \
-e OKTA_SCOPES="okta.users.read okta.groups.read" \
okta-mcp-server
Management Commands #
The project includes a comprehensive Makefile for easy management:
make help           # Display all available commands
make setup          # Initial setup
make build          # Build Docker images
make start          # Start all services
make stop           # Stop all services
make status         # Check service status
make health         # Health check
make logs-all       # View all service logs
make clean          # Clean Docker resources
Client Configuration Examples #
The lab includes ready-to-use configurations for popular MCP clients:
VS Code Configuration #
Edit the file (or create it if not exist) /.vscode/mcp.json:
Example with Gateway access: (Requires the Docker-compose stack up and running)
{
"mcp": {
  "servers": {
    "okta-gateway": {
      "type": "http",
      "url": "http://localhost:8000/mcp"
      }
    }
}
}
Example with Docker and direct stdio:
(Start a temporary Docker container using the okta-mcp-server image - Remember to change the environment variable in the args part of the JSON)
{
"mcp": {
    "servers": {
        "okta-docker": {
            "type": "stdio",
            "command": "docker",
            "args": [
                "run", "-i", "--rm",
                "--name", "okta-mcp-vscode",
                "-e", "OKTA_ORG_URL=https://xxxx.okta.com",
                "-e", "OKTA_CLIENT_ID=xxxx",
                "-e", "OKTA_SCOPES=okta.users.read okta.groups.read",
                "-e", "OKTA_PRIVATE_KEY=-----BEGIN PRIVATE KEY-----\nxxxxxxxx\n-----END PRIVATE KEY-----",
                "-e", "OKTA_KEY_ID=xxxxx",
                "okta-mcp-server"
            ]
        }
    }
  }
}
You can choose what to use, or try both. I suggest in any case to keep only one active at time.
Claude Desktop Configuration #
Create or edit ~/Library/Application Support/Claude/claude_desktop_config.json (macOS) or %APPDATA%\Claude\claude_desktop_config.json (Windows):
Example with Gateway access: (Requires the Docker-compose stack up and running)
{
  "mcpServers": {
    "okta-gateway": {
      "type": "http",
      "url": "http://localhost:8000/mcp"
    }
  }
}
Example with Docker and direct stdio:
(Start a temporary Docker container using the okta-mcp-server image - Remember to change the environment variable in the args part of the JSON)
{
  "mcpServers": {
    "okta-docker": {
      "command": "docker",
      "args": [
        "run",
        "-i",
        "--rm",
        "--name", "okta-mcp-claude",
        "-e", "OKTA_ORG_URL=https://xxxx.okta.com",
        "-e", "OKTA_CLIENT_ID=xxxx",
        "-e", "OKTA_SCOPES=okta.users.read okta.groups.read okta.logs.read okta.apps.read okta.userTypes.read",
        "-e", "OKTA_PRIVATE_KEY=-----BEGIN PRIVATE KEY-----\nxxxxxxxx\n-----END PRIVATE KEY-----",
        "-e", "OKTA_KEY_ID=xxxxx",
        "-e", "OKTA_LOG_LEVEL=DEBUG",
        "okta-mcp-server:latest"
      ]
    },
  }
}
You can choose what to use, or try both. I suggest in any case to keep only one active at time.
Gemini CLI Configuration #
We have already a Gemini CLI running inside the Docker compose stack. If you prefer to run a local instance of the Gemini CLI here are two sample configuration that you can use with a standalone installation (see Testing and Examples):
Example with Gateway access: (Requires the Docker-compose stack up and running)
{
  "mcpServers": {
    "okta-gateway": {
    "httpUrl": "http://localhost:8000/mcp"
    }
  }
}
Example with Docker and direct stdio:
(Start a temporary Docker container using the okta-mcp-server image - Remember to change the environment variable in the args part of the JSON)
{
  "mcpServers": {
    "okta-docker": {
      "command": "docker",
      "args": [
        "run",
        "-i",
        "--rm",
        "--name", "okta-mcp-gemini",
        "-e", "OKTA_ORG_URL=https://xxxx.okta.com",
        "-e", "OKTA_CLIENT_ID=xxxx",
        "-e", "OKTA_SCOPES=okta.users.read okta.groups.read okta.logs.read okta.apps.read okta.userTypes.read",
        "-e", "OKTA_PRIVATE_KEY=-----BEGIN PRIVATE KEY-----\nxxxxxxxx\n-----END PRIVATE KEY-----",
        "-e", "OKTA_KEY_ID=xxxxx",
        "-e", "OKTA_LOG_LEVEL=DEBUG",
        "-v",
        "okta-mcp-server:latest"
      ]
    }
  }
}
You can choose what to use, or try both. I suggest in any case to keep only one active at time.
Testing and Examples #
Gemini CLI #
You have different ways to start gemini-cli:
-
Docker Desktop: Open the
gemini-clicontainer, go to the Exec tab and rungemini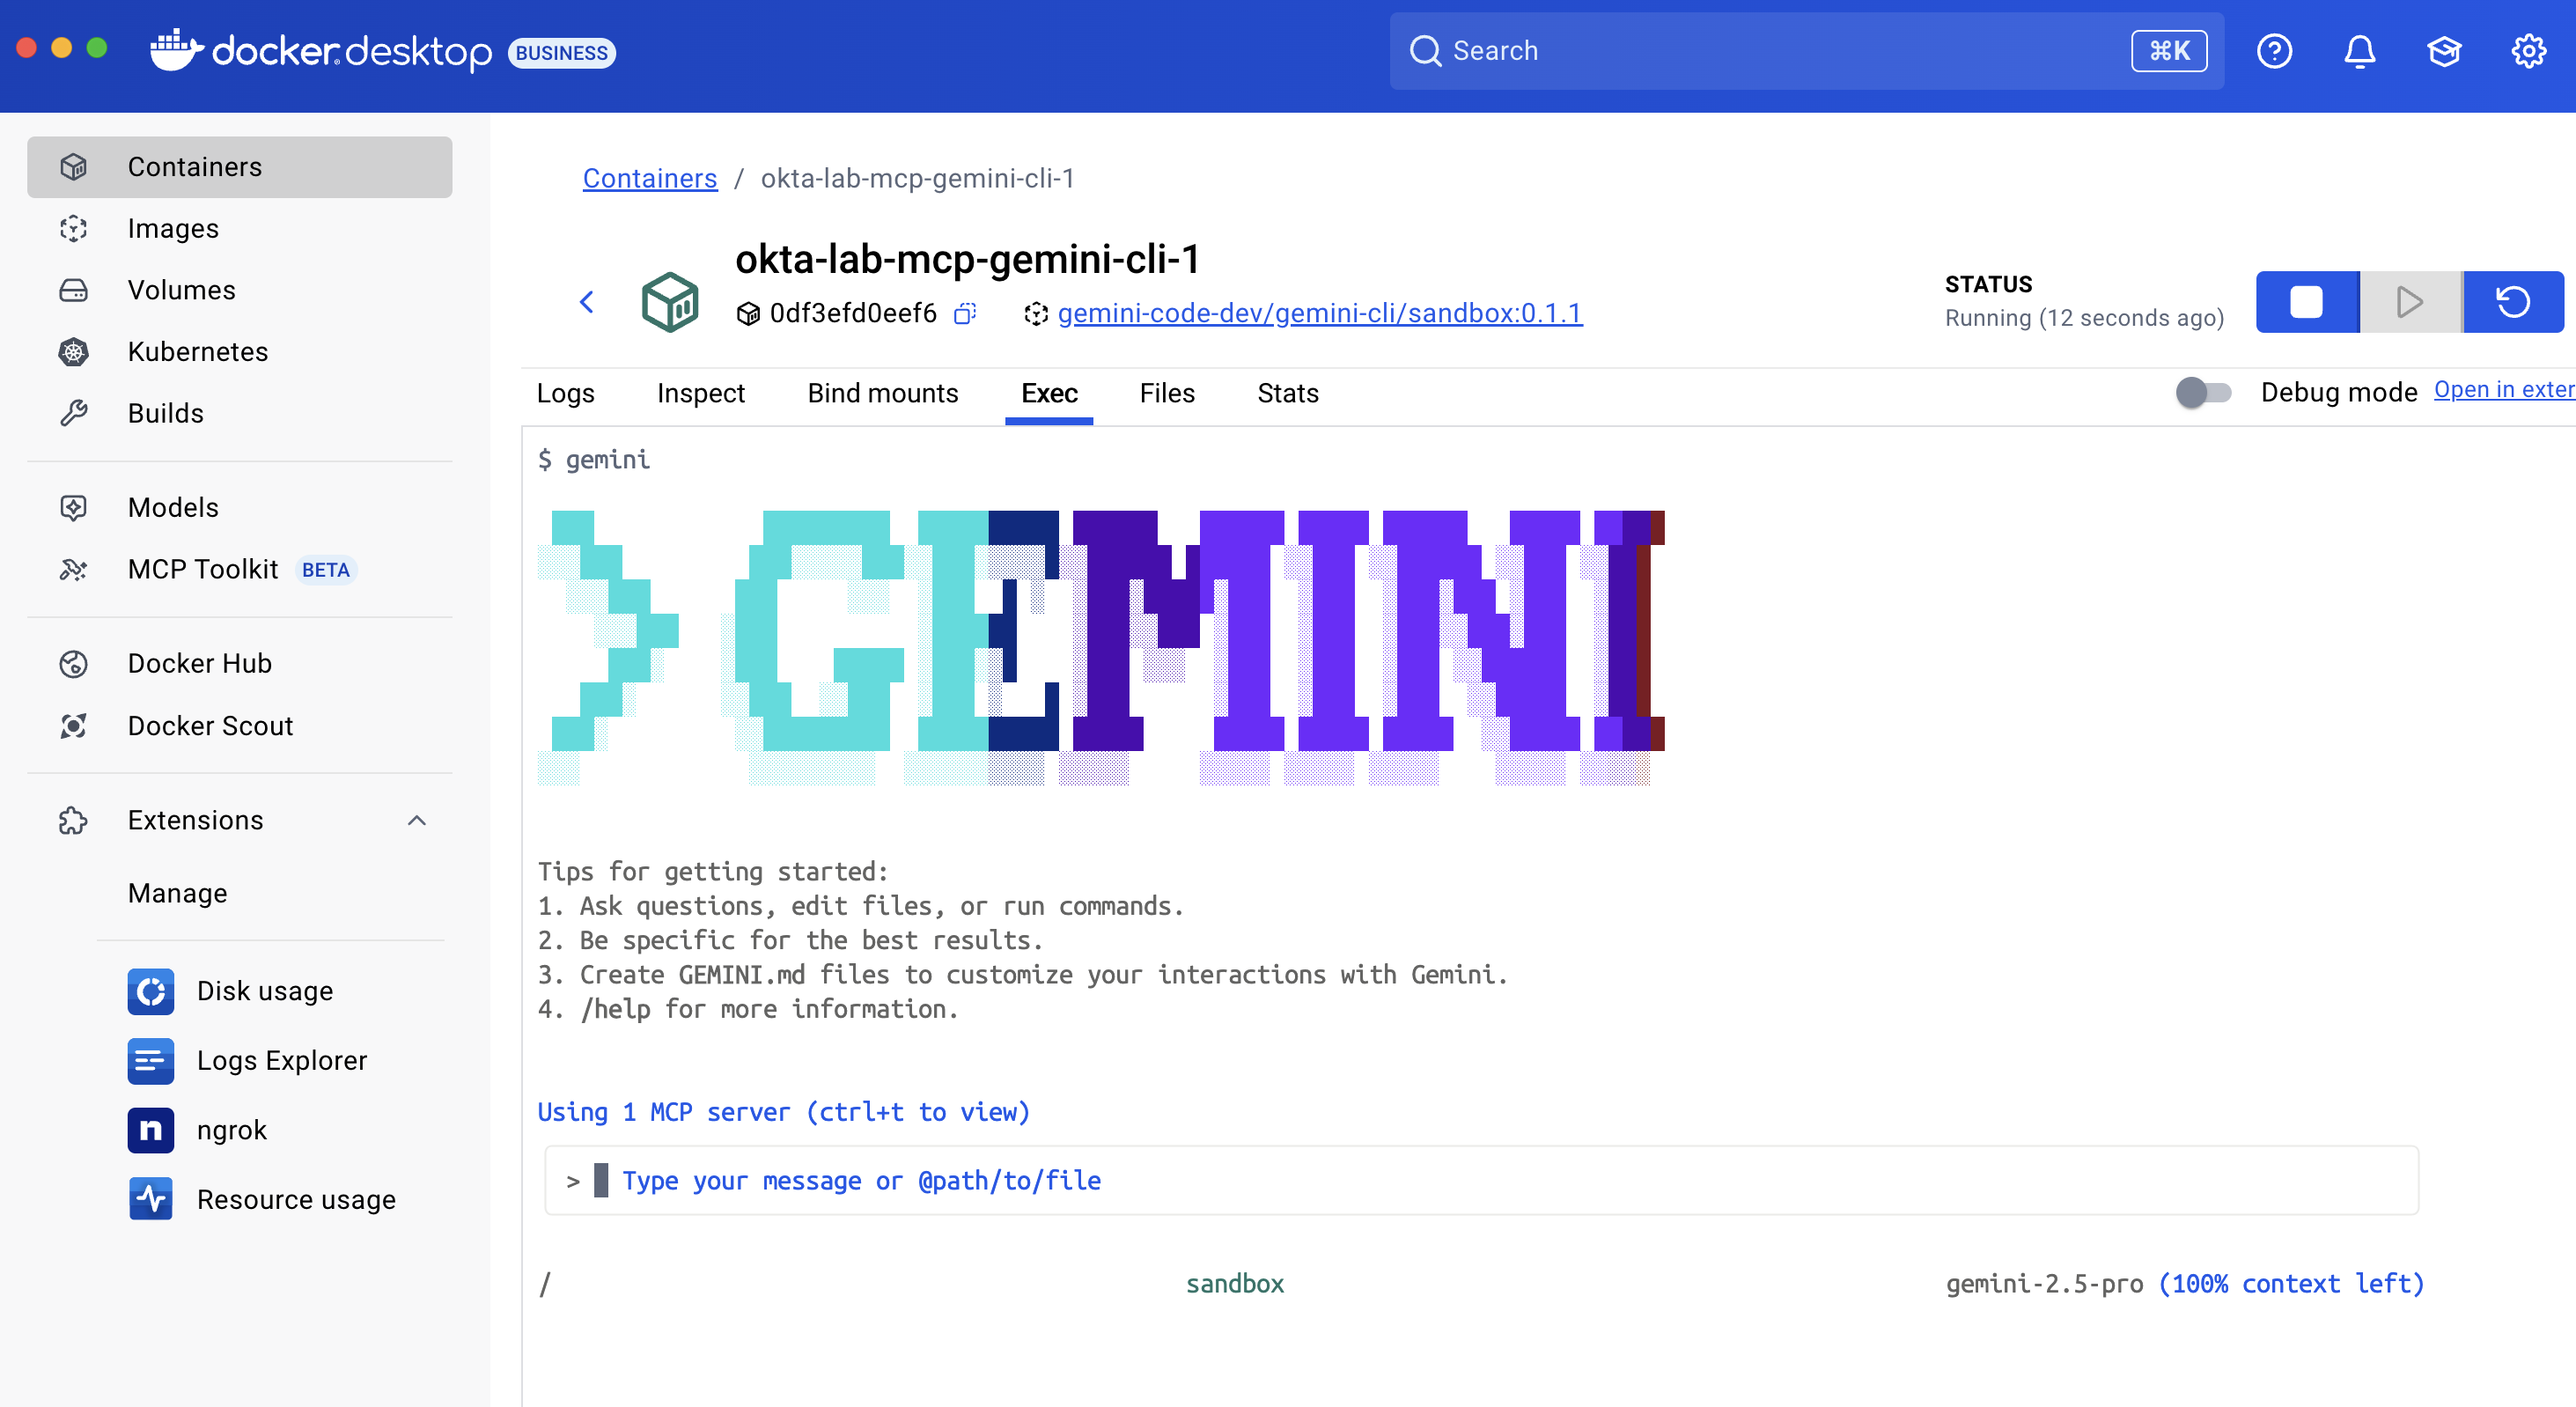
-
CLI Inside Docker Compose: If you’re running the Docker Compose stack, you can open the Gemini CLI directly on the terminal using the command:
make gemini-cli # Or docker compose exec gemini-cli gemini -
Standalone Docker:
# Copy the configuration in ./data/gemini/settings.json docker run -it --rm \ --name gemini-cli -v ./data/gemini:/home/node/.gemini:rw \ -e GEMINI_API_KEY="your_api_key" \ us-docker.pkg.dev/gemini-code-dev/gemini-cli/sandbox:0.8.1 -
Local run or installation:
# Copy the correct configuration in `~/.gemini/settings.json`

# Run using npx (no installation required)
npx @google/gemini-cli

# Or install
# with NPM
npm install -g @google/gemini-cli
# with brew
brew install gemini-cli

# Then run
gemini
Available Commands #
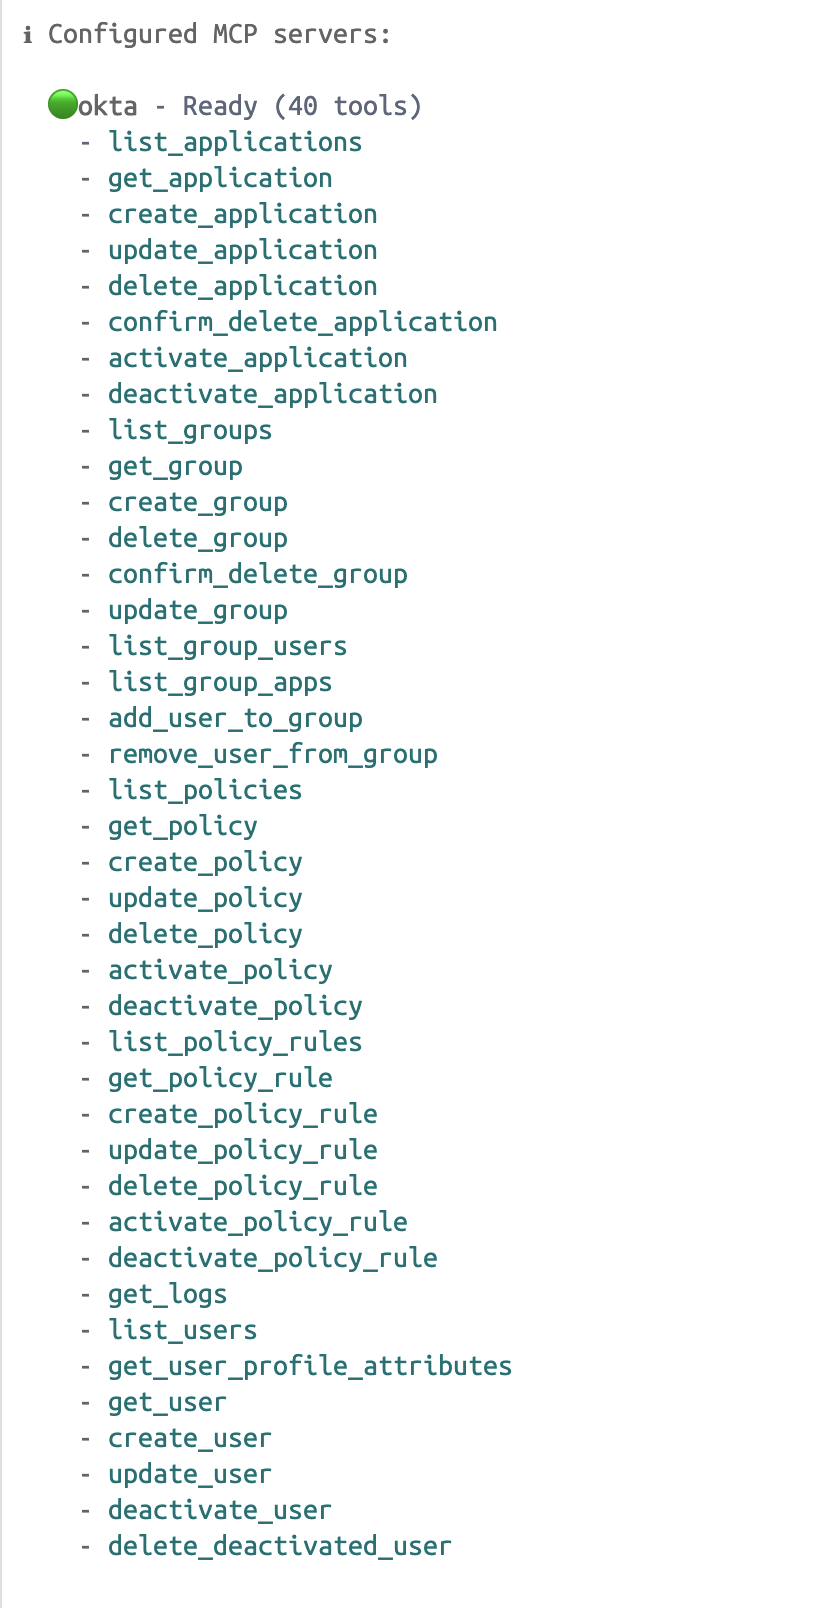
Once you’ve started gemini-cli, you can run /mcp to see available MCP servers and supported commands.
Then test queries like:
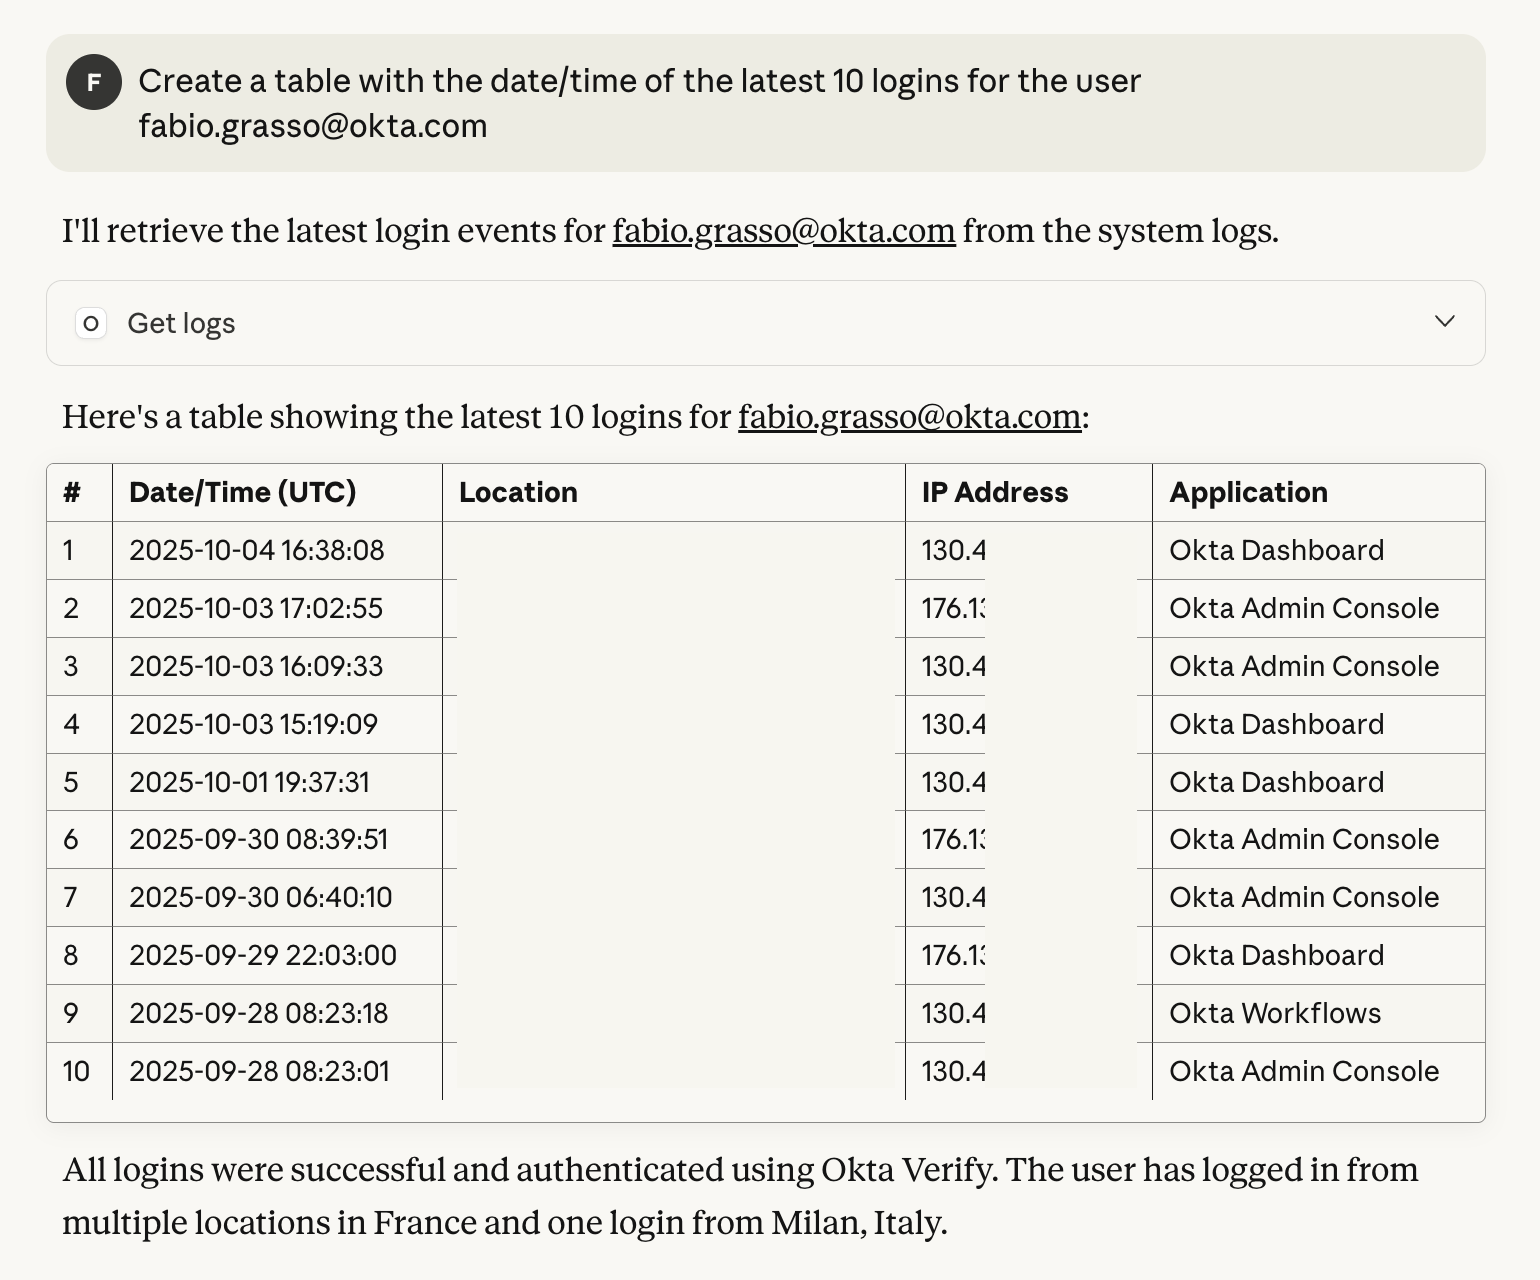
How many users are in my Okta tenant?What are the latest logins of user Fabio Grasso?Add user Fabio Grasso to the group Office 365 LicenseCheck the logs for login errors and provide me the list of users with more than 5 failed login attemptsCheck the logs, count all logins per user and give me the ranking of the 10 top users by login count

Claude Desktop Integration #
[TODO: Will be added in future updates with configuration examples and demos]
VS Code Integration #
[TODO: Will be added in future updates with screenshots and examples]
Remote Access and Security #
SSH Tunnel #
If you’re not using Docker Desktop, but a remote server, I suggest to use an SSH tunnell for secure remote access to the HTTP Gateway, without opening ports to the internet:
# On your local machine, create an SSH tunnel
ssh -L 8000:localhost:8000 username@server-ip

# Now access the gateway at http://localhost:8000 on your local machine
This is the recommended approach for remote access as it keeps the gateway port closed to the internet while still allowing you to access it securely.
Security Considerations #
⚠️ Lab Environment Warning #
This setup is designed for testing and development only:
- Plaintext Keyring: Uses basic credential storage (
keyrings.alt.file.PlaintextKeyring) - HTTP Transport: No TLS/SSL encryption by default
- No Authentication: Gateway has no access control
- Environment Variables: Sensitive data stored in plain text
- File Permissions: Logs and config files may contain sensitive information
Production Recommendations #
For production use, implement proper security measures:
- Use proper secret management solutions
- Enable HTTPS with valid certificates for the gateway
- Add authentication to the gateway (OAuth, API keys, etc.)
- Implement rate limiting and request throttling
- Use dedicated service accounts with minimal required permissions
- Enable comprehensive audit logging
- Encrypt data at rest and in transit
- Use proper file permissions (600 for .env files)
- Regularly rotate credentials and keys
Troubleshooting #
-
Authentication Failures
- Verify all environment variables in
.envfile - Check
OKTA_ORG_URLformat (must include https://) - Ensure
OKTA_CLIENT_ID,OKTA_KEY_IDare correct - Verify private key formatting (single line with
\nseparators) - Check that Okta application has required API scopes granted
- Ensure the correct Administrator role is assigned to the application
- Verify all environment variables in
-
MCP Client Connection Issues
- Restart your MCP client after configuration changes
- Verify server path in client configuration
- Test the gateway with
curl http://localhost:8000/healthz
-
Enable Debug Mode
- For more detailed logging, enable debug mode and restart:
OKTA_LOG_LEVEL=DEBUGGATEWAY_LOG_LEVEL=debug
- For more detailed logging, enable debug mode and restart:
Practical Use Cases #
Once configured, you can use natural language to perform Okta operations, like:
- User Management
- “Create a new user John Smith with email
john.smith@company.comand add him to the Engineering group” - “Show me all users who haven’t logged in for more than 90 days”
- “Deactivate all contractor accounts that are expired”
- “Create a new user John Smith with email
- Security Operations
- “Show me all failed login attempts from suspicious IP addresses in the past 24 hours”
- “List all applications that don’t have MFA enforced”
- “Find users with admin privileges who aren’t in the Administrators group”
- Compliance and Reporting
- “Generate a report of all users with access to the Finance application”
- “Show me all policy exceptions for the past month”
- “List applications that haven’t been used in the past 90 days”
Alternative: Native Installation #
If you prefer not to use Docker or need a persistent installation, you can install all components natively. The following examples are for Ubuntu 24.04 LTS, but you can easily adapt them to other systems.
Prerequisites #
- Ubuntu 24.04 LTS
- sudo privileges
- Okta tenant with appropriate permissions (configured as described in the Okta Authentication Setup section)
System Preparation #
First, update the system and install required dependencies:
# Update system
sudo apt-get update
sudo apt-get upgrade -y

# Install essential packages
sudo apt-get install -y \
    ca-certificates \
    curl \
    gnupg \
    lsb-release \
    apt-transport-https \
    software-properties-common \
    git \
    make \
    jq \
    unzip \
    wget \
    build-essential \
    libssl-dev \
    zlib1g-dev \
    libbz2-dev \
    libreadline-dev \
    libsqlite3-dev \
    libncursesw5-dev \
    xz-utils \
    tk-dev \
    libxml2-dev \
    libxmlsec1-dev \
    libffi-dev \
    liblzma-dev
Install Python 3.13 #
Python 3.13 is required for the Okta MCP Server:
# Add deadsnakes PPA for Python 3.13
sudo add-apt-repository -y ppa:deadsnakes/ppa
sudo apt-get update

# Install Python 3.13 and development tools
sudo apt-get install -y python3.13 python3.13-venv python3.13-dev

# Install pip for Python 3.13
curl -sS https://bootstrap.pypa.io/get-pip.py | sudo python3.13

# Install uv package manager
sudo python3.13 -m pip install uv

# Verify installation
python3.13 --version
python3.13 -m uv --version
Install Node.js and NPM #
Node.js is required for the HTTP Gateway and Gemini CLI:
# Install NodeSource repository for Node.js 20
curl -fsSL https://deb.nodesource.com/setup_20.x | sudo -E bash -
sudo apt-get install -y nodejs

# Verify installation
node --version
npm --version
Installation of the main components #
Install the HTTP Gateway and Gemini-cli #
# Install supergateway globally
sudo npm install -g supergateway

# Install Gemini CLI globally
sudo npm install -g @google/gemini-cli

# Verify installations
supergateway --version
gemini --version
Clone and Install Okta MCP Server #
# Set installation directory
BASE_DIR="$HOME/okta-mcp-server"

# Clone the official Okta MCP Server repository
git clone https://github.com/okta/okta-mcp-server.git "$BASE_DIR"
cd "$BASE_DIR"

# Install Python dependencies using uv
python3.13 -m uv sync

# Create directories for logs and configuration
mkdir -p "$BASE_DIR/logs"
mkdir -p "$HOME/.config/okta-mcp"
Configure Environment Variables #
Create a .env file with your Okta configuration:
# Create .env file
cat > "$BASE_DIR/.env" << 'EOF'
# Okta Configuration
# Okta Configuration
OKTA_ORG_URL=https://your-org.okta.com
OKTA_CLIENT_ID=your_client_id
OKTA_SCOPES=okta.users.read okta.groups.read okta.apps.read okta.logs.read
OKTA_KEY_ID=your_key_id
# Private Key (formatted as single line with \n)
OKTA_PRIVATE_KEY=-----BEGIN PRIVATE KEY-----\n...\n-----END PRIVATE KEY-----
# OKTA_LOG_LEVEL=DEBUG
# OKTA_TIMEOUT=30
# OKTA_MAX_RETRIES=3
# OKTA_RATE_LIMIT=600

# Gemini Configuration
# GEMINI_CLI_VERSION=sandbox:0.7.0
GEMINI_API_KEY=your_gemini_api_key
EOF

# Edit the file with your actual values
nano "$BASE_DIR/.env"Important: For the private key, convert it to a single line with \n separators:
# Convert your private key file to the correct format
awk 'NF {sub(/\r/, ""); printf "%s\\n",$0;}' your_private_key.pem
Create Systemd Service for HTTP Gateway #
Create a systemd service to run the MCP Server with HTTP Gateway:
# Create systemd service file
sudo tee /etc/systemd/system/okta-mcp-gateway.service > /dev/null << EOF
[Unit]
Description=Okta MCP HTTP Gateway
After=network.target

[Service]
Type=simple
User=$USER
WorkingDirectory=$BASE_DIR
Environment="PATH=/usr/local/bin:/usr/bin:/bin"
EnvironmentFile=$BASE_DIR/.env
ExecStart=/usr/bin/npx supergateway --stdio "python3.13 -m uv run okta-mcp-server" --outputTransport streamableHttp --stateful --port \${GATEWAY_PORT}
Restart=always
RestartSec=10
StandardOutput=append:$BASE_DIR/logs/gateway.log
StandardError=append:$BASE_DIR/logs/gateway-error.log

[Install]
WantedBy=multi-user.target
EOF

# Reload systemd daemon
sudo systemctl daemon-reload

# Enable the service to start on boot
sudo systemctl enable okta-mcp-gateway.service

# Start the service
sudo systemctl start okta-mcp-gateway.service

# Check status
systemctl status okta-mcp-gateway.service
Configure Gemini CLI #
Create a configuration file for Gemini CLI to use the MCP server:
# Create Gemini configuration directory
mkdir -p "$HOME/.gemini"

# Create settings.json with MCP server configuration
cat > "$HOME/.gemini/settings.json" << EOF
{
  "mcpServers": {
    "okta-mcp-local": {
      "type": "stdio",
      "command": "python3.13",
      "args": ["-m", "uv", "run", "okta-mcp-server"],
      "cwd": "$BASE_DIR",
      "env": {
        "OKTA_ORG_URL": "$(grep OKTA_ORG_URL $BASE_DIR/.env | cut -d '=' -f2)",
        "OKTA_CLIENT_ID": "$(grep OKTA_CLIENT_ID $BASE_DIR/.env | cut -d '=' -f2)",
        "OKTA_KEY_ID": "$(grep OKTA_KEY_ID $BASE_DIR/.env | cut -d '=' -f2)",
        "OKTA_PRIVATE_KEY": "$(grep OKTA_PRIVATE_KEY $BASE_DIR/.env | cut -d '=' -f2-)",
        "OKTA_SCOPES": "$(grep OKTA_SCOPES $BASE_DIR/.env | cut -d '=' -f2)"
      }
    },
    "okta-mcp-gateway": {
      "type": "http",
      "url": "http://localhost:8000/mcp"
    }
  },
  "defaultServer": "okta-mcp-gateway"
}
EOF
The sample code implement both ways to connect to the MCP Server: via HTTP gateway or via stdio. You can choose what to use, or try both. I suggest in any case to keep only one active at time.
Service Management Commands #
Use these commands to manage the Okta MCP Gateway service:
# Start the service
sudo systemctl start okta-mcp-gateway

# Stop the service
sudo systemctl stop okta-mcp-gateway

# Restart the service
sudo systemctl restart okta-mcp-gateway

# Check service status
systemctl status okta-mcp-gateway

# View real-time logs
journalctl -u okta-mcp-gateway -f

# View last 50 log lines
journalctl -u okta-mcp-gateway -n 50

# Enable service to start on boot
sudo systemctl enable okta-mcp-gateway

# Disable auto-start
sudo systemctl disable okta-mcp-gateway
Testing the Installation #
Test that everything is working correctly:
# Test the HTTP gateway
curl http://localhost:8000

# Test Gemini CLI with default gateway server
gemini

# Inside Gemini, run:
# /mcp - to see available MCP servers
# Then try: "How many users are in my Okta tenant?"

# View gateway logs
tail -f ~/okta-mcp-server/logs/gateway.log
Installation Paths #
| Component | Path |
|---|---|
| MCP Server | ~/okta-mcp-server/ |
| Configuration | ~/okta-mcp-server/.env |
| Logs | ~/okta-mcp-server/logs/ |
| Gemini Config | ~/.gemini/settings.json |
| VS Code Config | ~/okta-mcp-server/.vscode/mcp.json |
| Systemd Service | /etc/systemd/system/okta-mcp-gateway.service |
Troubleshooting (Native Installation) #
-
MCP Client Connection Issues
- Check that
uvis installed and accessible - Test with
curl http://localhost:8000 - Check if service is running:
systemctl is-active okta-mcp-gateway - Verify firewall rules:
sudo ufw status - Check logs:
tail -f ~/okta-mcp-server/logs/gateway.log
- Check that
-
Python or Node.js Version Issues
- Verify Python 3.13 is installed:
python3.13 --version - Verify Node.js is installed:
node --version - Ensure
uvis installed:python3.13 -m uv --version - Check that
supergatewayis installed:which supergateway
- Verify Python 3.13 is installed:
Pro and Cons #
✅ Advantages of Native Installation:
- Direct stdio access for local clients
- Better performance (no container overhead)
- System service integration with systemd
- Auto-start on boot
- Native file system access
- Better for long-term dedicated servers
❌ Disadvantages of Native Installation:
- System-wide changes required
- Harder to clean up completely
- Platform-specific (The instructions provided here are Ubuntu only, but you can adapt them to other platform)
- Manual updates required
- Requires more system administration knowledge
Conclusion #
The Okta Lab MCP setup provides a powerful way to integrate AI assistants with Okta’s management APIs. Whether you choose the Docker-based approach for quick testing or the native installation for persistent development, you’ll have a robust environment for exploring AI-driven Okta administration.
The Model Context Protocol opens up exciting possibilities for automating identity management tasks through natural language, making complex administrative operations accessible to both technical and non-technical users.
Next Steps #
- Explore the official Okta MCP Server tools and Okta’s blog post Introducing the Okta MCP Server
- Check the okta-lab-mcp repository for Docker-based setup and additional tools
- Join the MCP Community
- Check out other MCP Servers for additional integrations
- Consider building custom MCP tools for your organization’s specific needs
Questions or feedback? Feel free to comment on this blog or open an issue on the okta-lab-mcp repository.