
Introduction #
In today’s identity and access management landscape, modern VPNs and network systems increasingly support advanced authentication protocols such as SAML and OIDC (OpenID Connect). These protocols offer enhanced security and significantly improved user experiences, including features like Okta’s FastPass, which enables passwordless and frictionless authentication.
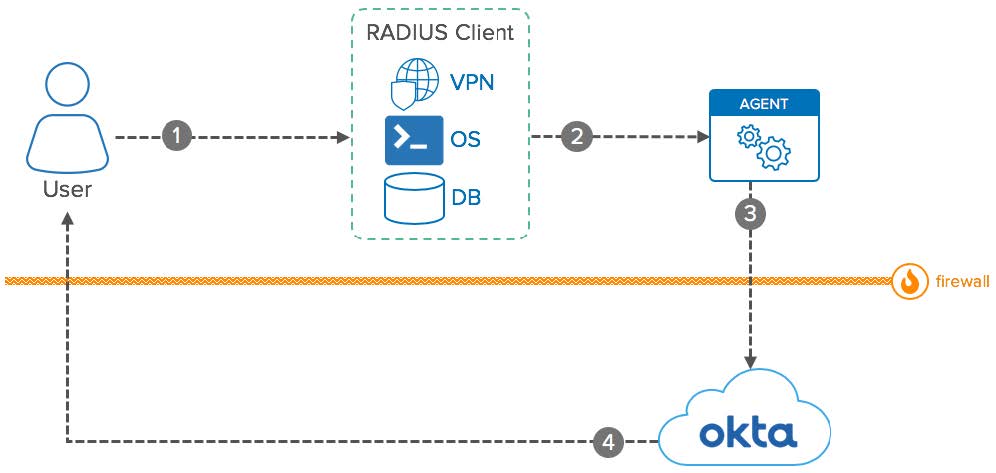
Despite this evolution, many organizations still rely on legacy systems where the RADIUS protocol remains widely used. RADIUS is a robust and proven standard for network authentication, particularly well-suited to integrating Multi-Factor Authentication (MFA) with VPN access. Okta provides dedicated support for RADIUS through its Okta RADIUS agent, offering a seamless way to add MFA protections to these existing infrastructures.
This lab environment is an ideal solution for anyone looking to quickly demo or build a proof of concept (PoC) for RADIUS-based MFA integration with Okta. It encapsulates the Okta RADIUS agent, a test client, and an optional OpenVPN Access Server in a Docker Compose setup, enabling fast and easy deployment without complex manual configuration.
Note: While Docker is not officially supported by Okta for running the RADIUS agent in production environments, it serves as an excellent tool for demonstration, testing, and PoC purposes. This approach dramatically simplifies setup and accelerates experimentation with Okta RADIUS integrations.
Quick instructions #
- Clone the following git repository: https://github.com/fabiograsso/okta-lab-radius.
- Before starting, copy the Okta RADIUS Agent setup file (
OktaRadiusAgentSetup-x.xx.x.deb) to the./docker/okta-radius-agent/packagefolder. - Edit the
.envfile, runmake config, and thenmake start
Prerequisites #
- Docker and Docker Compose are installed.
- If you are using a Ubuntu 24.04 Linux server:
apt-get install -y docker docker-compose - You can also use Docker Desktop.
- If you are using a Ubuntu 24.04 Linux server:
- Git clone the following project:
Or, if you don’t want to use git:
apt-get install -y git # if git is not yet installed git clone https://github.com/fabiograsso/okta-lab-radiuscurl -o lab-radius.tar.gz https://github.com/fabiograsso/okta-lab-radius/main.tar.gz tar -xvf lab-radius.tar.gz` - OKTA RADIUS Agent Installation Package:
- Download the
.debfile of the RADIUS Agent and copy it into the./docker/okta-radius-agent/packagefolder. - Alternatively, insert the download URL in the
DEB_URLvariable in the.envfile.
- Download the
Okta RADIUS App Configuration #
- Click Browse App Catalog.
- Search for RADIUS App, select it, and then click Add Integration.
- Enter a unique app label and click Next.
- In the Sign On tab, do the following:
- Select the Authentication checkbox.
- Enter a UDP Port (for example, 1812). The UDP port values of the app and the client gateway must match.
- Enter the Secret Key to use to encrypt the user password. The secret key for the app and the client gateway must match. The maximum length of the secret key is 16 characters.
- Select an appropriate username format from the Application username format dropdown.
- To enable authentication with Active Directory (AD) UPN or AD Sam account name, do the following:
- Select the Sign On tab.
- Scroll to the Advanced RADIUS Settings section.
- Click Edit .
- In the Authentication section, select Enable UPN or SAM Account Name Login . Users assigned to this app must have their username set to the AD user principal name before being assigned to the RADIUS app. For the SAM account name to be used successfully, it must have the same prefix as the UPN.
- Click Save .
- Scroll to the Settings section of the Sign On tab.
- Click Edit .
- Select Email from the Application username format dropdown to import users are imported with their full
username@domain.comvalue. - Click Save .
- Add to groups
- On the app page, click the Assignments tab.
- Click Assign to Groups .
- Find the group that you want to assign the app to and click Assign .
- Repeat for any additional groups.
- Click Done .
Reference doc: Add the RADIUS app | Okta Identity Engine
Run the Docker Compose #
Configuration #
Rename the .env.sample file to .env, and change the parameters based on your configuration:
# Okta tenant
OKTA_ORG=xxxxx.okta.com
# RADIUS Secret and Port, as defined in the Okta RADIUS App configuration
RADIUS_SECRET=mysecret123
RADIUS_PORT=1812
# Password for the 'openvpn' admin user
OPENVPN_PASSWORD=admin
#Optional for the test script
#TEST_USERNAME=radius.user
#TEST_PASSWORD=Radius.pass
#TEST_IP=127.0.0.1
How to start #
Only for the first time, you will need to run make configure, in order to start the Okta RADIUS Agent Configuration.
Then follow the onscreen instructions. At the end, you will see something like:
Please visit the URL: <https://xxxx.okta.com/oauth2/auth?code=9hkkimp1>
before Wed Aug 06 14:10:27 UTC 2025 to authenticate and continue agent registration.
Open the provided URL and confirm the registration.
Then, run make start, to start the compose stack.
For the following run, you can just run make start, as the configuration is already done.
Commands Recap #
# Start the stack
make start

# Run the RADIUS Agent configuration
make config

# Run the RADIUS client to test
make radius-test

# View the full command list
make help
Test Script #
This bundle includes a Bash script utility for testing RADIUS authentication, designed specifically to handle interactive multi-factor authentication (MFA) challenges. It initiates an authentication attempt using the radclient tool. The script can be configured via command-line arguments, environment variables, or interactive prompts if no other values are provided.
Its main feature is the ability to parse Access-Challenge responses from the RADIUS server. When an MFA challenge is received, the script prompts the user for the required input (such as an OTP or a factor selection) and submits it back to the server. This process repeats until a final Access-Accept or Access-Reject is received. Finally, it analyzes the server’s reply message to provide a clear, success or failure status.
In order to test the RADIUS Authentication, you have three options:
-
Run
make radius-testand digit the username and password when prompted -
Pass the username and password as arguments to the command:
make radius-test USERNAME=myuser@test.email PASSWORD=mypassword -
Set username and password in the .env file:
TEST_USERNAME=myuser@test.email
TEST_PASSWORD=mypassword
Then run
make radius-test
radclient (with apt-get install freeradius-utils on Ubuntu/Debian)
Flowchart #
---
config:
layout: dagre
---
flowchart TD
A["🙎♂️ Start Test Script"] --> B["🪪 Get Credentials"]
B --> G["Send RADIUS Access-Request"]
I{"RADIUS Response?"} -- "Access-Accept" --> J["✅ Authentication Successful"]
I -- "Access-Reject" --> K["❌ Authentication Failed"]
I -- "Access-Challenge" --> L["🧐 Parse MFA Challenge"]
L --> M["🔐 Display Challenge Message to User"]
O["User Provides MFA Input"] --> P["Send Access-Request with State + MFA Response"]
G --> I
J --> T["🏁 End"]
K --> T
M --> O
P --> I
G:::Peach
G:::Ash
L:::Ash
L:::Okta
M:::Ash
M:::Okta
O:::Ash
P:::Okta
classDef Peach stroke-width:1px, stroke-dasharray:none, stroke:#FBB35A, fill:#FFEFDB, color:#8F632D
classDef Ash stroke-width:1px, stroke-dasharray:none, stroke:#999999, fill:#EEEEEE, color:#000000
classDef Okta stroke-width:1px, stroke-dasharray:none, fill:#fff3cd, stroke:#856404, color:#856404
style J fill:#d4edda,stroke:#155724,color:#155724
style K fill:#f8d7da,stroke:#721c24,color:#721c24
Sequence Diagram #
sequenceDiagram
  actor User as User
  participant TestScript as TestScript
  participant radclient as radclient
  participant RADIUS_Agent as RADIUS_Agent
  participant Okta as Okta
  autonumber
  User ->> TestScript: Start Script
  TestScript ->> User: Prompt for Credentials
  User ->> TestScript: Enter Username/Password
  TestScript ->> radclient: Send Access-Request (credentials)
  radclient ->> RADIUS_Agent: Forward Request
  RADIUS_Agent ->> Okta: Authenticate Credentials
  Okta -->> RADIUS_Agent: Authentication Response
  RADIUS_Agent -->> radclient: Return RADIUS Response (Accept/Reject/Challenge)
  radclient -->> TestScript: Parse Response
  alt Access-Accept
    TestScript ->> User: ✅ Display Success
  else Access-Reject
    TestScript ->> User: ❌ Display Failure/Error
  else Access-Challenge
    TestScript ->> User: 🔐 Prompt for MFA input
    User ->> TestScript: Provide MFA response
    TestScript ->> radclient: Send Response (with State)
    radclient ->> RADIUS_Agent: Forward MFA response
    RADIUS_Agent ->> Okta: Validate MFA
    Okta -->> RADIUS_Agent: MFA Result
    RADIUS_Agent -->> radclient: Return RADIUS Response
    radclient -->> TestScript: Parse Response
    TestScript ->> User: Loop until Access-Accept/Reject
  end
Notes #
-
Persistent configuration will be stored in the
datafolder. -
The docker-compose exposes UDP port
1812. To use a different port, change theRADIUS_PORTin the.envfile. -
I tried to parse all the possible outputs of the
radclientcommand, but it’s possible that I missed some use case. You can run theradclientmanually by executing:echo "User-Name=testuser,User-Password=testpass" | docker-compose exec -T radius-client radclient -x radius-agent:1812 auth test123 -
Based on the settings of the RADIUS app in Okta, you can:
- Skip the password verification and do only the MFA challenge
- Default to the push if the user has Okta Verify enrolled
- Pass the preferred MFA method after the password, separated by a comma. Example
mypassword,pushThe available methods are:PUSH,SMS,CALL, orEMAIL - Pass the OTP after the password, separated by a comma. Example
mypassword,123456
-
radclientautomatically generatesMessage-Authenticatorwhen needed, so you can enable the feature in the Okta configuration -
To simplify, I’ve used PAP authentication. This is also the supported method for OpenVPN AS.
OpenVPN AS #
The Docker Compose includes a pre-configured OpenVPN AS Server. The free license includes 2 concurrent connections, which is more than enough for a test/demo environment.
You can open the OpenVPN management console at https://localhost:943/admin/settings
You will find the RADIUS configuration already prepared and active:
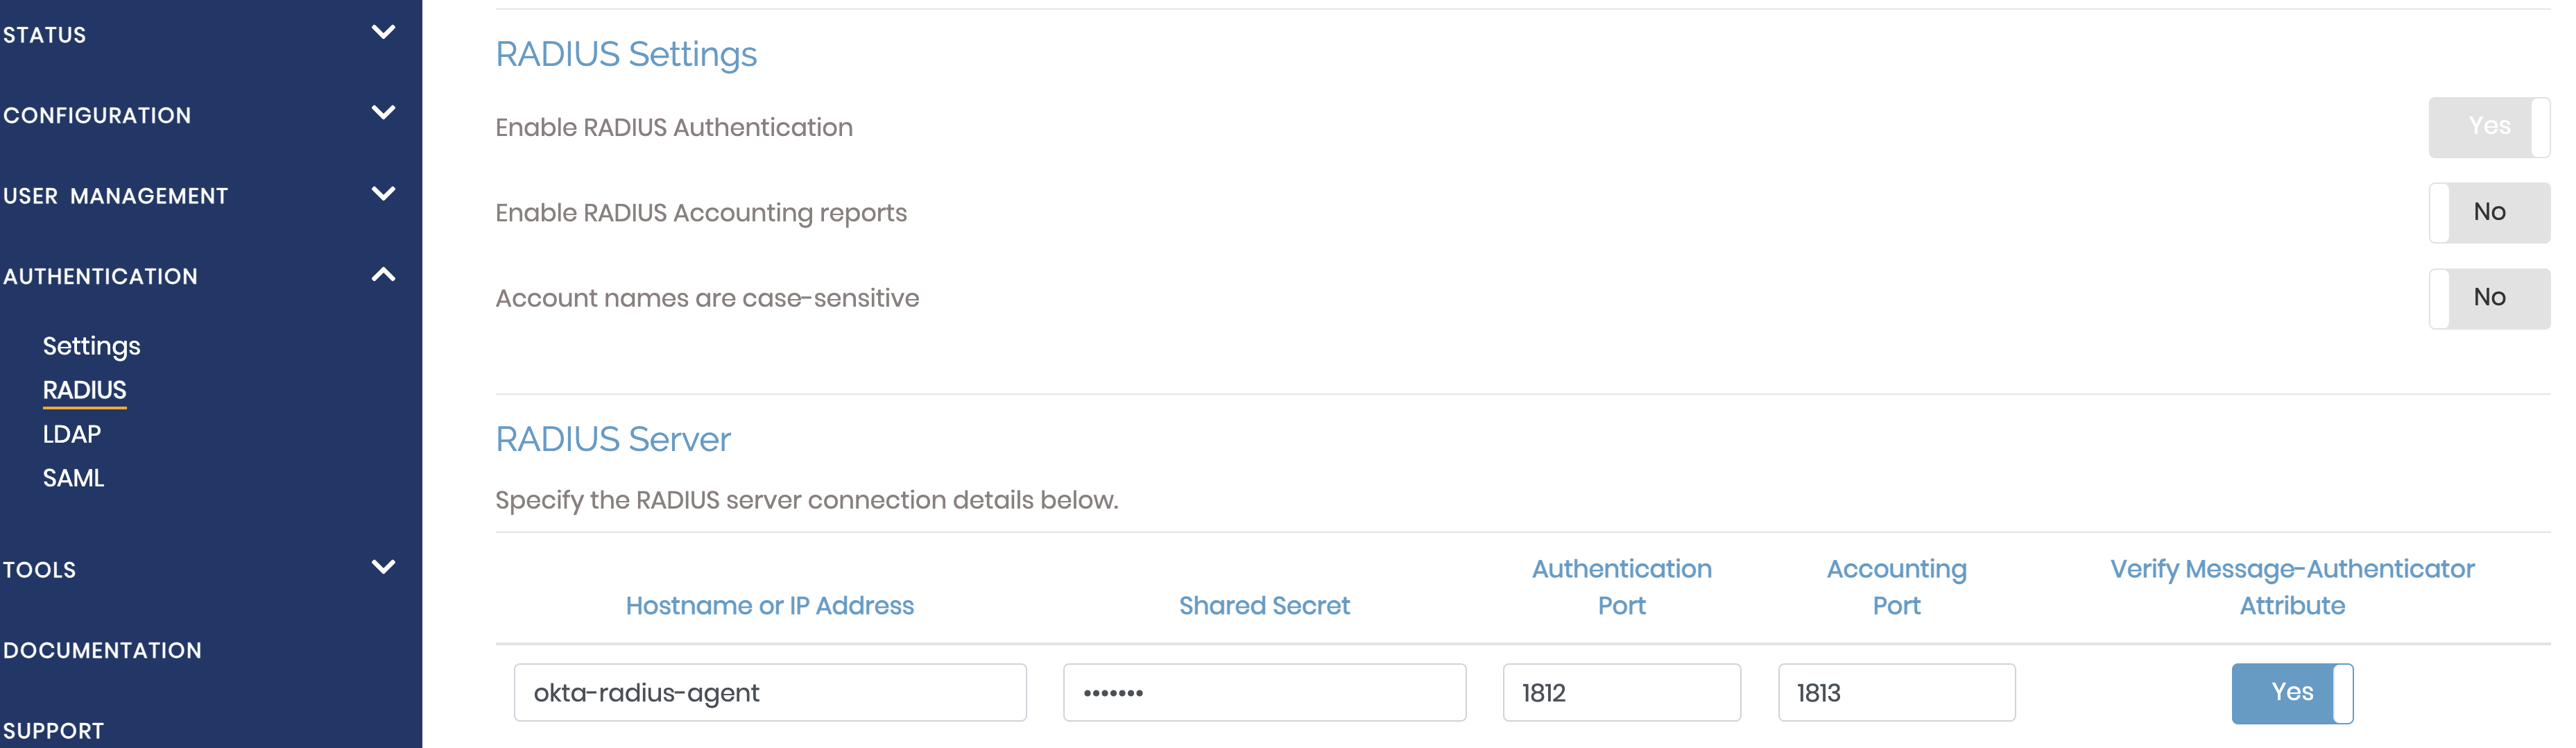
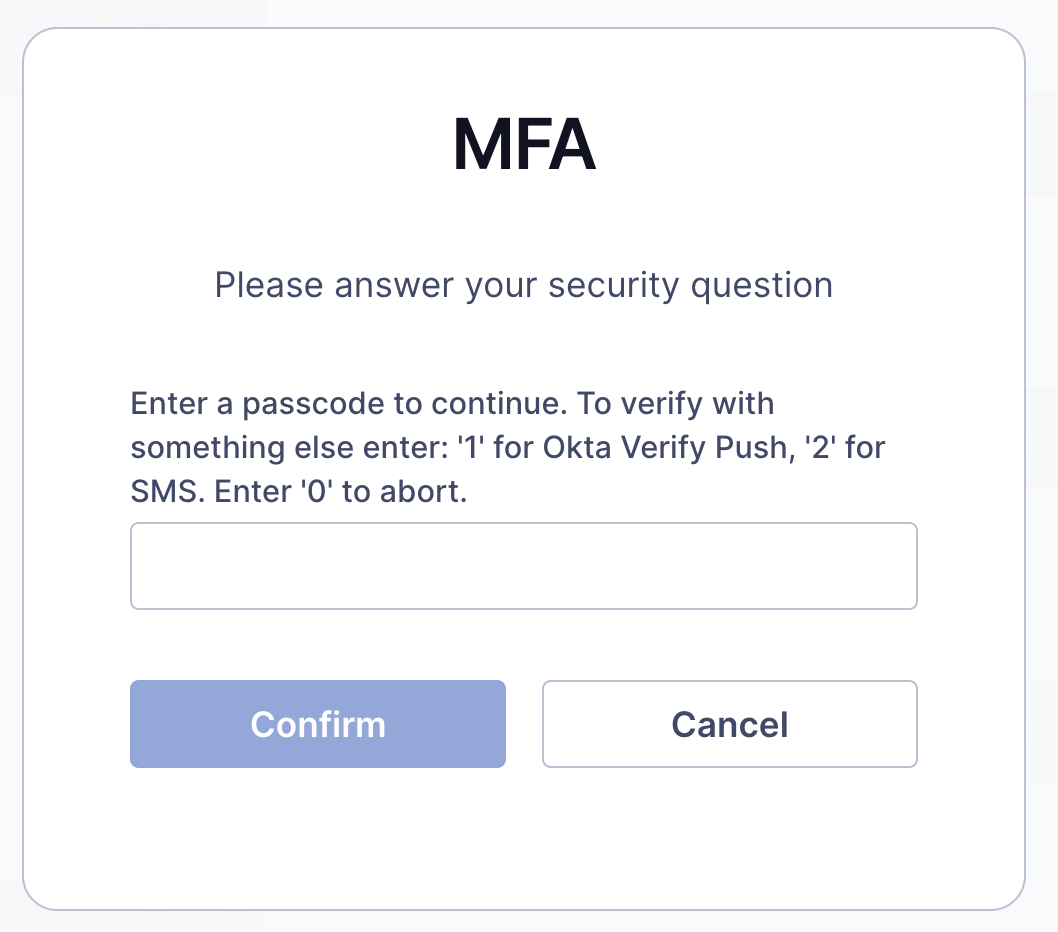
You can then test to log in with a user at https://localhost/login
After inserting the username/password, it will require the MFA challenge:

Client IP Consideration #
When integrating a VPN or network access device with Okta via the RADIUS protocol, a critical aspect to consider is the visibility of the end-user’s original IP address. Correctly configuring the client IP ensures that Okta security policies, such as Network Zones and behavior detection , function as intended.
Why is the Client IP Important? #
Passing the true client IP address to Okta is essential for:
- Applying Location-Based Policies: Enforce or relax security measures based on the user’s geographical location by using Okta’s Network Zones.
- Behavior and Threat Detection: Allow Okta to accurately identify suspicious activity, such as logins from impossible-to-travel-to locations or unfamiliar devices.
- Enhanced Security Auditing: Provide clearer and more accurate logs in the Okta System Log for security analysis and incident response.
How Okta Handles the Client IP #
To solve this, many RADIUS-enabled devices can send the end-user’s IP address within a specific RADIUS attribute. The Okta RADIUS Server Agent is designed to look for the client IP in the following standard RADIUS attributes, such as: Calling-Station-Id or Framed-IP-Address
If your device, like OpenVPN AS, can be configured to send one of these attributes containing the client’s public IP address, Okta will use it to evaluate security policies.
Configuration Steps #
While this document does not cover the specific configuration within specific VPN services, the general steps are as follows:
- Configure VPN: You must configure your OpenVPN Access Server to include the IP attribute in the RADIUS packets it sends to the Okta RADIUS Agent. Consult the OpenVPN AS documentation for instructions on how to add RADIUS attributes to authentication requests.
- Configure the Okta RADIUS App: In your Okta admin console, navigate to the RADIUS application you’ve configured.
- Go to the Sign On tab.
- In the “Advanced RADIUS Settings " section, locate the Report client IP setting.
- From the dropdown menu, select the attribute that your VPN Server is configured to send (i.e.
Calling-Station-IdorFramed-IP-Address). - For OpenVPN (and for our test script), you can use
31 Calling-Station-Id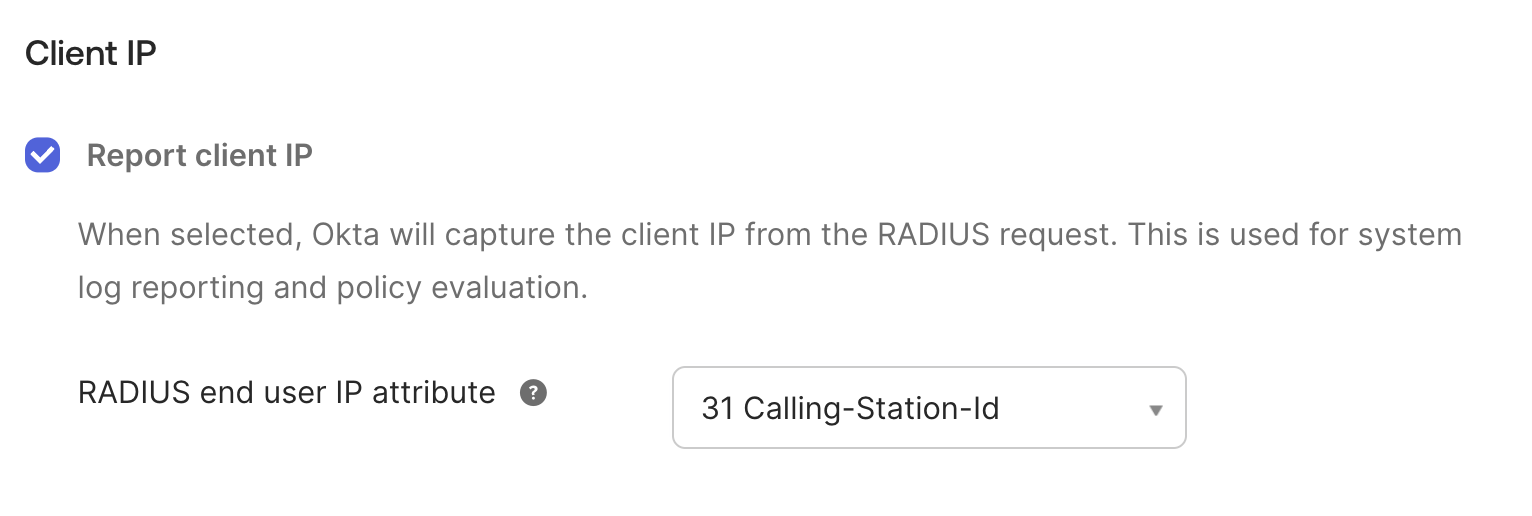
For more technical details, you can refer to the official Okta documentation: Client IP reporting | Okta Identity Engine.
Limitations and Supported Factors #
When deploying the Okta RADIUS Server Agent, it’s important to be aware of its capabilities and constraints to ensure a successful and secure integration.
Limitations #
The Okta RADIUS Agent has the following limitations:
- Authentication Protocol: The agent exclusively supports the Password Authentication Protocol (PAP). Other protocols, such as CHAP or EAP, are not supported.
- WiFi Infrastructure: The agent is not designed to support WiFi infrastructure integrations.
- Single Okta Verify Enrollment: To avoid unexpected behavior, users should only have a single Okta Verify device enrolled.
Supported Factors #
The Okta RADIUS integration doesn’t support all the Factors supported by Okta. Especially, factors that require browser interaction (i.e., FastPass or FIDO2) are not supported. Also, Number Challenge is not supported.
- Factor Enrollment: Okta recommends that users enroll no more than eight MFA factors at a time. If too many factors are enrolled, the challenge message displayed in the RADIUS prompt can become too large, leading to a poor user experience.
- Passwordless Mode (2FA Only): You can configure the RADIUS application to bypass primary password authentication and proceed directly to the second factor challenge. This is also known as “passwordless mode” and is configured by clearing the Okta performs primary authentication checkbox in the application settings.
For detailed information and a list of supported factors, you can refer to the following documentation: RADIUS applications in Okta | Okta Identity Engine
Production Considerations #
This is just a demo/example project for test and experiment with the Okta RADIUS Agent. In production remember to implement some best-practices:
- Network Security
- Use firewall rules to restrict access to the RADIUS port (default 1812)
- Consider placing the RADIUS agent in a DMZ or secured network segment
- Use strong, unique secret keys for each RADIUS client
- When supported, prefer more secure protocols such as EAP-TTLS
- Client IP Reporting Configure proper client IP reporting to enable Okta’s location-based policies. See Client IP Consideration
- HA and Performance
- Install at leas two RADIUS Agent, in order to guarantee high availability and eventually load balancing. Define if use a load balancer or an active/passive aproach, depending also on what is supported with your RADIUS Client: RADIUS deployment architectures.
- If you’re using a Load Balancer, consider also RADIUS session persistence best practices
- Fine tune the RADIUS Agent properties, especially
ragent.num_request_threadsandragent.num_max_http_connection:
- Monitoring and Auditing
- Review Okta System Logs regularly for authentication events
- Monitor RADIUS agent logs for failed authentication attempts
- Set up alerts for repeated authentication failures
Appendix #
Documentation #
- Okta RADIUS Integrations | Okta Identity Engine
- Getting started with Okta RADIUS Integrations | Okta Identity Engine
- RADIUS applications in Okta | Okta Identity Engine
- RADIUS integrations | Okta Identity Engine
- Radclient
- RADIUS Multi-Factor Authentication to Send Automatic Push Notification
- Security considerations: Securing RADIUS Authentication Against Malicious Logins
- An alternative test client for Windows: How to Test if Okta RADIUS Agent / RADIUS Application is Working Properly with NTRadPing
- Integration Patterns for Legacy Applications
Sample Output #
Example of output from radclient. These outputs are parsed by the test script.
# Case 1 - Push

Sent Access-Request Id 206 from 0.0.0.0:53925 to 172.19.0.4:1812 length 111
	User-Name = "myuser@okta.com"
	User-Password = "mypassword,push"
	Cleartext-Password = "mypassword,push"
Sent Access-Request Id 206 from 0.0.0.0:53925 to 172.19.0.4:1812 length 111
	User-Name = "myuser@okta.com"
	User-Password = "mypassword,push"
	Cleartext-Password = "mypassword,push"
Received Access-Accept Id 206 from 172.19.0.4:1812 to 172.19.0.2:53925 length 70
	Message-Authenticator = 0x4486d15514efd4f5dba5d26b62d0c2fa
	Reply-Message = "Welcome myuser@okta.com!"


# Case 2 - SMS

(0) -: Expected Access-Accept got Access-Challenge
Sent Access-Request Id 216 from 0.0.0.0:53608 to 172.19.0.4:1812 length 111
	User-Name = "myuser@okta.com"
	User-Password = "mypassword,sms"
	Cleartext-Password = "mypassword,sms"
Received Access-Challenge Id 216 from 172.19.0.4:1812 to 172.19.0.2:53608 length 211
	Message-Authenticator = 0x22006e1a7dd6c98b45556c3650730a31
	Reply-Message = "Enter the code sent to your phone.\nEnter '0' to abort.\n"
	State = 0x794f7151376c42327646686e376b61636650395a2f43654972507959764a52365278484334645773534c47444f445156304838366475736d32467a72707558664939366553372f7764544b696a7150456364343631582b5a787278644b2b444a654d5066724f384f6d35633d
	Session-Timeout = 60


# Case 3 - OTP

Sent Access-Request Id 227 from 0.0.0.0:36997 to 172.19.0.4:1812 length 111
	User-Name = "myuser@okta.com"
	User-Password = "mypassword,191813"
	Cleartext-Password = "mypassword,191813"
Received Access-Accept Id 227 from 172.19.0.4:1812 to 172.19.0.2:36997 length 70
	Message-Authenticator = 0xc0f9ae1aa6f5f62ecf689925cc23a47c
	Reply-Message = "Welcome myuser@okta.com!"


# Case 4 - OTP with wrong code

(0) -: Expected Access-Accept got Access-Reject
Sent Access-Request Id 222 from 0.0.0.0:46127 to 172.19.0.4:1812 length 111
	User-Name = "myuser@okta.com"
	User-Password = "mypassword,191813"
	Cleartext-Password = "mypassword,191813"
Received Access-Reject Id 222 from 172.19.0.4:1812 to 172.19.0.2:46127 length 134
	Message-Authenticator = 0x516023275a7dbcff037bff24e90c44cf
	Reply-Message = "Authentication failed for user myuser@okta.com, reason --- Access denied. Invalid creds?"


# Case 5 - Push Refused

(0) -: Expected Access-Accept got Access-Reject
Sent Access-Request Id 173 from 0.0.0.0:52349 to 172.19.0.4:1812 length 111
	User-Name = "myuser@okta.com"
	User-Password = "mypassword"
	Cleartext-Password = "mypassword"
Sent Access-Request Id 173 from 0.0.0.0:52349 to 172.19.0.4:1812 length 111
	User-Name = "myuser@okta.com"
	User-Password = "mypassword"
	Cleartext-Password = "mypassword"
Sent Access-Request Id 173 from 0.0.0.0:52349 to 172.19.0.4:1812 length 111
	User-Name = "myuser@okta.com"
	User-Password = "mypassword"
	Cleartext-Password = "mypassword"
Received Access-Reject Id 173 from 172.19.0.4:1812 to 172.19.0.2:52349 length 134
	Message-Authenticator = 0x2a3aed152db05367588b5210746a38c9
	Reply-Message = "Authentication failed for user myuser@okta.com, reason --- Access denied. Invalid creds?"


# Case 6 - Push timeout

Sent Access-Request Id 74 from 0.0.0.0:49880 to 172.19.0.4:1812 length 111
	User-Name = "myuser@okta.com"
	User-Password = "mypassword"
	Cleartext-Password = "mypassword"
Sent Access-Request Id 74 from 0.0.0.0:49880 to 172.19.0.4:1812 length 111
	User-Name = "myuser@okta.com"
	User-Password = "mypassword"
	Cleartext-Password = "mypassword"
Sent Access-Request Id 74 from 0.0.0.0:49880 to 172.19.0.4:1812 length 111
	User-Name = "myuser@okta.com"
	User-Password = "mypassword"
	Cleartext-Password = "mypassword"
(0) No reply from server for ID 74 socket 5