
Introduction #
Your organization likely runs critical business applications backed by custom databases—systems that have been reliable workhorses for years but don’t speak the language of modern identity protocols. While integrating cloud applications with Okta using SAML, OIDC (OpenID Connect), and SCIM 2.0 is straightforward, bringing these legacy database-driven applications into your unified identity fabric has historically required complex custom scripting or middleware solutions.
Okta’s On-premises Connector for Generic Databases solves this by enabling direct provisioning and lifecycle management to on-premises databases via JDBC, bringing automated joiner/mover/leaver (JML) workflows and entitlement management to applications that were previously difficult to integrate. No more custom scripts, no more manual account management—just standards-based automation using the SCIM protocol.
This guide provides a complete deep dive into deploying and configuring the Generic Database Connector with the new agent. You’ll build a fully functional test environment using Docker Compose with MariaDB (MySQL-compatible), configure every aspect of the integration—from user provisioning to entitlement management—and test real-world scenarios including user creation, attribute updates, entitlement assignments, and deactivation workflows.
Why Docker for This Lab?
Docker Compose provides the fastest path to a working environment, letting you spin up the entire stack—the Okta On-Prem SCIM Agent, MariaDB database, and a web-based management interface—in minutes. While Okta doesn’t officially support Docker for production deployments, it’s ideal for demonstrations, proof-of-concepts, and learning the integration workflow.
Importantly, every configuration step in this guide applies equally to manual installations on production systems. Whether you’re testing in Docker or deploying on dedicated Linux servers, the Okta configuration, stored procedures, and integration patterns remain identical. Think of the Docker environment as an accelerator for understanding—once you’ve mastered the concepts here, translating them to a production deployment is straightforward.
Quick Instructions #
- Clone the repository: https://github.com/fabiograsso/okta-lab-onprem-jdbc
- Download the required RPM from Okta Help Center:
OktaOnPremSCIMAgent-*.rpm→ copy to./docker/okta-scim/packages/ - Configure the environment:
cp .env-sample .env(edit with your data) - Build and start:
make build && make start - Register the agent:
make configure(enter your Okta org URL and approve the device code in your browser) - Add the agent in the Okta Admin Console and configure the database connection
- Configure the Generic Database Connector application’s import/provisioning operations
Prerequisites #
System Requirements #
- Docker and Docker Compose (v2+) are installed
- If you are using Ubuntu 24.04 Linux server:
apt-get install -y docker docker-compose - You can also use Docker Desktop
- If you are using Ubuntu 24.04 Linux server:
- Okta Organization with administrative access and OIG (Okta Identity Governance) enabled
- Git (to clone the repository)
Okta Early Access Feature #
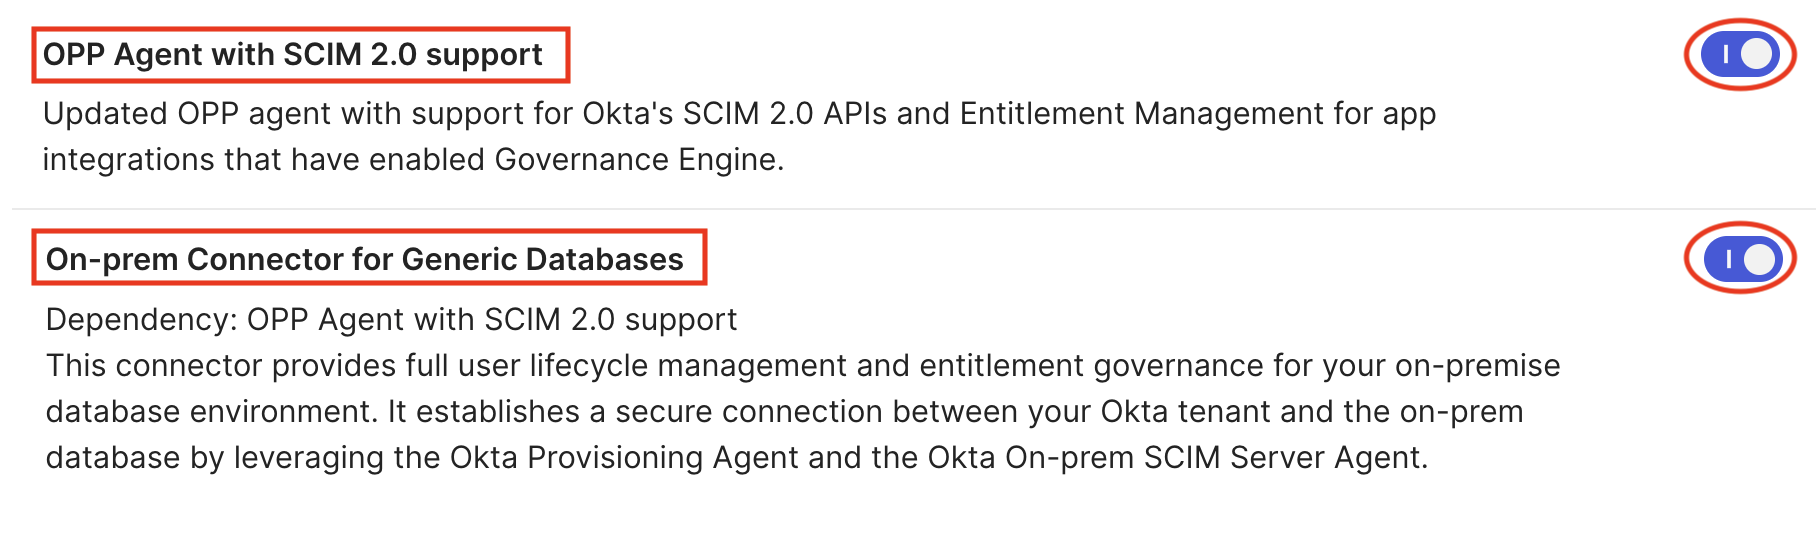
Since the Okta Generic Database Connector is currently an Early Access feature, you need to enable the following in the Okta Admin Panel:
-
Navigate to Settings → Features
-
Enable “On-prem Connector for Generic Databases”
-
Enable “Enable the Okta On-Premises SCIM Agent” (dependency: the feature above)

-
(optional) Enable “Enable Incremental Import for On-prem Connector for Generic Databases provisioning” (dependency: the SCIM Agent feature) — for more efficient sync of user data instead of always doing a full import

We’ve not implmented a timestamp in the database schema, so incremental imports are not supported. Only full imports will be performed.
If you want to test the incremental import, you can extend the schema for add a timestamp, and configure it in the database connector.
Required Files from Okta #
You’ll need to download one installer package from the Okta Admin Console.
Place in ./docker/okta-scim/packages/:
| File | Required | Description | Download |
|---|---|---|---|
OktaOnPremSCIMAgent-<version>.rpm |
Yes | On-Prem SCIM Agent installer | From the Okta Admin Console → Provisioning setup → "+ Add first agent" → For Linux (x64 RPM), or see the official install guide |
*.jar (JDBC drivers) |
No | Additional database drivers | MySQL Connector/J is auto-downloaded. For other databases see: PostgreSQL, Oracle, SQL Server |
*.pem or *.crt (certificates) |
No | Custom VPN certificates | Copy your VPN provider root CA |
Understanding the Architecture #
Before diving into the setup, it’s essential to understand how the components work together—and what changed from the legacy architecture.
What is the Okta Generic Database Connector (JDBC)? #
The Okta Generic Database Connector allows Okta to connect to on-premises databases using JDBC drivers. It enables comprehensive user lifecycle management and entitlement operations by executing SQL queries or stored procedures against the database. This is particularly valuable for organizations with legacy applications or custom databases that don’t support modern provisioning protocols but can be accessed via JDBC.
What Changed: From Two Agents to One #
Previously, this connector required two separate components:
- The On-Premises Provisioning (OPP) Agent, which maintained the outbound connection to Okta
- The On-Prem SCIM Server, which translated SCIM calls into JDBC operations
The OPP Agent forwarded requests to the SCIM Server over an internal HTTPS hop, secured with a bearer token and a self-signed certificate that had to be uploaded to Okta as a “Public Key.”
As of Okta 2026.09.0, these two components are merged into a single Okta On-Prem SCIM Agent. There’s no more internal hop to secure, no bearer token to manage, and no certificate to upload—registration now happens through a one-time OAuth device-code flow.
What is the Okta On-Prem SCIM Agent? #
The Okta On-Prem SCIM Agent acts as a secure bridge between Okta’s cloud identity platform and your on-premises database. It combines installation, registration, and provisioning into a single process, and it:
- Automated User Provisioning: Creates, updates, and deactivates user accounts in on-premises databases
- SCIM Protocol Support: Industry-standard protocol for user identity management
- Secure Communication: Outbound-only HTTPS connections from your network to Okta (no inbound firewall rules required)
- Real-time Synchronization: Pushes user changes from Okta to on-premises systems instantly
- Database Operations via JDBC: Translates provisioning requests into SQL queries or stored procedure calls against your database
How It Works #
The provisioning flow now involves just two stages instead of four:
-
Okta Cloud → On-Prem SCIM Agent: The agent maintains a secure, outbound HTTPS connection from your network to Okta. Since the connection originates from within your network perimeter, no inbound firewall rules are required.
-
On-Prem SCIM Agent → Database: The agent interprets incoming provisioning/lifecycle requests and executes the corresponding database operations—creating users, modifying attributes, deactivating accounts, or managing entitlements—directly against your on-premises database.
-
Response Flow: Data and operation results return through the same path in reverse: from the database to the agent, which securely transmits the results back to Okta.
---
config:
 layout: dagre
---
flowchart TB
 subgraph subGraph0["**Okta Cloud**"]
 A["Okta Org"]
 end
 subgraph subGraph1["**Docker Environment**"]
 C["On-Prem SCIM Agent"]
 D["MariaDB Database"]
 E["DBGate UI"]
 end
 C -- Outbound HTTPS --> A
 C -- JDBC Connection --> D
 E -- Management --> D

 style C fill:#FFE0B2
 style D fill:#FFCDD2
 style E fill:#FFF9C4
 style subGraph0 stroke:#757575,fill:#C8E6C9
 style subGraph1 fill:#BBDEFB,stroke:#2962FF
Lab Components #
This Docker Compose environment includes three containers:
- Okta On-Prem SCIM Agent (okta-scim): CentOS Stream 9-based container maintaining the secure connection to Okta and translating provisioning requests into database operations
- MariaDB (db): Database server pre-populated with test data and stored procedures
- DBGate: Web-based database management interface for easy data inspection
Multi-Database Support #
A single On-Prem SCIM Agent deployment can still manage up to 8 databases simultaneously. This enables:
- Management of users across multiple applications
- Support for different database types (MySQL, PostgreSQL, Oracle, SQL Server)
- Separation of production and staging environments
- Organizational unit isolation
Each database requires a separate Generic Database Connector application instance in Okta, but all share the same on-premises agent installation. This means you only need one agent to provision to multiple databases—just ensure all required JDBC drivers are available before building the container.
Docker Compose Setup #
Docker provides the fastest path to a working environment. This section covers the complete setup process using Docker Compose.
Okta does not officially support Docker for running the On-Prem SCIM Agent in production environments. While it’s a fantastic way to quickly set up a full environment for demos and POCs, production deployments should follow the official installation guide on supported operating systems.
However, Docker is the optimal solution for:
- Demonstrations and presentations
- Proof of concepts (POCs)
- Development and testing
- Learning the integration workflow
Initial Setup #
-
Clone the Repository
git clone https://github.com/fabiograsso/okta-lab-onprem-jdbc cd okta-lab-onprem-jdbc -
Prepare Required Files
Download the RPM package from the Okta Admin Console’s “Add agent” panel, covered below) and place it:
# Copy the On-Prem SCIM Agent RPM cp /path/to/OktaOnPremSCIMAgent-*.rpm ./docker/okta-scim/packages/ -
Configure Environment Variables
The
.envfile contains all configuration parameters:cp .env-sample .envYou can customize the database settings if needed (default values work for testing):
# Database Configuration
MARIADB_PORT=3306
MARIADB_DATABASE=oktademo
MARIADB_USER=oktademo
MARIADB_PASSWORD=oktademo
MARIADB_ROOT_PASSWORD=oktademo
Before proceeding, verify:
- The
OktaOnPremSCIMAgent-*.rpmfile exists in./docker/okta-scim/packages/ .envfile is configured (default values are fine for testing)
Build and Start Services #
The project includes a Makefile with convenient commands for managing the Docker environment:
# Build Docker images (includes prerequisite checks)
make build

# Start all services (detached mode with log following)
make start-logs

# Alternative: Start in detached mode without logs
# make start
The make start command will:
- Run prerequisite checks to verify the RPM file is present
- Start all three containers (db, dbgate, okta-scim)
- Initialize the database with schema and test data
You’ll see output similar to this:
[+] Running 3/3
 ✔ Container lab-db-1          Started
 ✔ Container lab-dbgate-1      Started
 ✔ Container lab-okta-scim-1   Started
Register the On-Prem SCIM Agent #
Unlike the legacy setup, there’s no bearer token, no certificate, and no config file to wait for—just a one-time OAuth device-code registration. Run the interactive registration script:
make configureYou’ll see output similar to this:
--> Launching Okta On-Prem SCIM Agent configuration script...

 ______  _______  _____
/ __ \ |  __ \ |  ___|
| |  | || |__) || (___
| |  | ||  ___/  \___ \
| |__| || |      ____) |
 \____/ |_|     |_____/

 Agent Configuration

 This script registers the agent with your Okta org.

 Okta org URL (e.g. https://mycompany.okta.com): https://your-org.okta.com

 Enable proxy (y/n)? [n]:

 Org URL:     https://your-org.okta.com
 Log file:    /opt/OktaOnPremSCIMAgent/logs/configure-agent.log

 [1/3] Requesting device authorization...
       Done.

   Open this URL in your browser:
   https://your-org.okta.com/activate

   Enter this code when prompted:
   XXXXXXXX

 [2/3] Waiting for authorization...
       (approve in your browser, then this will continue automatically)
Open the printed URL in your browser, enter the code, and approve the registration when prompted. The script will pick up the approval automatically, and the agent starts running inside the container.
Expected error after approval: once you approve the device code in your browser, you’ll likely see an error in the terminal like make: *** [configure] Error 137. This is expected and can be safely ignored — it happens because Docker isn’t an officially supported way to run the agent, and this lab attaches to configure_agent.sh in a way the script itself doesn’t manage or expect once the container’s foreground process changes.
The registration itself still completes successfully; verify it by checking the SCIM Agent’s logs (docker compose logs -f okta-scim or ./data/okta-scim/logs/*.log) or by refreshing the agent list in the Okta Admin Console—it should show as OPERATIONAL.
Verify the Setup #
Check that all containers are running properly:
# Check container status
docker compose ps

# Expected output:
# NAME               STATUS        PORTS
# lab-db-1           Up (healthy)  33060/tcp
# lab-dbgate-1       Up            0.0.0.0:8090->3000/tcp
# lab-okta-scim-1    Up
You can also access the DBGate web interface to inspect the database:
- Open http://localhost:8090 in your browser
- Username:
oktademo - Password:
oktademo
Other Useful Commands #
The Makefile provides additional commands for managing the environment:
| Command | Description |
|---|---|
make help |
Display all available commands |
make stop |
Stop and remove all containers |
make restart |
Restart all services |
make restart-logs |
Restart and follow logs |
make logs |
Follow container logs (last 500 lines) |
make rebuild |
Force rebuild from scratch (no cache) |
make kill |
Kill containers and remove orphans |
Database Schema and Test Data #
The MariaDB database is automatically initialized with a comprehensive schema designed for realistic user provisioning scenarios. This part is unchanged from the legacy version of the lab.
Database Tables #
The database includes three core tables:
USERS Table (25 fields):
- Identity:
USER_ID(PRIMARY KEY),USERNAME(UNIQUE),EMAIL - Personal:
FIRSTNAME,LASTNAME,MIDDLENAME,DISPLAYNAME,NICKNAME - Contact:
MOBILEPHONE,STREETADDRESS,CITY,STATE,ZIPCODE,COUNTRYCODE,TIMEZONE - Work:
TITLE,ORGANIZATION,DEPARTMENT,EMPLOYEENUMBER,MANAGER,MANAGERID - Dates:
HIREDATE,TERMINATIONDATE - Security:
PASSWORD_HASH,IS_ACTIVE(BOOLEAN, default TRUE)
ENTITLEMENTS Table
ENT_ID(INT PRIMARY KEY, values 1-10)ENT_NAME(VARCHAR 100, UNIQUE)ENT_DESCRIPTION(VARCHAR 255)
USERENTITLEMENTS Table (Junction Table):
USERENTITLEMENT_ID(UUID PRIMARY KEY)USER_ID(FOREIGN KEY to USERS)ENT_ID(FOREIGN KEY to ENTITLEMENTS)ASSIGNEDDATE(DATETIME, auto-populated)- Unique constraint on (USER_ID, ENT_ID) combination
erDiagram
    USERS ||--o{ USERENTITLEMENTS : "has"
    ENTITLEMENTS ||--o{ USERENTITLEMENTS : "assigned_to"

    USERS {
        VARCHAR(100) *USER_ID PK "User identifier (email format) - REQUIRED"
        VARCHAR(100) USERNAME UK "Login username (unique) - REQUIRED"
        VARCHAR(100) EMAIL "Email address - REQUIRED"
        VARCHAR(100) FIRSTNAME "First name - REQUIRED"
        VARCHAR(100) LASTNAME "Last name - REQUIRED"
        VARCHAR(100) OTHERFIELDS "...Other Fields..."
        DATE HIREDATE "Date of hire"
        DATE TERMINATIONDATE "Date of termination"
        VARCHAR(255) PASSWORD_HASH "Password hash"
        BOOLEAN IS_ACTIVE "Account status (default TRUE)"
    }

    ENTITLEMENTS {
        INT ENT_ID PK "Entitlement identifier"
        VARCHAR(100) ENT_NAME UK "Entitlement name (unique)"
        TEXT ENT_DESCRIPTION "Description of entitlement"
    }

    USERENTITLEMENTS {
        INT USERENTITLEMENT_ID PK "Auto-increment ID"
        VARCHAR(100) USER_ID FK "Foreign key to USERS"
        INT ENT_ID FK "Foreign key to ENTITLEMENTS"
        DATETIME ASSIGNEDDATE "When entitlement was assigned"
    }
Test Data #
The database comes pre-populated with 15 Star Wars characters as test users:
| User ID | Name | Organization | Title | Entitlements |
|---|---|---|---|---|
| luke.skywalker@galaxy.local | Luke Skywalker | Jedi | Jedi Knight | VPN Access, GitHub Admin, Confluence Edit |
| leia.organa@galaxy.local | Leia Organa | Resistance | General | VPN Access, AWS Console, Jira Admin |
| han.solo@galaxy.local | Han Solo | Resistance | Smuggler | VPN Access, Database Read |
| obiwan.kenobi@galaxy.local | Obi-Wan Kenobi | Jedi | Jedi Master | VPN Access, GitHub Admin, AWS Console |
| yoda@galaxy.local | Yoda | Jedi | Grand Master | VPN Access, GitHub Admin, AWS Console, Jira Admin |
| … | … | … | … | … |
10 Pre-configured Entitlements:
- VPN Access
- GitHub Admin
- AWS Console
- Jira Admin
- Confluence Edit
- Database Read
- Database Write
- Slack Admin
- Office 365
- Salesforce
You can inspect the test data using DBGate or command-line queries:
# View all users
docker compose exec db mariadb -u oktademo -poktademo oktademo \
  -e "SELECT USER_ID, FIRSTNAME, LASTNAME, TITLE, ORGANIZATION FROM USERS LIMIT 10;"

# View all entitlements
docker compose exec db mariadb -u oktademo -poktademo oktademo \
  -e "SELECT * FROM ENTITLEMENTS;"

# View user-entitlement assignments
docker compose exec db mariadb -u oktademo -poktademo oktademo \
  -e "SELECT * FROM USERENTITLEMENTS LIMIT 10;"
Operational Views #
The database also includes 6 operational views for convenient monitoring and reporting queries:
V_USERENTITLEMENTS- Comprehensive view joining users with their entitlementsV_ACTIVE_USERS- Quick access to active users onlyV_INACTIVE_USERS- Quick access to inactive/deactivated usersV_ENTITLEMENT_USAGE- Statistics on entitlement assignmentsV_USER_HIERARCHY- User reporting structure and management chainsV_INACTIVE_USERENTITLEMENTS- Entitlements assigned to inactive users (for cleanup)
These views provide simplified access to common queries without writing complex joins, making it easier to monitor your identity data.
Stored Procedures #
The database includes stored procedures that provide a clean abstraction layer for SCIM operations:
Import Operations (To Okta):
GET_ACTIVEUSERS()- Retrieve all active users (WHERE IS_ACTIVE = 1)GET_USER_BY_ID(p_user_id)- Get specific user by USER_IDGET_ALL_ENTITLEMENTS()- List all available entitlementsGET_USER_ENTITLEMENT(p_user_id)- Get user’s assigned entitlements
Provisioning Operations (To App):
CREATE_USER(...)- Create new user with 24 parameters (5 mandatory, 19 optional)UPDATE_USER(...)- Update user attributes with 24 parameters (5 mandatory, 19 optional)ACTIVATE_USER(p_user_id)- Set IS_ACTIVE = TRUEDEACTIVATE_USER(p_user_id)- Set IS_ACTIVE = FALSEADD_ENTITLEMENT_TO_USER(p_user_id, p_ent_id)- Assign entitlementREMOVE_ENTITLEMENT_FROM_USER(p_user_id, p_ent_id)- Revoke entitlement
You can test stored procedures directly:
# Test GET_ACTIVEUSERS
docker compose exec db mariadb -u oktademo -poktademo oktademo \
  -e "CALL GET_ACTIVEUSERS();"

# Test GET_USER_ENTITLEMENT
docker compose exec db mariadb -u oktademo -poktademo oktademo \
  -e "CALL GET_USER_ENTITLEMENT('yoda@galaxy.local');"
SQL Queries vs Stored Procedures #
The Generic Database Connector supports two approaches for configuring database operations:
- SQL Statements: Direct SQL queries (e.g.
SELECT,INSERT,UPDATE,DELETE) - Stored Procedures: Pre-compiled database procedures that encapsulate business logic
This guide provides both options for each operation, allowing you to choose the approach that best fits your requirements and database architecture. Stored procedures are pre-configured in sql/stored_proc.sql and are the recommended approach.
Stored Procedures are pre-compiled SQL code blocks stored in the database that can be executed with a single call. They act as reusable functions that encapsulate complex queries and business logic.
Key Benefits:
- Security: Parameters are automatically handled, preventing SQL injection attacks
- Performance: Pre-compiled and optimized by the database engine
- Maintainability: Centralized logic makes updates easier without changing Okta configuration
- Abstraction: Hides database complexity from the provisioning layer
- Consistency: Ensures the same logic is applied across all operations
- Portability: Easier to migrate to different databases by just rewriting the stored procedures without changing Okta configuration
Example:
Instead of writing: SELECT * FROM USERS WHERE USER_ID = ?
You call: CALL GET_USER_BY_ID(?)
The procedure internally handles the query, any data transformations, and - eventually - error handling.
The following diagram illustrates how all stored procedures interact with the database tables:
---
config:
  layout: elk
---
flowchart TB
 subgraph s1["Database Tables"]
        USERENTITLEMENTS[("USERENTITLEMENTS
Junction Table")]
        ENTITLEMENTS[("ENTITLEMENTS
ENT_ID, ENT_NAME, ENT_DESCRIPTION")]
        USERS[("USERS")]
  end
 subgraph s2["Read Operations"]
        GET_USER_ENTITLEMENT["GET_USER_ENTITLEMENT
Input: p_user_id"]
        GET_ALL_ENTITLEMENTS["GET_ALL_ENTITLEMENTS
Returns all entitlements"]
        GET_USER_BY_ID["GET_USER_BY_ID
Input: p_user_id"]
        GET_ACTIVEUSERS["GET_ACTIVEUSERS
Returns all active users"]
  end
 subgraph s3["User Lifecycle Operations"]
        DEACTIVATE_USER["DEACTIVATE_USER
Input: p_user_id"]
        ACTIVATE_USER["ACTIVATE_USER
Input: p_user_id"]
        UPDATE_USER["UPDATE_USER
24 Parameters
5 mandatory + 19 optional"]
        CREATE_USER["CREATE_USER
24 Parameters
5 mandatory + 19 optional"]
  end
 subgraph s4["Entitlement Management"]
        REMOVE_ENTITLEMENT["REMOVE_ENTITLEMENT_FROM_USER
Inputs: p_user_id, p_ent_id"]
        ADD_ENTITLEMENT["ADD_ENTITLEMENT_TO_USER
Inputs: p_user_id, p_ent_id"]
  end
    GET_ACTIVEUSERS -- "SELECT WHERE IS_ACTIVE=1" --> USERS
    GET_USER_BY_ID -- "SELECT WHERE USER_ID=?" --> USERS
    GET_ALL_ENTITLEMENTS -- SELECT * --> ENTITLEMENTS
    GET_USER_ENTITLEMENT -- JOIN --> USERENTITLEMENTS & USERS & ENTITLEMENTS
    CREATE_USER -- INSERT --> USERS
    UPDATE_USER -- "UPDATE WHERE USER_ID=?" --> USERS
    ACTIVATE_USER -- "UPDATE IS_ACTIVE=1" --> USERS
    DEACTIVATE_USER -- "UPDATE IS_ACTIVE=0" --> USERS
    ADD_ENTITLEMENT -- INSERT --> USERENTITLEMENTS
    ADD_ENTITLEMENT -. Validates .-> USERS & ENTITLEMENTS
    REMOVE_ENTITLEMENT -- DELETE --> USERENTITLEMENTS

     USERS:::tableStyle
     ENTITLEMENTS:::tableStyle
     USERENTITLEMENTS:::tableStyle
     GET_ACTIVEUSERS:::readStyle
     GET_USER_BY_ID:::readStyle
     GET_ALL_ENTITLEMENTS:::readStyle
     GET_USER_ENTITLEMENT:::readStyle
     CREATE_USER:::lifecycleStyle
     UPDATE_USER:::lifecycleStyle
     ACTIVATE_USER:::lifecycleStyle
     DEACTIVATE_USER:::lifecycleStyle
     ADD_ENTITLEMENT:::entitlementStyle
     REMOVE_ENTITLEMENT:::entitlementStyle
    classDef tableStyle fill:#e1f5ff,stroke:#0066cc,stroke-width:2px
    classDef readStyle fill:#d4edda,stroke:#28a745,stroke-width:2px
    classDef lifecycleStyle fill:#fff3cd,stroke:#ffc107,stroke-width:2px
    classDef entitlementStyle fill:#f8d7da,stroke:#dc3545,stroke-width:2px
Configuring Okta Integration #
Now that the infrastructure is running, it’s time to configure the Okta side of the integration. This section covers the complete setup process in the Okta Admin Console—and this is where the new agent’s workflow differs the most from the legacy one.
Create the Generic Database Connector Application #
-
Navigate to Applications
- Log on to Okta Admin Console
- Navigate to Applications → Browse App Catalog
-
Search for Generic Database Connector
- In the search box, type “Generic Database”
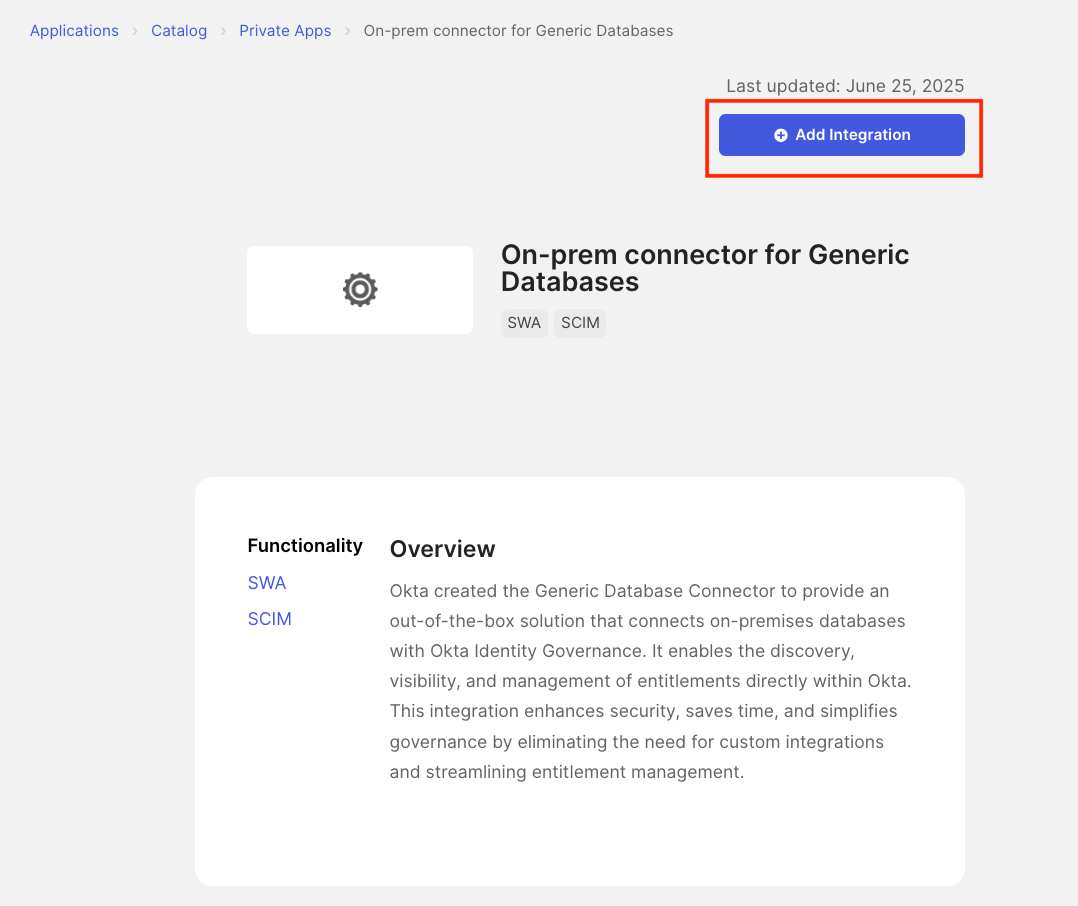
- Select “On-prem connector for Generic Databases” from the results
-
Add the Integration
- Click Add Integration
-
Configure Application Label
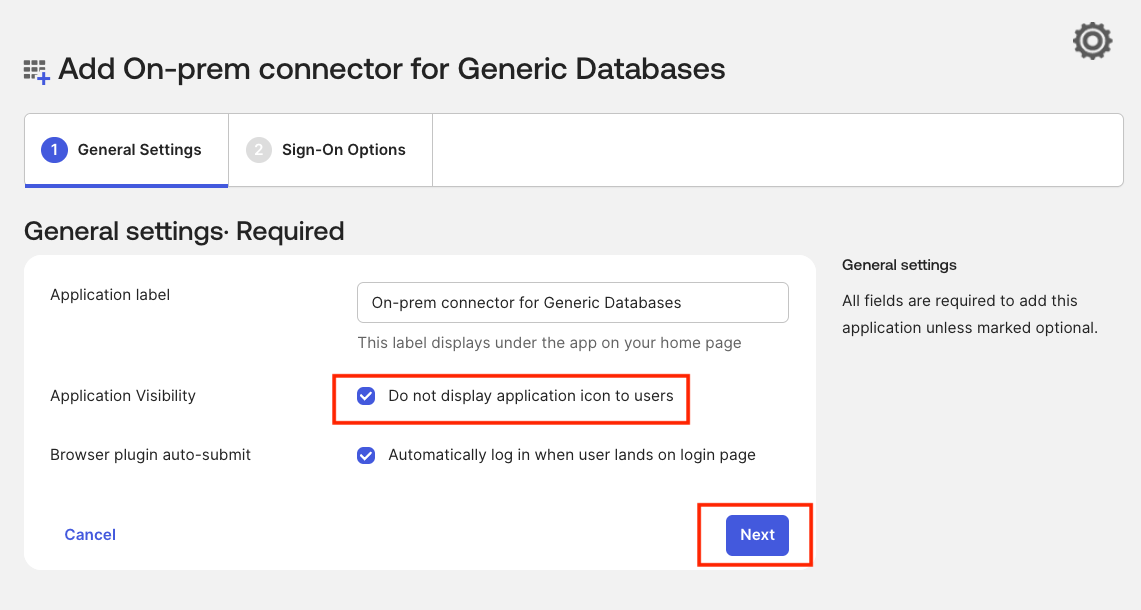
- Provide a name for the application in the Application Label field (Default name: “Generic Database Connector”)
- Check “Do not display application icon to users”
- Click Next
-
Complete Application Setup
- Leave all the other fields as default and click Done
-
Enable Entitlement Management
- In the General tab, scroll down to the Entitlement Management section
- Click Edit
- From the dropdown menu, select Enable
- Click Save
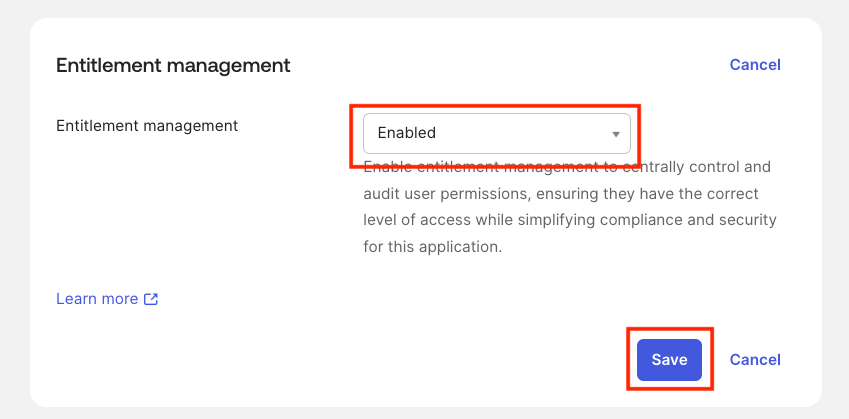 Once entitlement management is enabled, you’ll notice that the Governance tab now shows additional sub-tabs such as Entitlements, Bundles, etc.
Add and Register the On-Prem SCIM Agent #
-
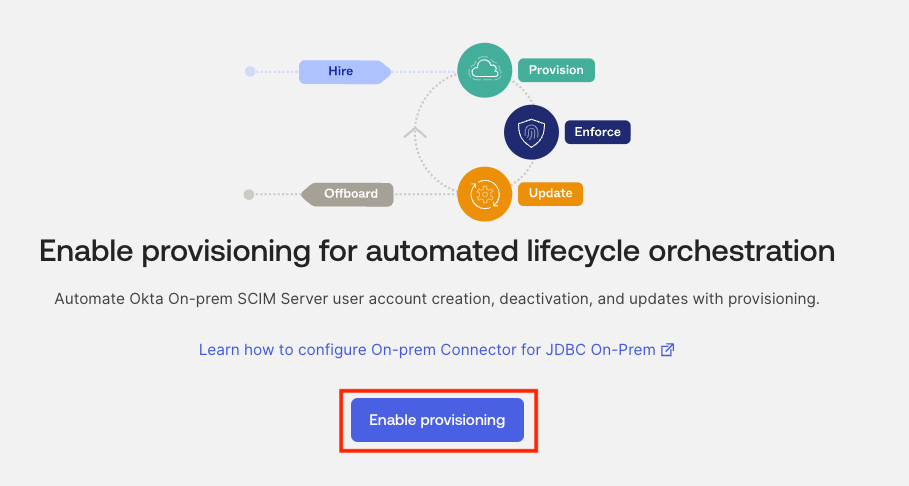
Enable Provisioning
- Navigate to the Provisioning tab
- Click Enable Provisioning
-
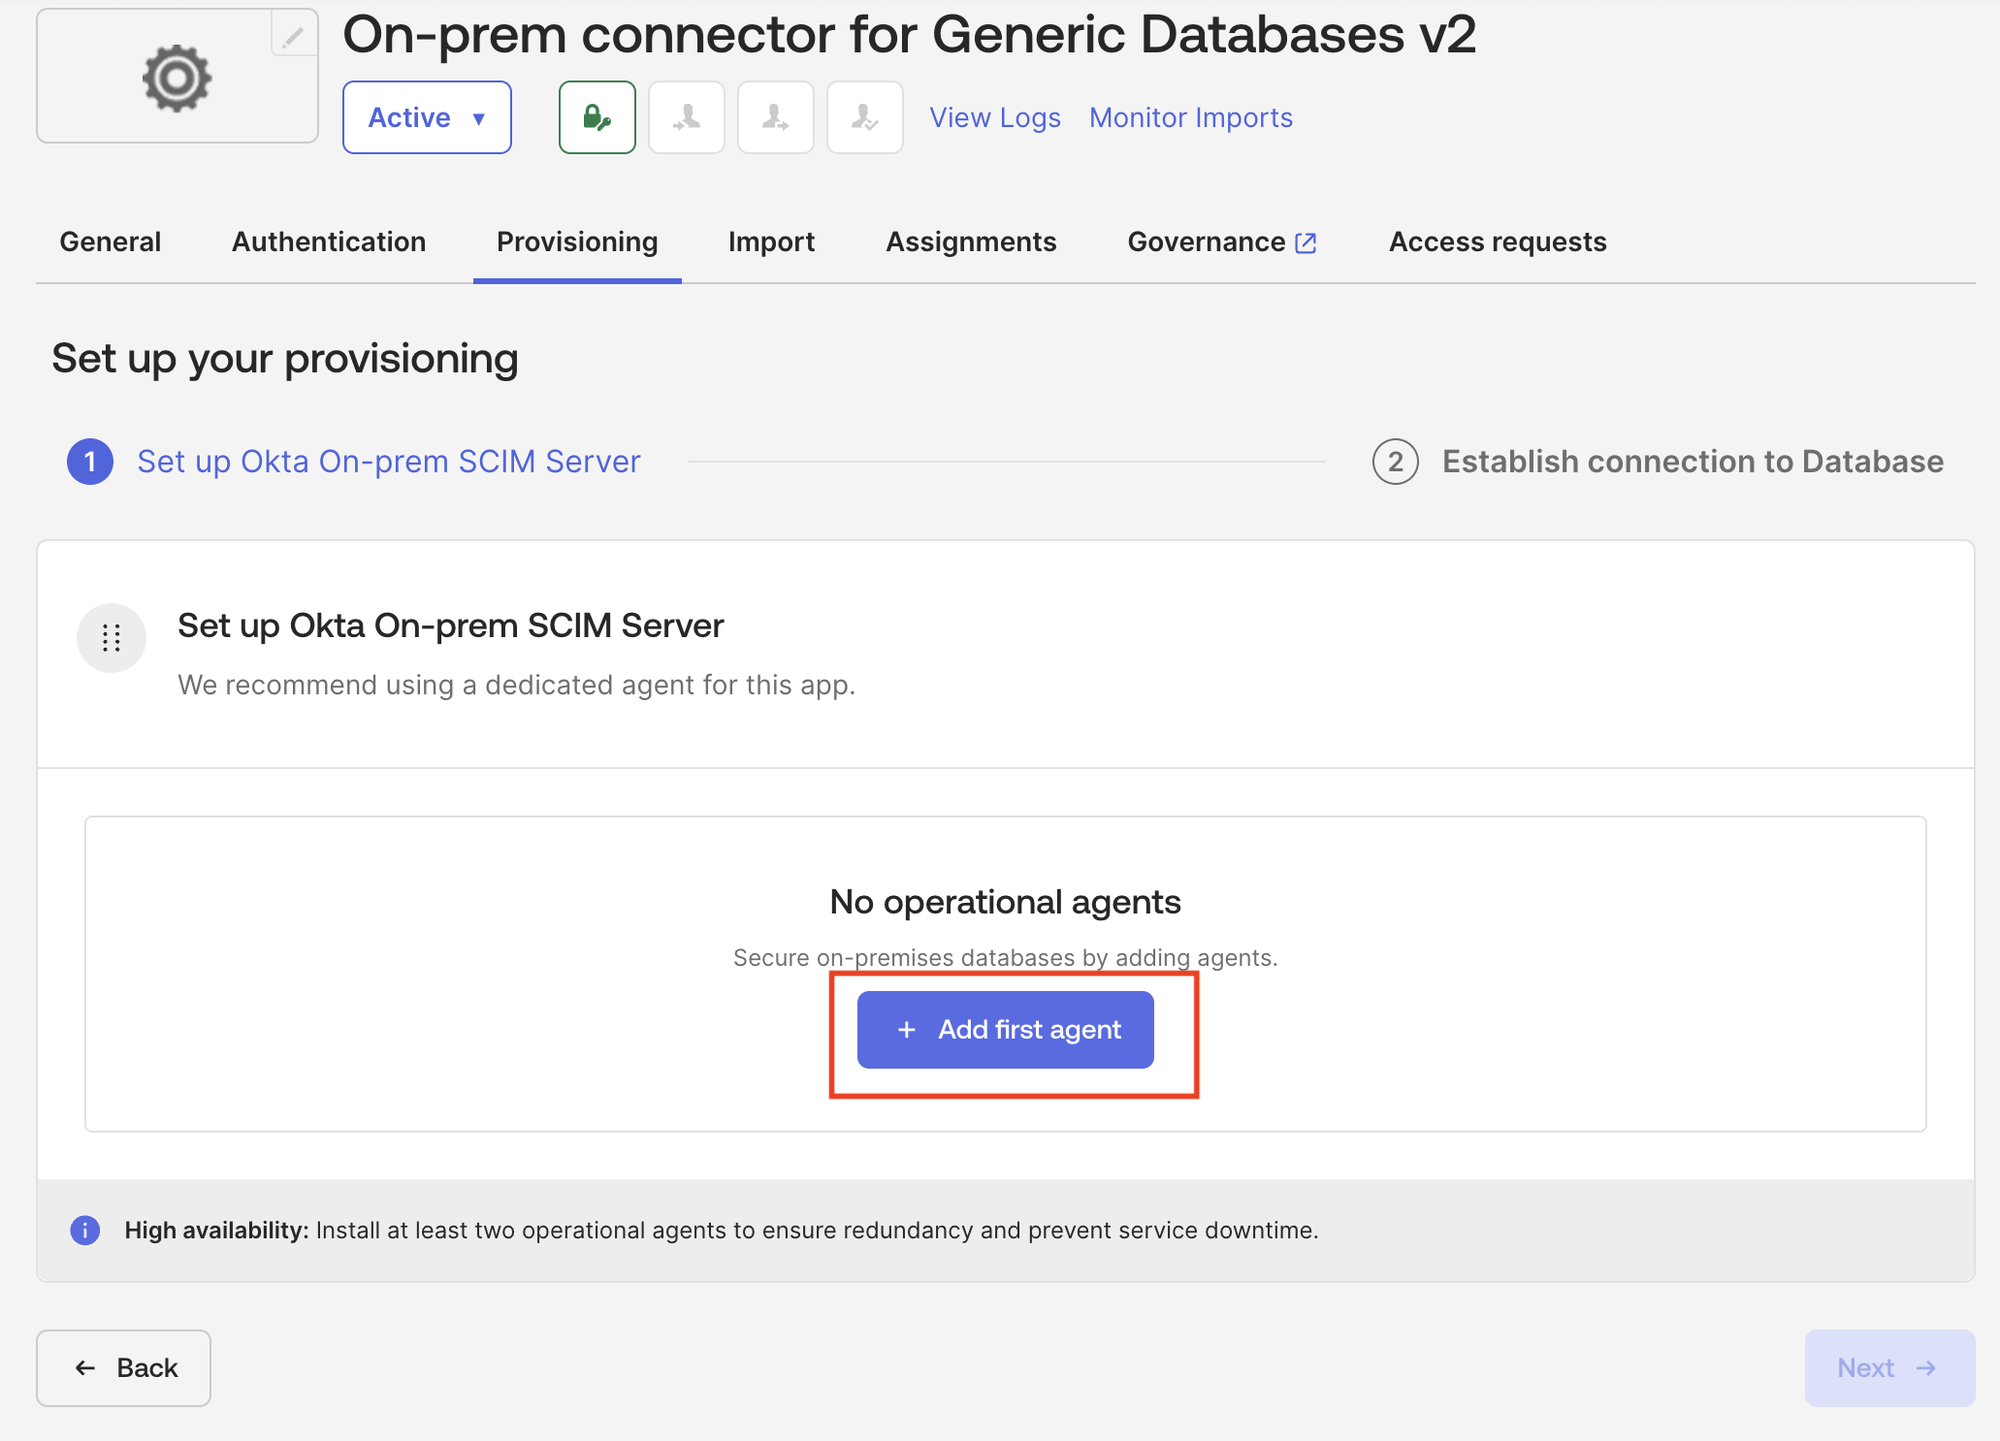
Add the Agent
- The “Set up Okta On-prem SCIM Server” step lists any already-registered agents. On a fresh setup, you’ll see “No operational agents”
- Click "+ Add first agent"
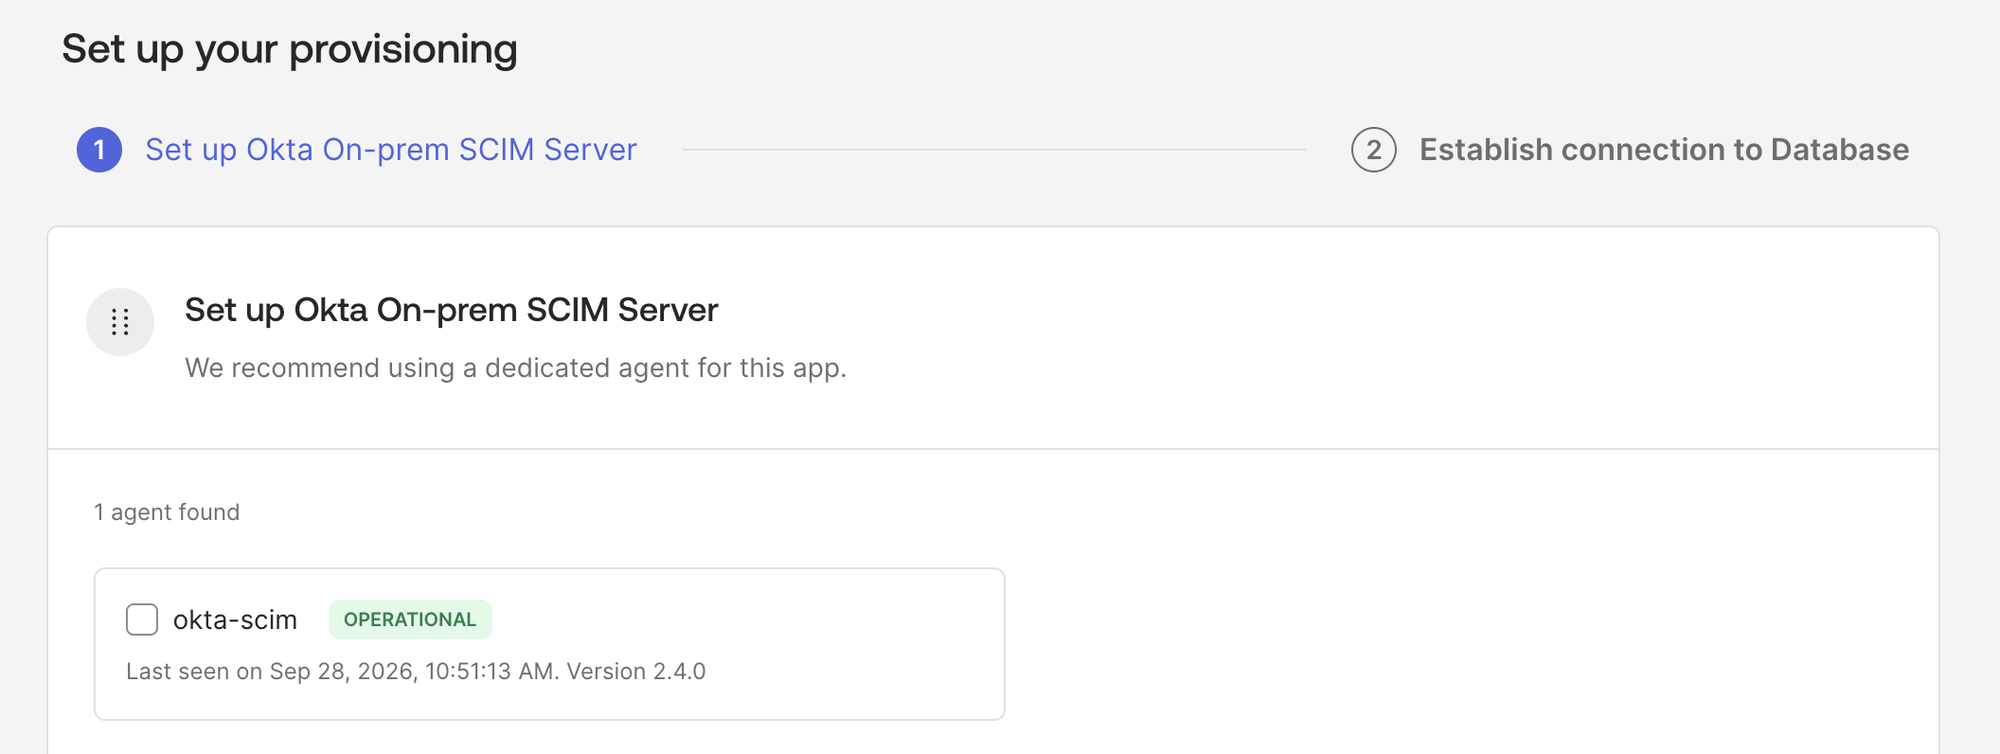
- This lab’s Dockerfile already performs the equivalent RPM install as part of
make build—you don’t need to run this manually.
-
Register the Agent
- On the machine/container running the agent, run
make configure(see the Register the On-Prem SCIM Agent section above) - Once approved, refresh the agent list in the Admin Console—the agent shows as OPERATIONAL
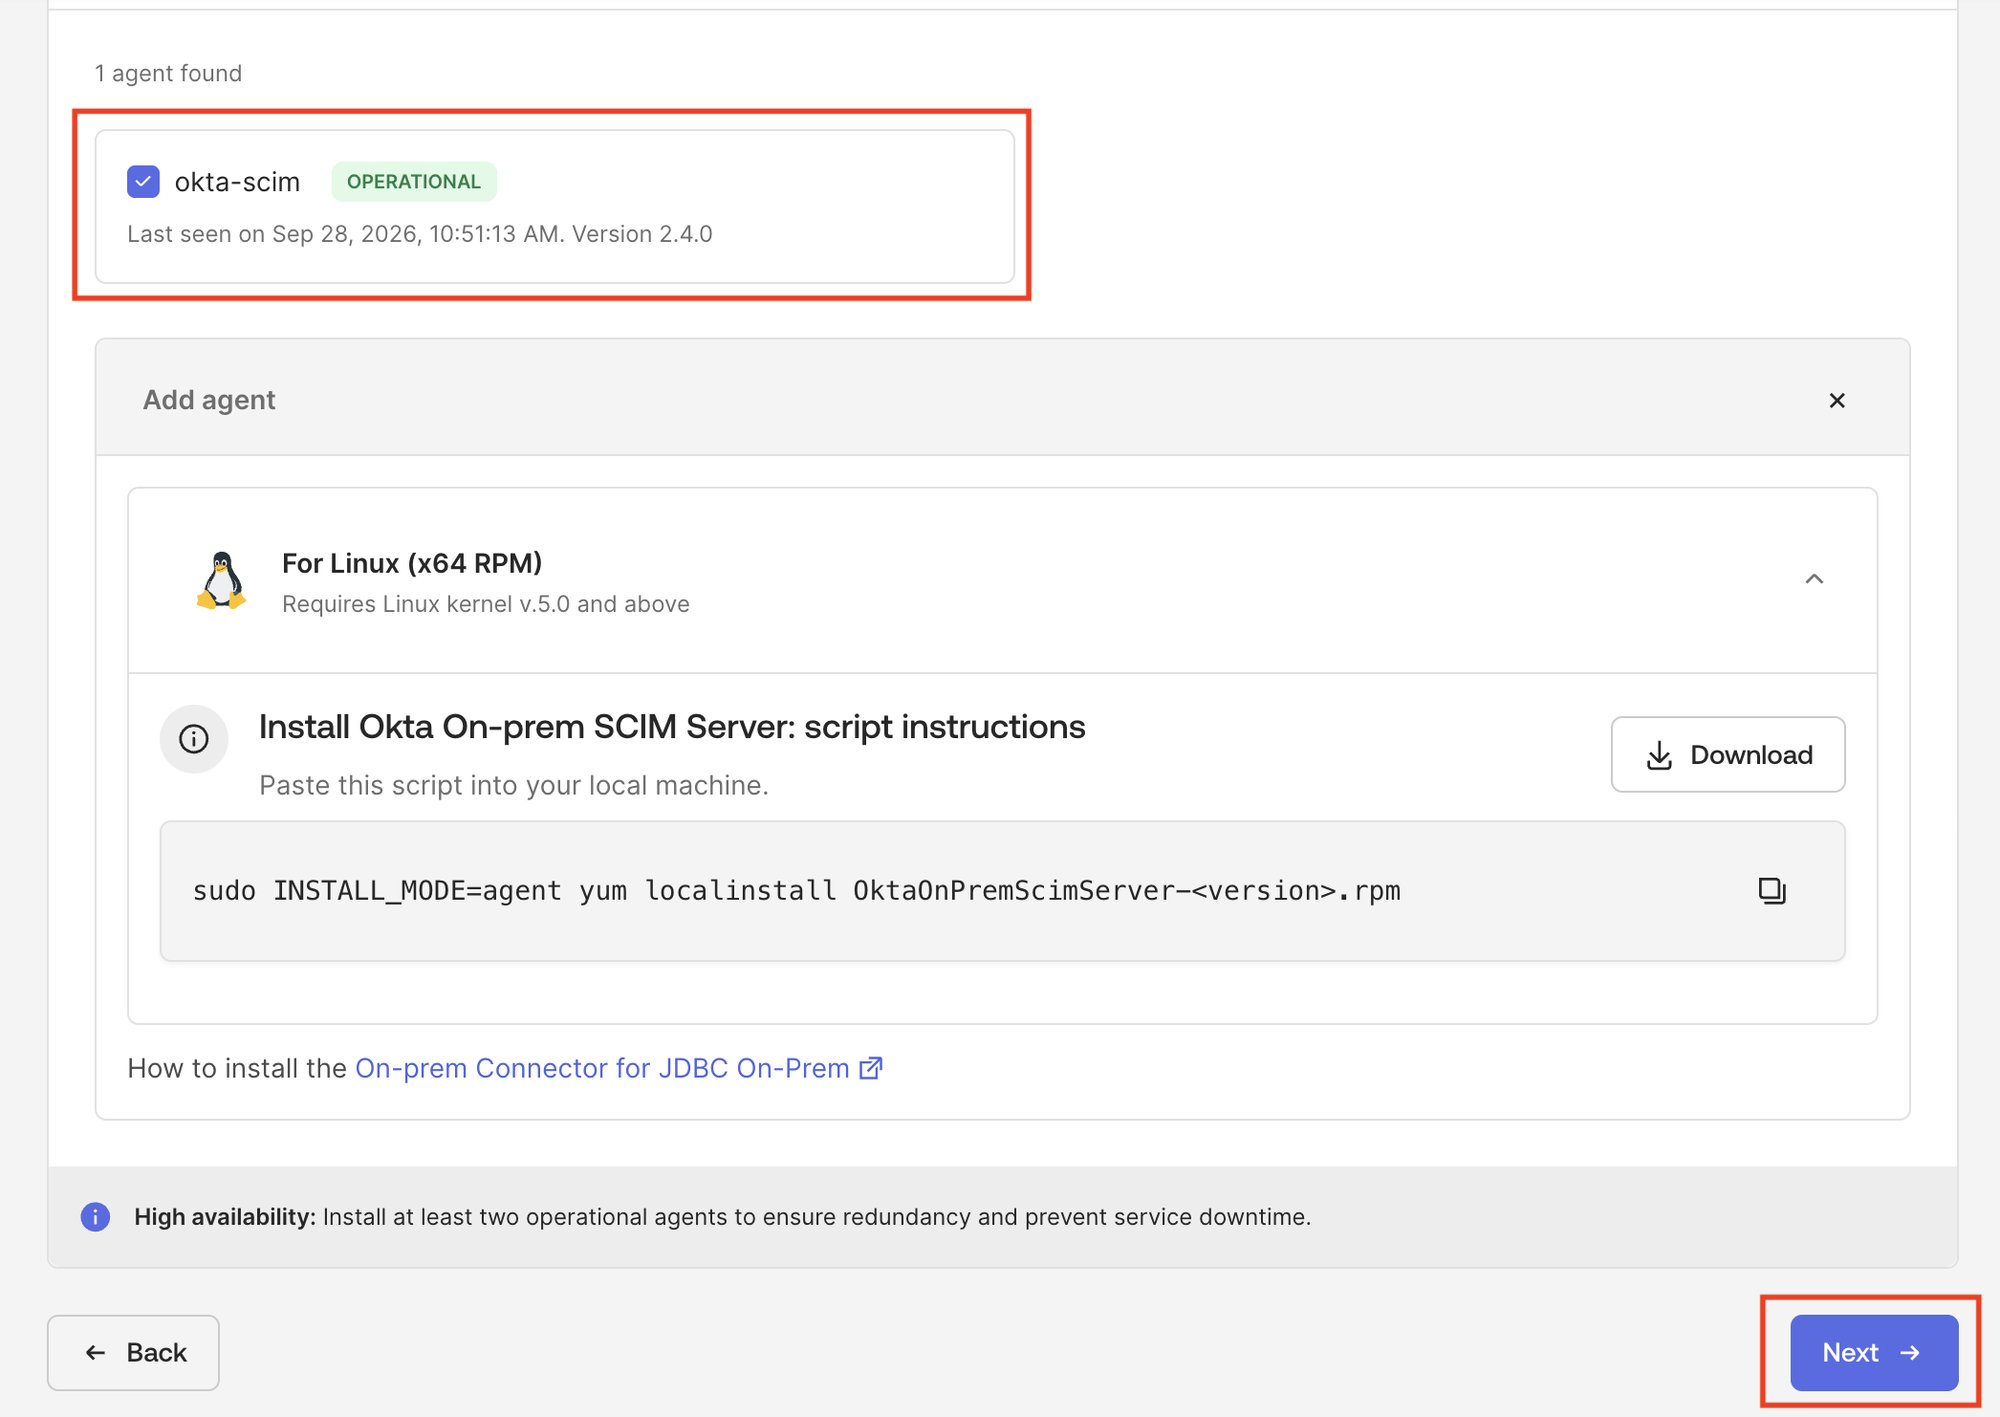
- Select the agent’s checkbox and click Next
- On the machine/container running the agent, run
-
Configure Database Connection
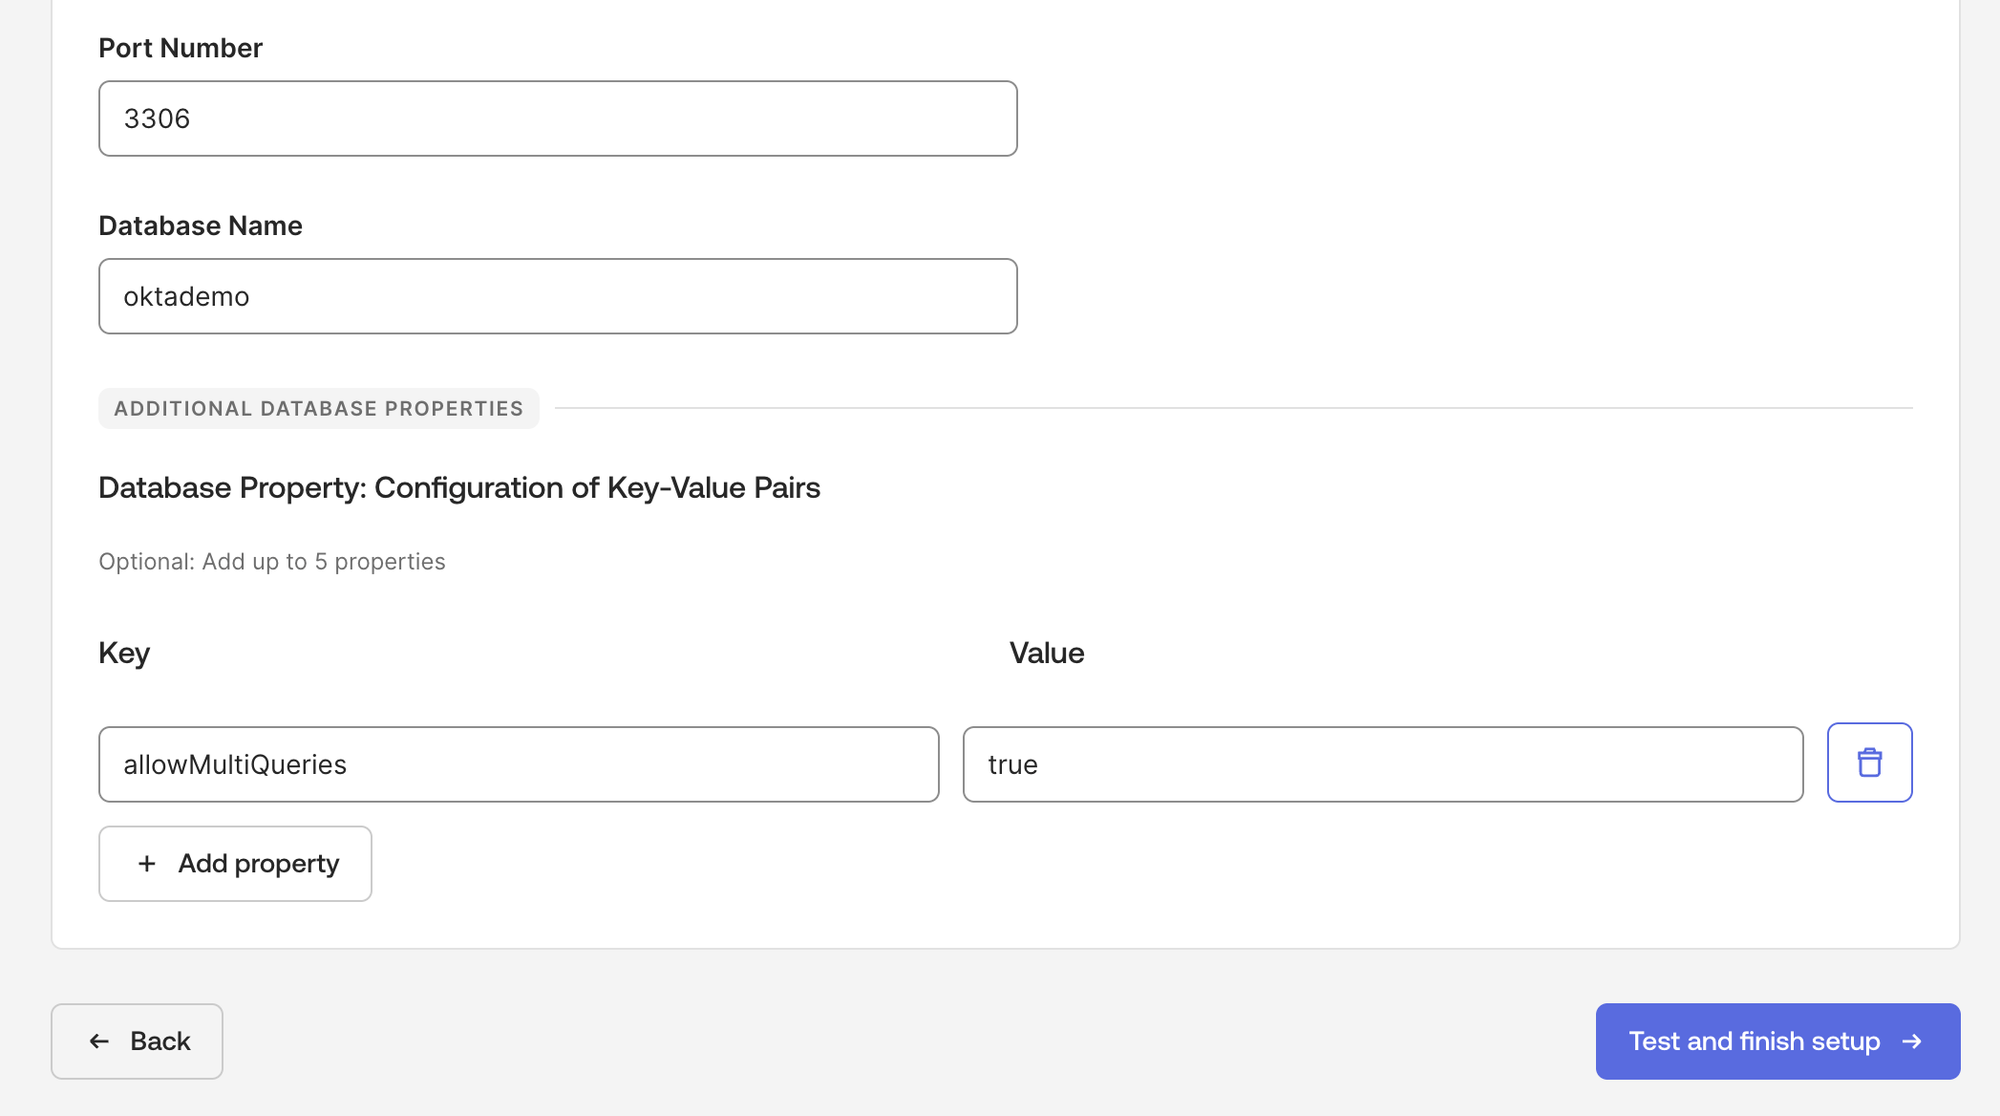
- Provide the database connection details (change them if you are not using the default values in your
.envfile):- Username:
oktademo - Password:
oktademo - Type of Database: Select
MySQL - IP/Domain Name:
db(must match the container name for internal connectivity) - Port:
3306 - Database Name:
oktademo - Add the following additional key/value pair in the Database Property: Configuration of Key-Value Pairs section:
- Key:
allowMultiQueries - Value:
true
- Key:
- Username:
- Click Test and finish setup
- Provide the database connection details (change them if you are not using the default values in your
-
You will see a Connecting agents… pop-up for a few seconds.
-
Connection Success: Once the connection is successful, you’ll be directed to the Integration tab of the Provisioning section. From here, you can proceed to configure Schema Discovery & Import and Provisioning operations—identical to the legacy flow from this point forward.
Configure Import Operations (To Okta) #
Import operations retrieve data from the database and bring it into Okta.
Navigate to Import Settings #
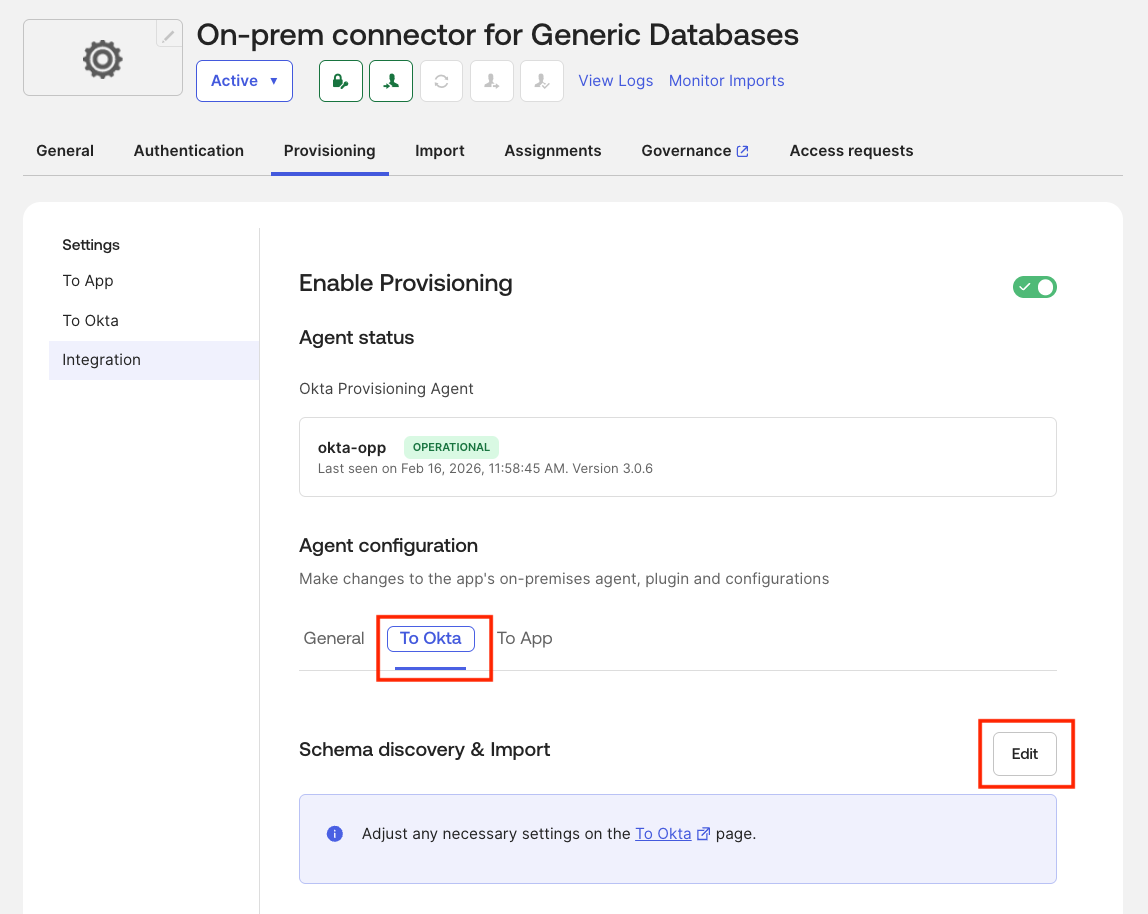
- Go to Okta Admin Console → Applications → Generic Database Connector
- Navigate to the Provisioning tab
- Go to Integration → To Okta
- Click Edit next to Schema discovery & Import
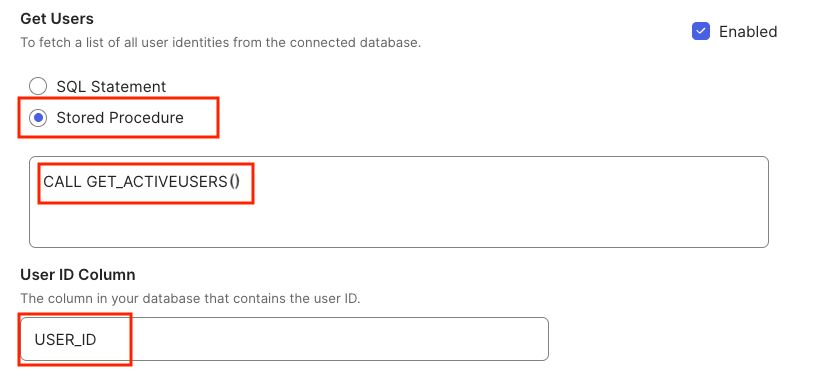
1. Get Users #
Import all active users from the database.
Configuration:
-
✅ Check Enabled
-
Option 1 - Select SQL Statement, and enter the SQL query:
SELECT USER_ID, USERNAME, FIRSTNAME, LASTNAME, MIDDLENAME, EMAIL, DISPLAYNAME, NICKNAME, MOBILEPHONE, STREETADDRESS, CITY, STATE, ZIPCODE, COUNTRYCODE, TIMEZONE, ORGANIZATION, DEPARTMENT, MANAGERID, MANAGER, TITLE, EMPLOYEENUMBER, HIREDATE, TERMINATIONDATE, PASSWORD_HASH, IS_ACTIVE FROM USERS WHERE IS_ACTIVE = 1 -
Option 2 - Select Stored Procedure (Recommended), and enter the stored procedure call:
CALL GET_ACTIVEUSERS() -
User ID Column:
USER_ID
IS_ACTIVE = 1) with all fields from the USERS table.
2. Get All Entitlements #
Import all available entitlements from the database.
Configuration:
-
✅ Check Enabled
-
Option 1 - Select SQL Statement, and enter the SQL query:
SELECT ENT_ID, ENT_NAME, ENT_DESCRIPTION FROM ENTITLEMENTS -
Option 2 - Select Stored Procedure (Recommended), and enter the stored procedure call:
CALL GET_ALL_ENTITLEMENTS() -
Entitlement ID Column:
ENT_ID -
Entitlement Display Column:
ENT_NAME
3. Get User by ID #
Retrieve specific user details by their USER_ID.
Configuration:
-
✅ Check Enabled
-
Option 1 - Select SQL Statement, and enter the SQL query:
SELECT USER_ID, USERNAME, FIRSTNAME, LASTNAME, MIDDLENAME, EMAIL, DISPLAYNAME, NICKNAME, MOBILEPHONE, STREETADDRESS, CITY, STATE, ZIPCODE, COUNTRYCODE, TIMEZONE, ORGANIZATION, DEPARTMENT, MANAGERID, MANAGER, TITLE, EMPLOYEENUMBER, HIREDATE, TERMINATIONDATE, PASSWORD_HASH, IS_ACTIVE FROM USERS WHERE USER_ID = ? -
Option 2 - Select Stored Procedure (Recommended), and enter the stored procedure call:
CALL GET_USER_BY_ID(?) -
Map Parameters to Fields:
- Parameter 1:
DATABASE_FIELD→USER_ID
- Parameter 1:
4. Get User Entitlements #
Retrieve all entitlements assigned to a specific user.
Configuration:
-
✅ Check Enabled
-
Option 1 - Select SQL Statement, and enter the SQL query:
SELECT UE.USERENTITLEMENT_ID, UE.USER_ID, U.USERNAME, U.EMAIL, UE.ENT_ID, E.ENT_NAME, E.ENT_DESCRIPTION, UE.ASSIGNEDDATE FROM USERENTITLEMENTS UE JOIN USERS U ON UE.USER_ID = U.USER_ID JOIN ENTITLEMENTS E ON UE.ENT_ID = E.ENT_ID WHERE UE.USER_ID = ? -
Option 2 - Select Stored Procedure (Recommended), and enter the stored procedure call:
CALL GET_USER_ENTITLEMENT(?) -
Map Parameters to Fields:
- Parameter 1:
DATABASE_FIELD→USER_ID
- Parameter 1:
Configure Provisioning Operations (To App) #
Provisioning operations push changes from Okta to the database.
Navigate to Provisioning Settings #
- Stay in the Provisioning tab
- Go to Integration → To App
- Click Edit next to Provisioning
5. Create User #
Create a new user in the database when assigned in Okta.
Configuration:
-
✅ Check Enabled
-
Option 1 - Select SQL Statement, and enter the SQL query:
INSERT INTO USERS (USER_ID, USERNAME, FIRSTNAME, LASTNAME, EMAIL, MIDDLENAME, DISPLAYNAME, NICKNAME, MOBILEPHONE, STREETADDRESS, CITY, STATE, ZIPCODE, COUNTRYCODE, TIMEZONE, ORGANIZATION, DEPARTMENT, MANAGERID, MANAGER, TITLE, EMPLOYEENUMBER, HIREDATE, TERMINATIONDATE, PASSWORD_HASH) VALUES (?, ?, ?, ?, ?, ?, ?, ?, ?, ?, ?, ?, ?, ?, ?, ?, ?, ?, ?, ?, ?, ?, ?, ?) -
Option 2 - Select Stored Procedure (Recommended), and enter the stored procedure call:
CALL CREATE_USER(?, ?, ?, ?, ?, ?, ?, ?, ?, ?, ?, ?, ?, ?, ?, ?, ?, ?, ?, ?, ?, ?, ?, ?) -
Map Parameters to Fields:
- Parameter 1:
DATABASE_FIELD→USER_ID(required) - Parameter 2:
DATABASE_FIELD→USERNAME(required) - Parameter 3:
DATABASE_FIELD→FIRSTNAME(required) - Parameter 4:
DATABASE_FIELD→LASTNAME(required) - Parameter 5:
DATABASE_FIELD→EMAIL(required) - Parameter 6:
DATABASE_FIELD→MIDDLENAME - Parameter 7:
DATABASE_FIELD→DISPLAYNAME - Parameter 8:
DATABASE_FIELD→NICKNAME - Parameter 9:
DATABASE_FIELD→MOBILEPHONE - Parameter 10:
DATABASE_FIELD→STREETADDRESS - Parameter 11:
DATABASE_FIELD→CITY - Parameter 12:
DATABASE_FIELD→STATE - Parameter 13:
DATABASE_FIELD→ZIPCODE - Parameter 14:
DATABASE_FIELD→COUNTRYCODE - Parameter 15:
DATABASE_FIELD→TIMEZONE - Parameter 16:
DATABASE_FIELD→ORGANIZATION - Parameter 17:
DATABASE_FIELD→DEPARTMENT - Parameter 18:
DATABASE_FIELD→MANAGERID - Parameter 19:
DATABASE_FIELD→MANAGER - Parameter 20:
DATABASE_FIELD→TITLE - Parameter 21:
DATABASE_FIELD→EMPLOYEENUMBER - Parameter 22:
DATABASE_FIELD→HIREDATE - Parameter 23:
DATABASE_FIELD→TERMINATIONDATE - Parameter 24:
DATABASE_FIELD→PASSWORD_HASH
- Parameter 1:
6. Update User #
Update existing user attributes in the database.
Configuration:
-
✅ Check Enabled
-
Option 1 - Select SQL Statement, and enter the SQL query:
UPDATE USERS SET USERNAME = ?, FIRSTNAME = ?, LASTNAME = ?, EMAIL = ?, MIDDLENAME = ?, DISPLAYNAME = ?, NICKNAME = ?, MOBILEPHONE = ?, STREETADDRESS = ?, CITY = ?, STATE = ?, ZIPCODE = ?, COUNTRYCODE = ?, TIMEZONE = ?, ORGANIZATION = ?, DEPARTMENT = ?, MANAGERID = ?, MANAGER = ?, TITLE = ?, EMPLOYEENUMBER = ?, HIREDATE = ?, TERMINATIONDATE = ?, PASSWORD_HASH = ? WHERE USER_ID = ? -
Option 2 - Select Stored Procedure (Recommended), and enter the stored procedure call:
CALL UPDATE_USER(?, ?, ?, ?, ?, ?, ?, ?, ?, ?, ?, ?, ?, ?, ?, ?, ?, ?, ?, ?, ?, ?, ?, ?) -
Map Parameters to Fields:
- Parameter 1:
DATABASE_FIELD→USER_ID(required) - Parameter 2:
DATABASE_FIELD→USERNAME(required) - Parameter 3:
DATABASE_FIELD→FIRSTNAME(required) - Parameter 4:
DATABASE_FIELD→LASTNAME(required) - Parameter 5:
DATABASE_FIELD→EMAIL(required) - Parameter 6:
DATABASE_FIELD→MIDDLENAME - Parameter 7:
DATABASE_FIELD→DISPLAYNAME - Parameter 8:
DATABASE_FIELD→NICKNAME - Parameter 9:
DATABASE_FIELD→MOBILEPHONE - Parameter 10:
DATABASE_FIELD→STREETADDRESS - Parameter 11:
DATABASE_FIELD→CITY - Parameter 12:
DATABASE_FIELD→STATE - Parameter 13:
DATABASE_FIELD→ZIPCODE - Parameter 14:
DATABASE_FIELD→COUNTRYCODE - Parameter 15:
DATABASE_FIELD→TIMEZONE - Parameter 16:
DATABASE_FIELD→ORGANIZATION - Parameter 17:
DATABASE_FIELD→DEPARTMENT - Parameter 18:
DATABASE_FIELD→MANAGERID - Parameter 19:
DATABASE_FIELD→MANAGER - Parameter 20:
DATABASE_FIELD→TITLE - Parameter 21:
DATABASE_FIELD→EMPLOYEENUMBER - Parameter 22:
DATABASE_FIELD→HIREDATE - Parameter 23:
DATABASE_FIELD→TERMINATIONDATE - Parameter 24:
DATABASE_FIELD→PASSWORD_HASH
- Parameter 1:
7. Activate User #
Activate a user account.
Configuration:
-
✅ Check Enabled
-
Option 1 - Select SQL Statement, and enter the SQL query:
UPDATE USERS SET IS_ACTIVE = 1 WHERE USER_ID = ? -
Option 2 - Select Stored Procedure (Recommended), and enter the stored procedure call:
CALL ACTIVATE_USER(?) -
Map Parameters to Fields:
- Parameter 1:
DATABASE_FIELD→USER_ID
- Parameter 1:
IS_ACTIVE = TRUE for the specified user in the USERS table.
8. Deactivate User #
Deactivate a user account.
Configuration:
-
✅ Check Enabled
-
Option 1 - Select SQL Statement, and enter the SQL query:
UPDATE USERS SET IS_ACTIVE = 0 WHERE USER_ID = ? -
Option 2 - Select Stored Procedure (Recommended), and enter the stored procedure call:
CALL DEACTIVATE_USER(?) -
Map Parameters to Fields:
- Parameter 1:
DATABASE_FIELD→USER_ID
- Parameter 1:
IS_ACTIVE = FALSE for the specified user in the USERS table.
9. Add Entitlement to User #
Assign an entitlement to a user.
Configuration:
-
✅ Check Enabled
-
Option 1 - Select SQL Statement, and enter the SQL query:
INSERT INTO USERENTITLEMENTS (USER_ID, ENT_ID) VALUES (?, ?) -
Option 2 - Select Stored Procedure (Recommended), and enter the stored procedure call:
CALL ADD_ENTITLEMENT_TO_USER(?, ?) -
Map Parameters to Fields:
- Parameter 1:
DATABASE_FIELD→USER_ID - Parameter 2:
DATABASE_FIELD→ENT_ID
- Parameter 1:
10. Remove Entitlement from User #
Revoke an entitlement from a user.
Configuration:
-
✅ Check Enabled
-
Option 1 - Select SQL Statement, and enter the SQL query:
DELETE FROM USERENTITLEMENTS WHERE USER_ID = ? AND ENT_ID = ? -
Option 2 - Select Stored Procedure (Recommended), and enter the stored procedure call:
CALL REMOVE_ENTITLEMENT_FROM_USER(?, ?) -
Map Parameters to Fields:
- Parameter 1:
DATABASE_FIELD→USER_ID - Parameter 2:
DATABASE_FIELD→ENT_ID
- Parameter 1:
Configure User Profile Attributes #
Before enabling provisioning features, you need to configure attribute mappings between Okta and the database.
-
Navigate to Profile Editor
- In Okta Admin Console, go to Directory → Profile Editor
-
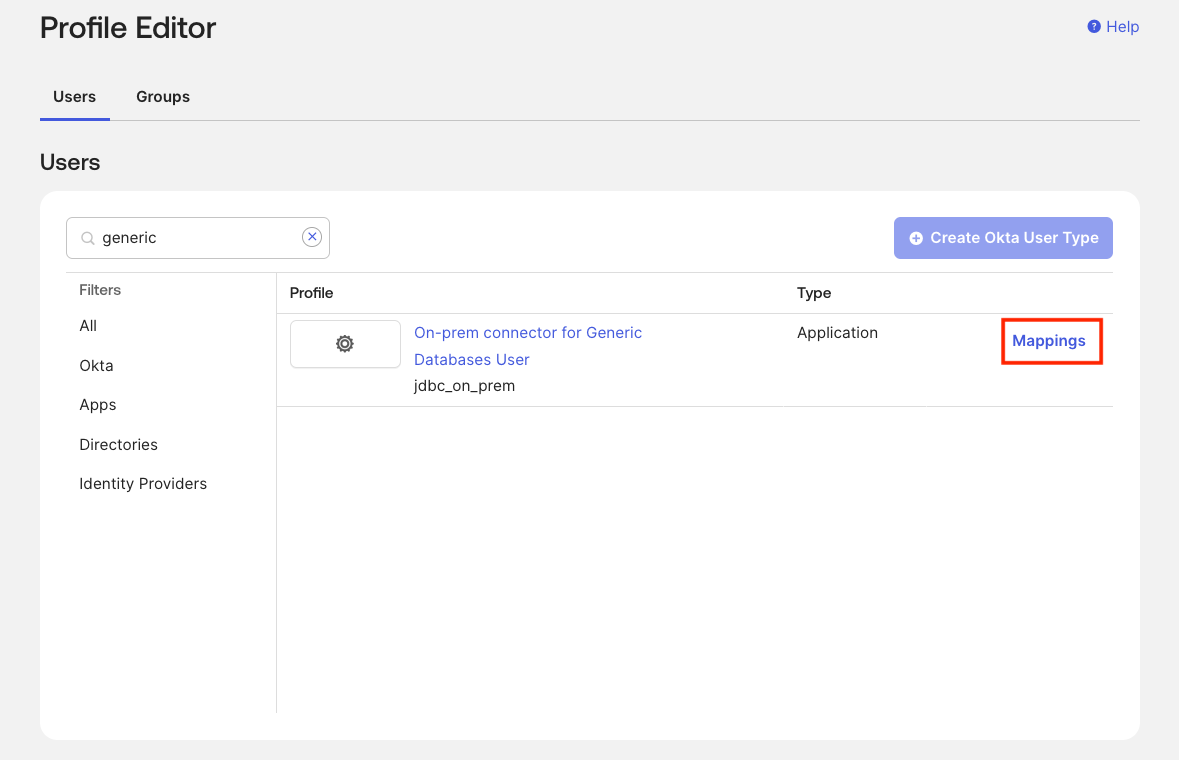
Select Generic Database Connector User Profile
- Search for “Generic Database Connector”
- Individuate the profile named “Generic Database Connector User” and click Mappings.
-
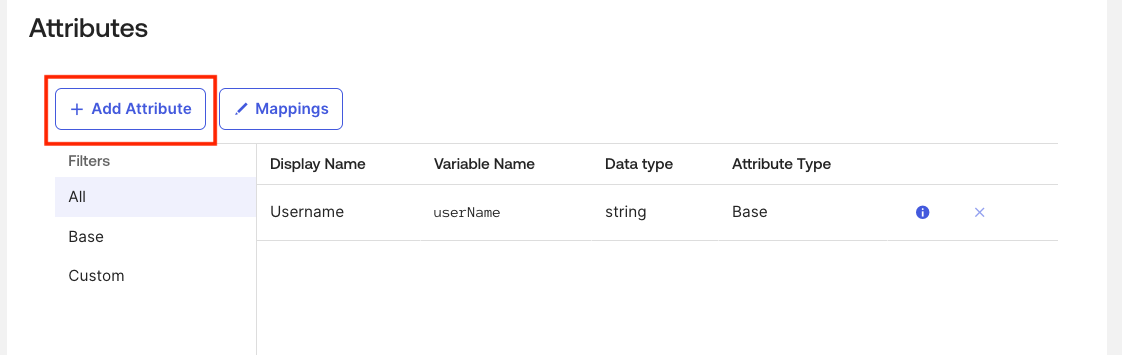
Add Attributes from Database
- Under Attributes, you’ll see that only the Username attribute is present
- Click + Add Attribute
-
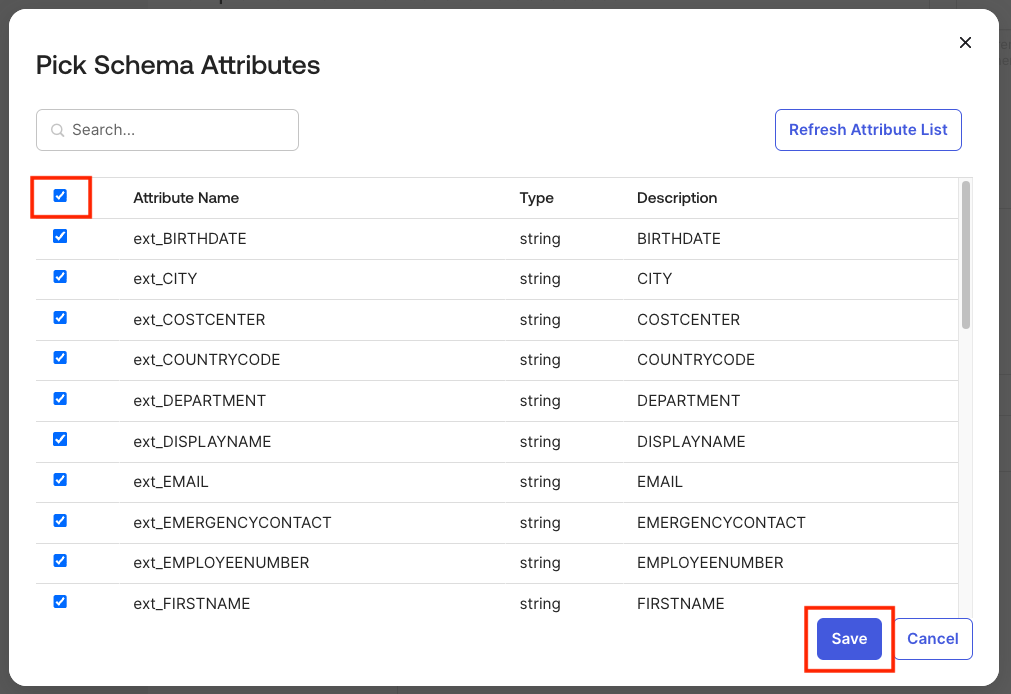
Import Database Attributes
- The next page displays all attributes imported from the database
- Check all the required attributes:
ext_USER_IDext_FIRSTNAMEext_LASTNAMEext_EMAILext_MANAGERext_TITLE- And any other custom attributes (you can click the first checkbox to select all)
- You can click the first box at the top to select all
- Click Save
-
Verify Attributes
- The Generic Database Connector user profile now contains all attributes needed for provisioning operations
Generic Database Connector User to Okta User #
This mapping governs how user accounts from the database are imported into Okta.
Configuration Steps:
-
Navigate to Mappings
-
Within the Generic Database Connector User profile, click Mappings

-
-
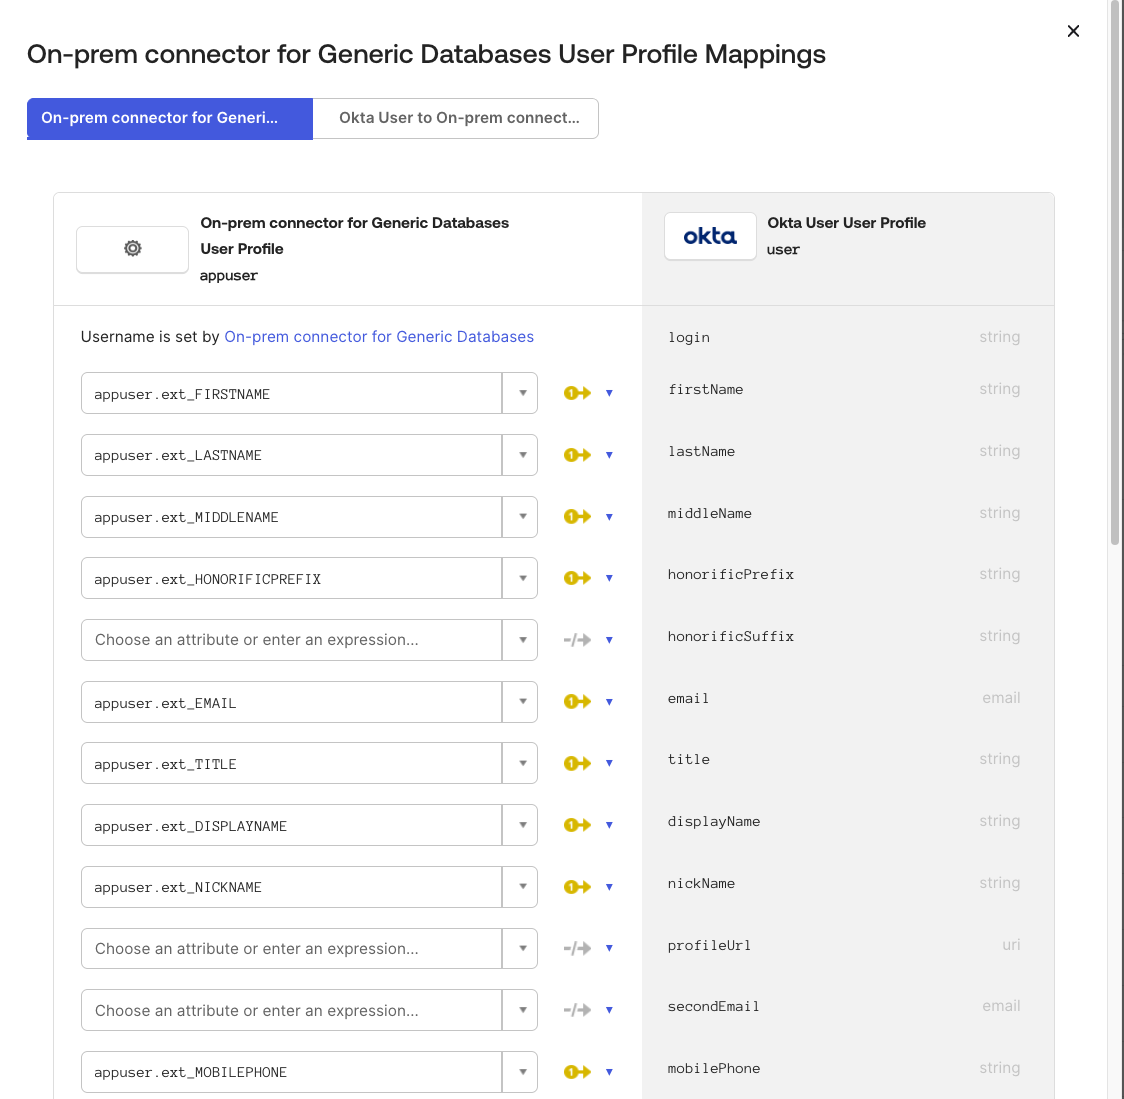
Configure Import Mappings
- By default, Generic Database Connector User to Okta User is selected
- You’ll see that mapping for
loginis present, but others are empty - Set up mappings for additional attributes as needed
-
Map Attributes
- Under Okta User Profile, click the dropdown in Choose an attribute or enter an expression
- Select the corresponding attribute from Generic Database Connector User Profile
Example mappings:
appuser.ext_FIRSTNAME→firstNameappuser.ext_LASTNAME→lastNameappuser.ext_EMAIL→emailappuser.ext_TITLE→titleappuser.ext_MANAGER→managerId
-
Save Mappings
- Click Save
- Click Apply updates
Okta User to Generic Database Connector User #
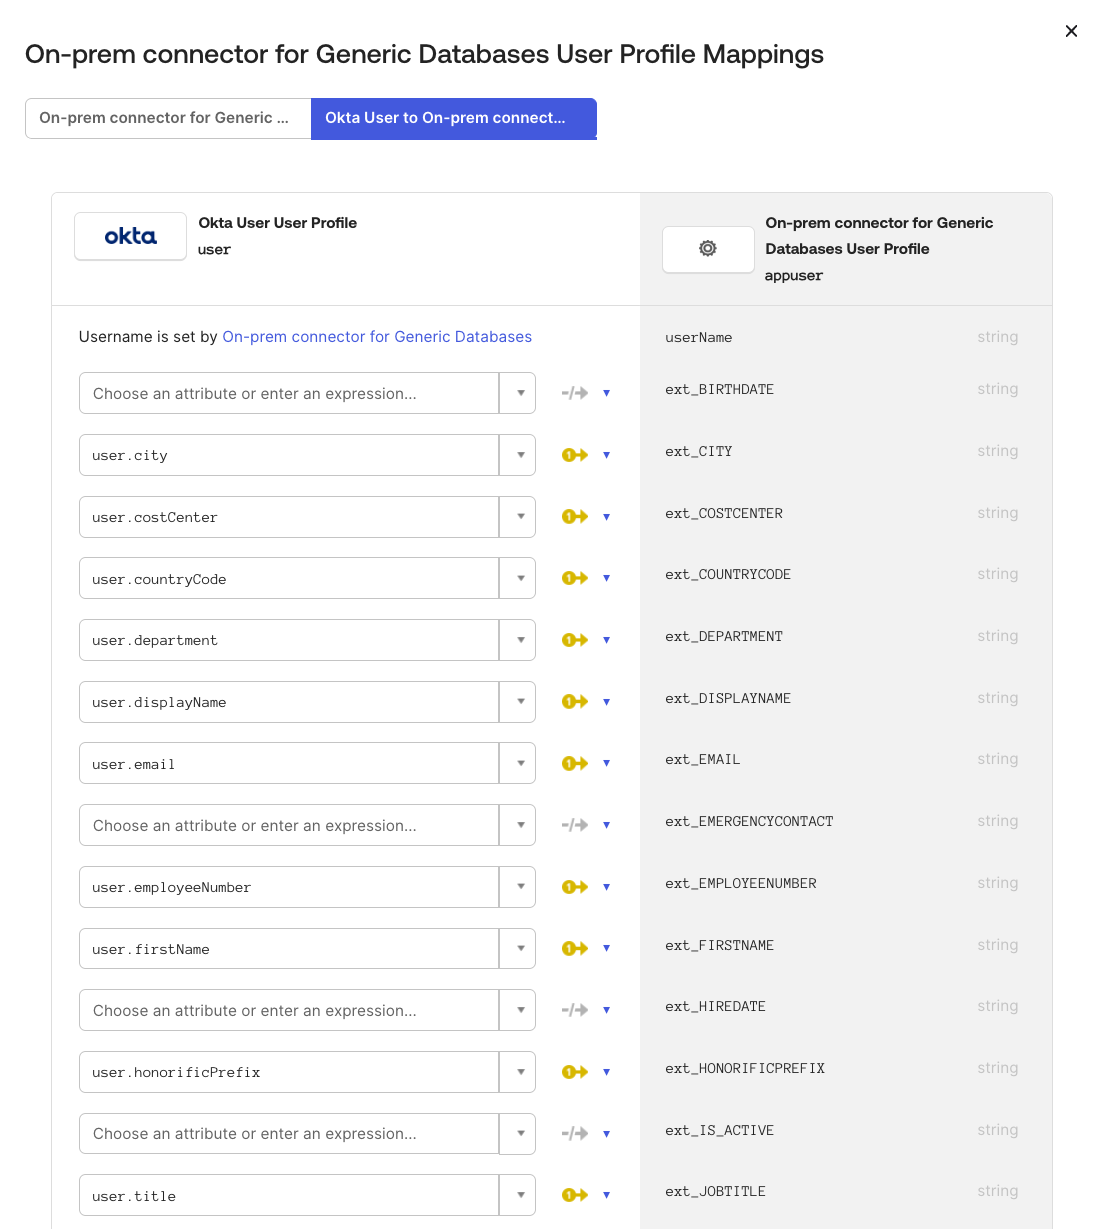
This mapping dictates how user attributes in Okta correlate with the database user profile, facilitating user creation or modification in the database.
Configuration Steps:
-
Navigate to Mappings
- Within the Generic Database Connector User profile, click Mappings
-
Select Okta User to Generic Database Connector User
- Click Okta User to Generic Database Connector User

-
Map Attributes
- Click the dropdown under Choose an attribute or enter an expression
- Select the appropriate attributes from Okta User Profile
Example mappings:
login→ext_USER_IDlogin→ext_USERNAMEfirstName→ext_FIRSTNAMElastName→ext_LASTNAMEemail→ext_EMAILmanagerId→ext_MANAGERtitle→ext_TITLE
-
Save Mappings
- Click Save Mappings
Enable Provisioning Features #
-
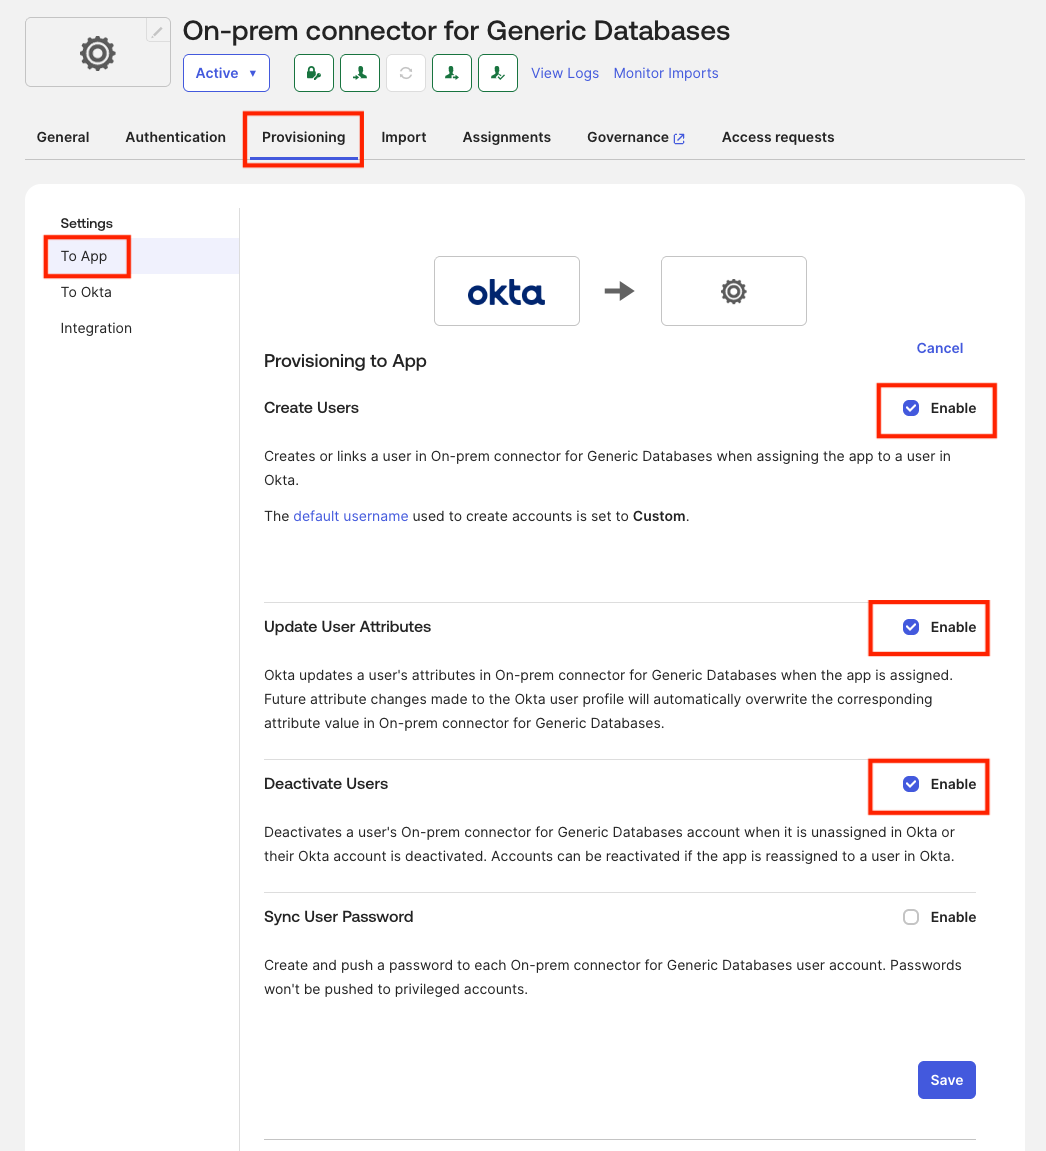
Navigate to Provisioning Settings
- In Okta Admin Console, go to Applications → Generic Database Connector
- Click the Provisioning tab
- Navigate to Settings → To App
-
Edit Provisioning Settings
- Click Edit in the Provisioning to App section
-
Enable Provisioning Features
- ✅ Create Users: Enable to create users in the database when assigned in Okta
- ✅ Update User Attributes: Enable to sync attribute changes from Okta to database
- ✅ Deactivate Users: Enable to deactivate users in database when unassigned from Okta
-
Save Configuration
- Click Save
Configure Import Schedule #
-
Navigate to Import Settings
- Go to Applications → Generic Database Connector
- Click Provisioning tab
- Navigate to Settings → To Okta
- Click Edit next to General
-
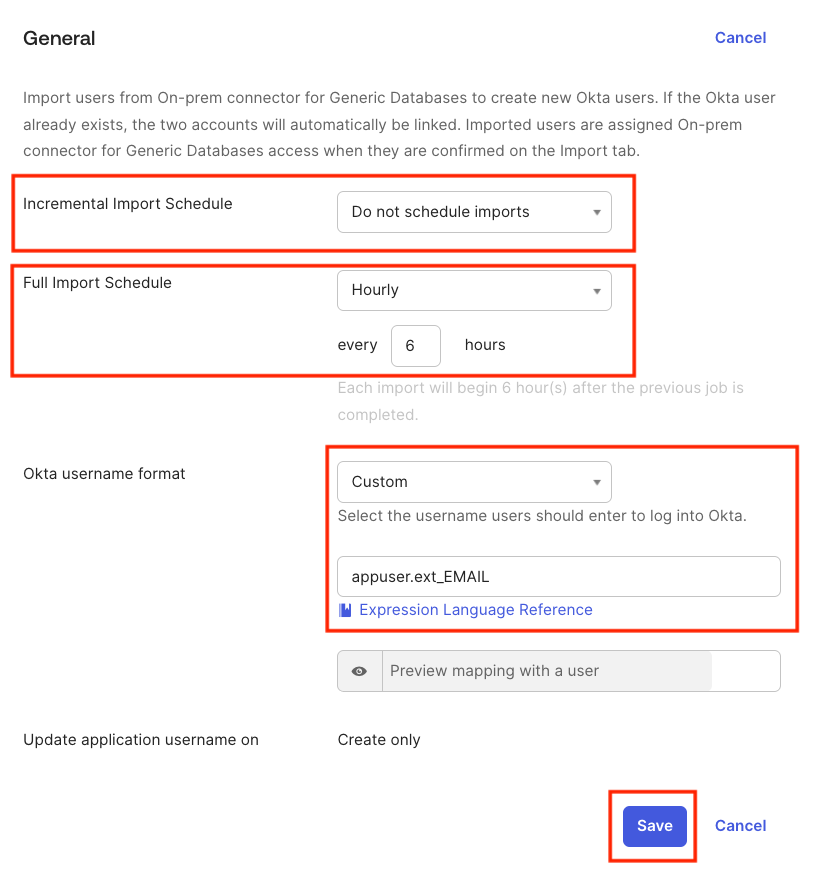
Configure Import Schedule
- Under Full Import Schedule, select the desired frequency for importing users (e.g., every 6 hours)
- If you enabled the Incremental Import Early Access feature earlier, you can also configure an Incremental Import Schedule here—note that this lab’s database schema doesn’t have a change-tracking timestamp field, so incremental import won’t detect updates on its own
-
Configure Okta Username Format
- Under Okta username format, select Custom from the dropdown
- Enter:
appuser.ext_EMAILin the textbox - This ensures usernames are in email format using the
appuser.ext_USERNAMEattribute
-
Save Configuration
- Click Save
Testing the Integration #
With configuration complete, it’s time to test the full integration workflow.
Test #1: Import Users from Database #
This test imports existing database users into Okta.
-
Navigate to Import Tab
- Go to Applications → Generic Database Connector
- Click the Import tab
-
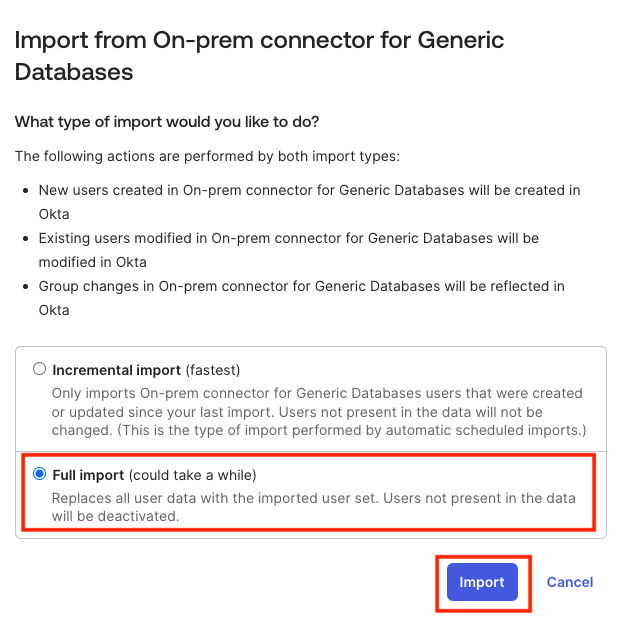
Start Import
- Click Import Now
- Select Full Import
- Click Import
-
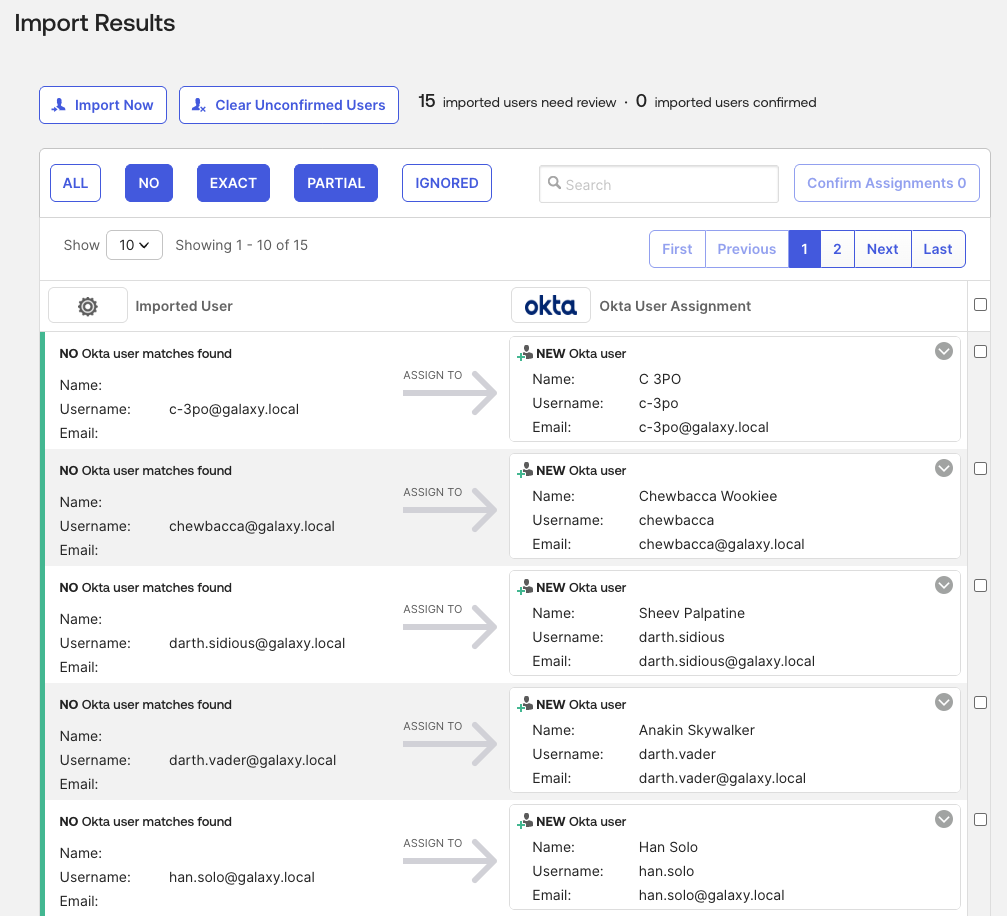
Review Import Results
- Once import completes, you’ll see an Import Success message
- Review the list of users imported from the database
-
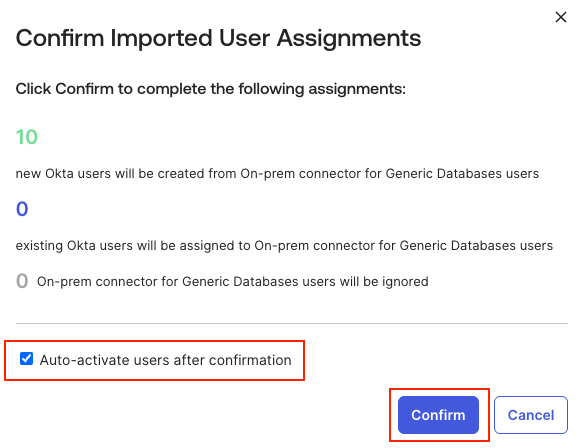
Confirm User Assignments
- By default, imported users require manual confirmation (configurable in Provisioning → To Okta → User Creation & Matching)
- Select the users you want to import into Okta
- Click Confirm Assignments
- Select Auto-activate users after confirmation
- Click Confirm when prompted
-
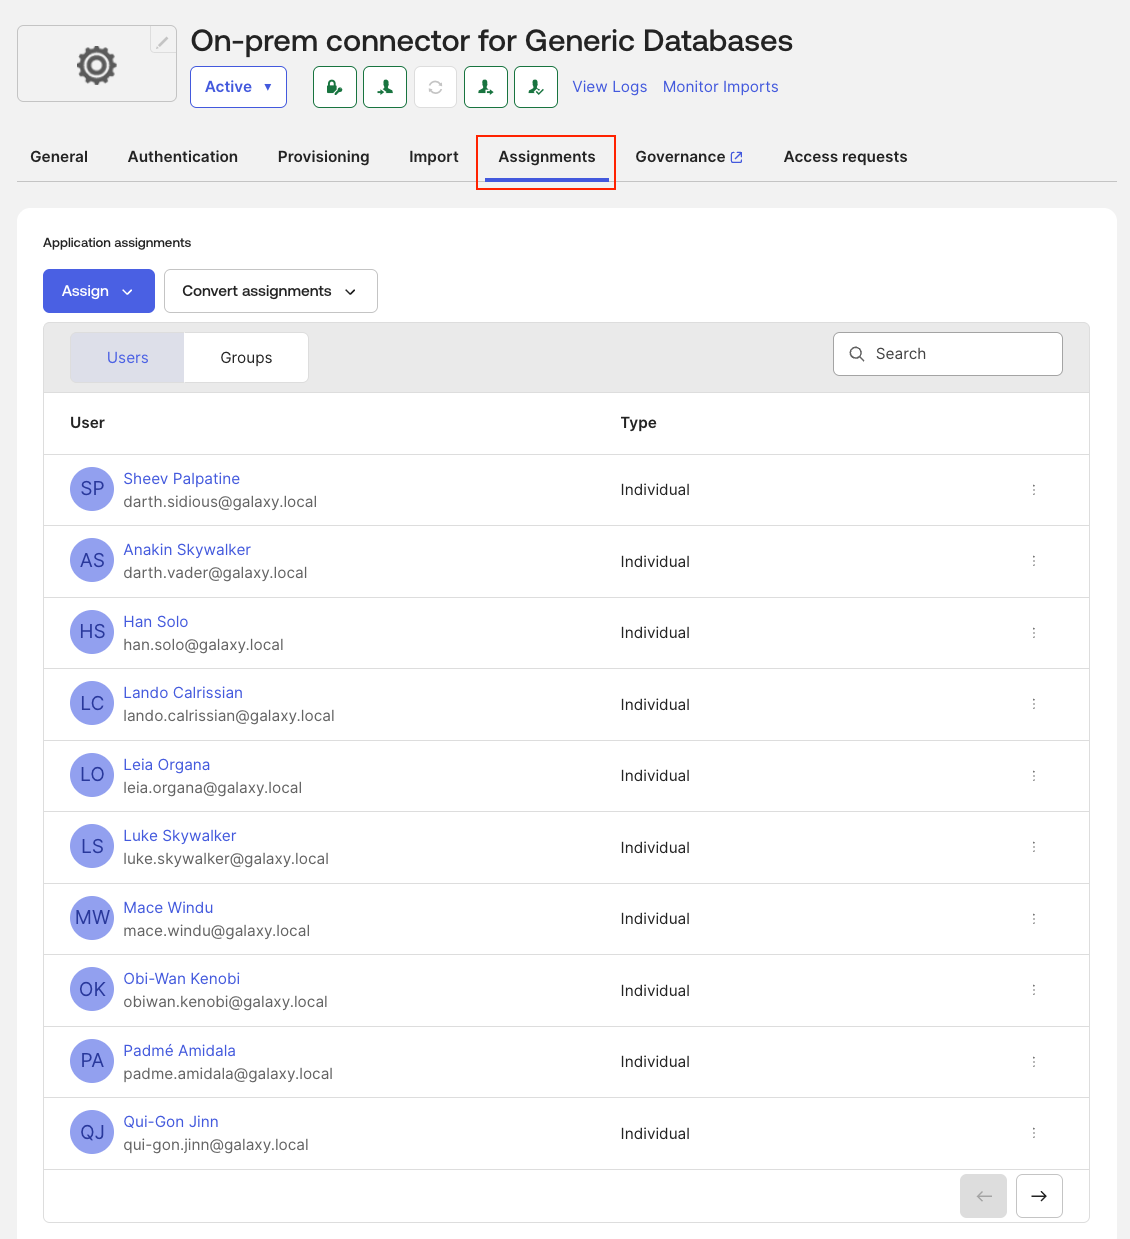
Verify Imported Users
- Navigate to the Assignments tab
- Verify that imported users are now visible
-
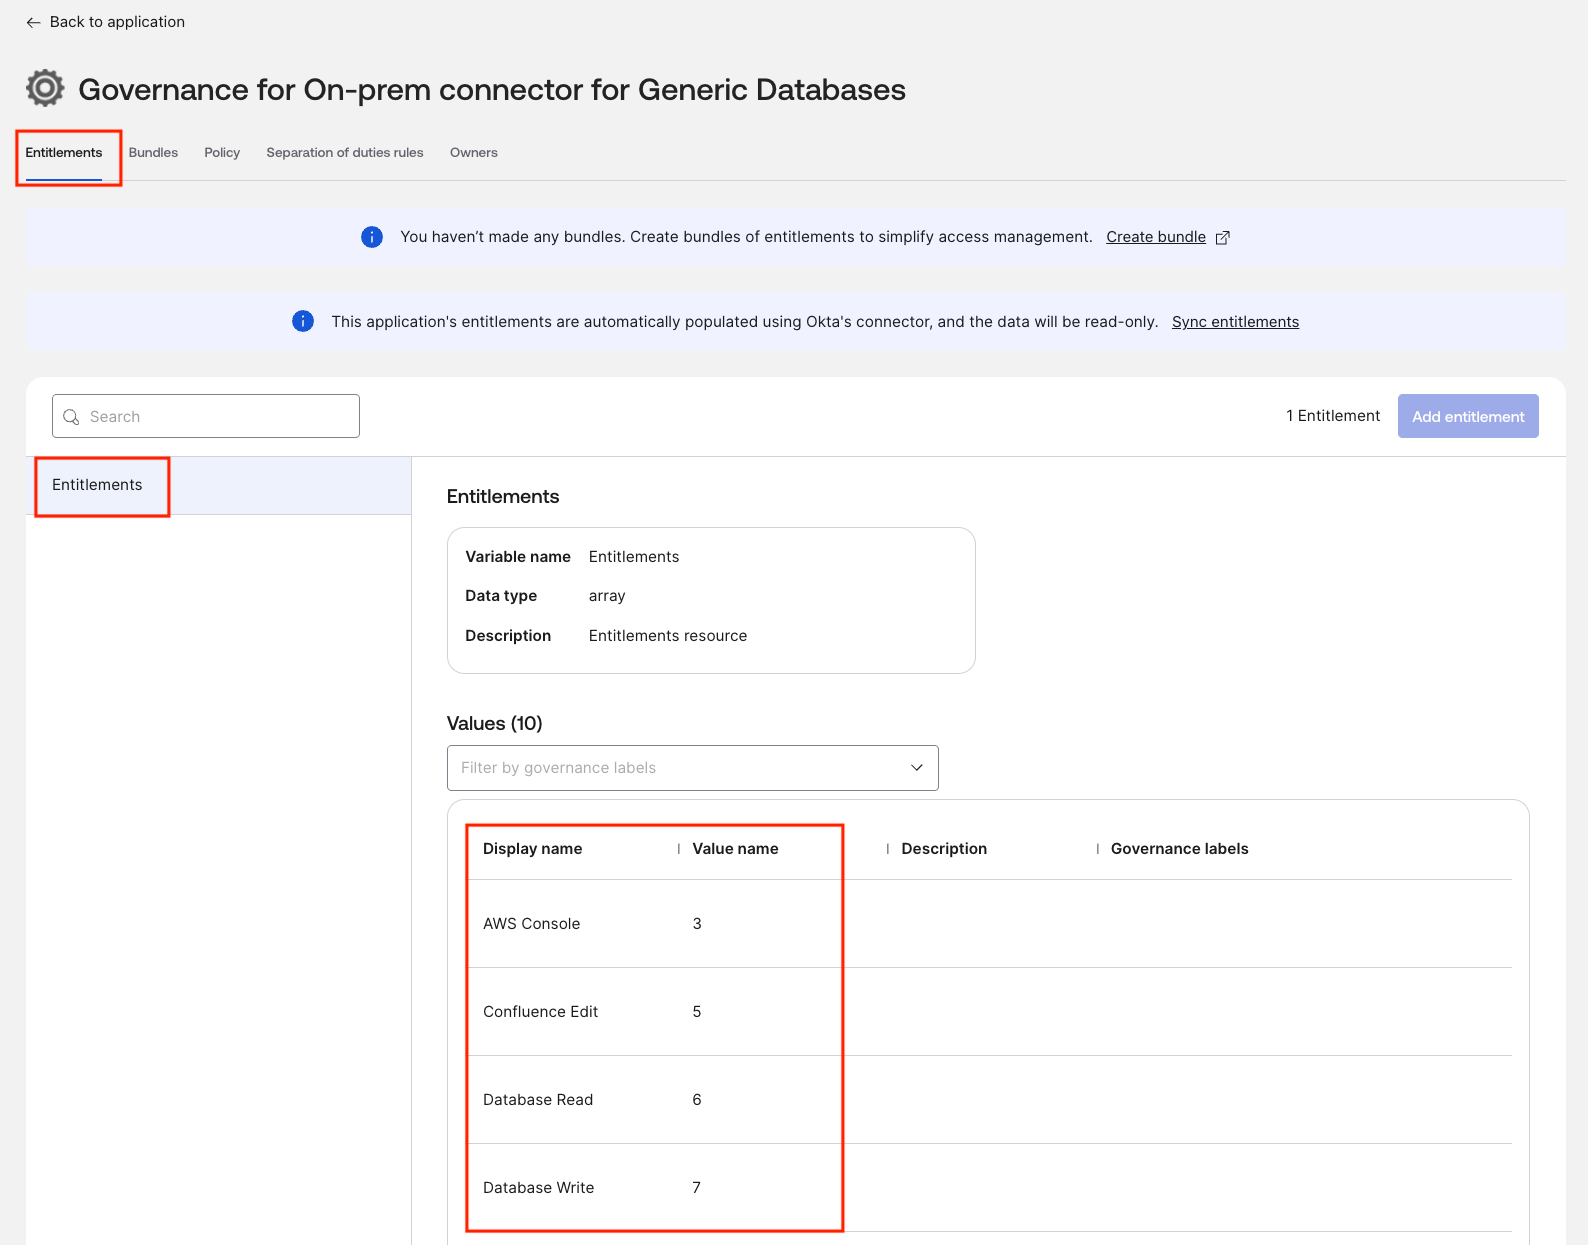
Check Entitlements
- Click the Governance tab
- Click Entitlements
- Verify that the entitlements from the database are listed in Okta
- Notes:
- At the moment only the Display Name and Value Name of the entitlement are supported. The Description is not yet included in the list
- To define the Governance Label refer to the Okta documentation for Resource labels
- Despite other application integrated with the Okta Governance, at the moment the Database Connector support only one entitlement type per each application instance.
-
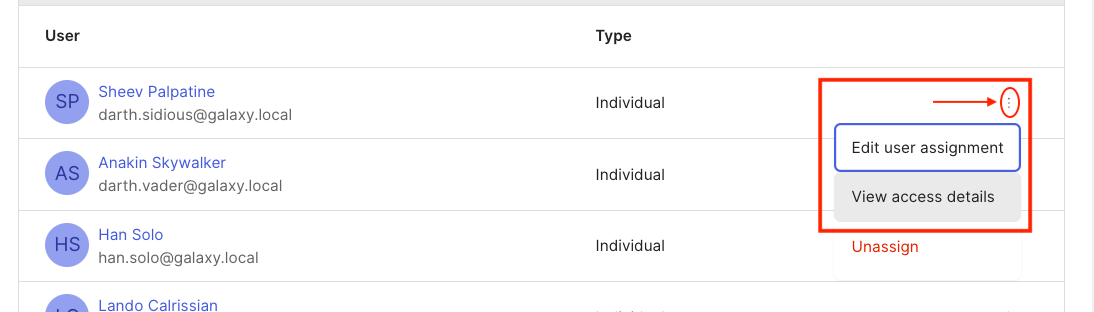
Check user entitlements
-
Click on the three dots next to the user you just imported in the Assignments tab
-
Click View access details
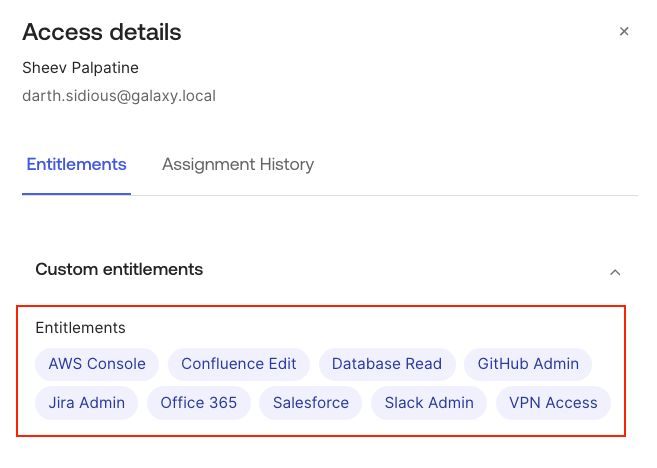
-
Verify that the entitlements assigned to the user in the database are reflected in Okta
-
Test #2: Manual User Assignment and Provisioning #
Test creating a new user in the database from Okta.
Steps:
-
Assign User to Application
- Log on to Okta Admin Console
- Navigate to Applications → Generic Database Connector
- Click the Assignments tab
- Click Assign → Assign to People
-
Select User
- Search for a user (e.g.,
testuser@example.com) - Click Assign next to the user
- Search for a user (e.g.,
-
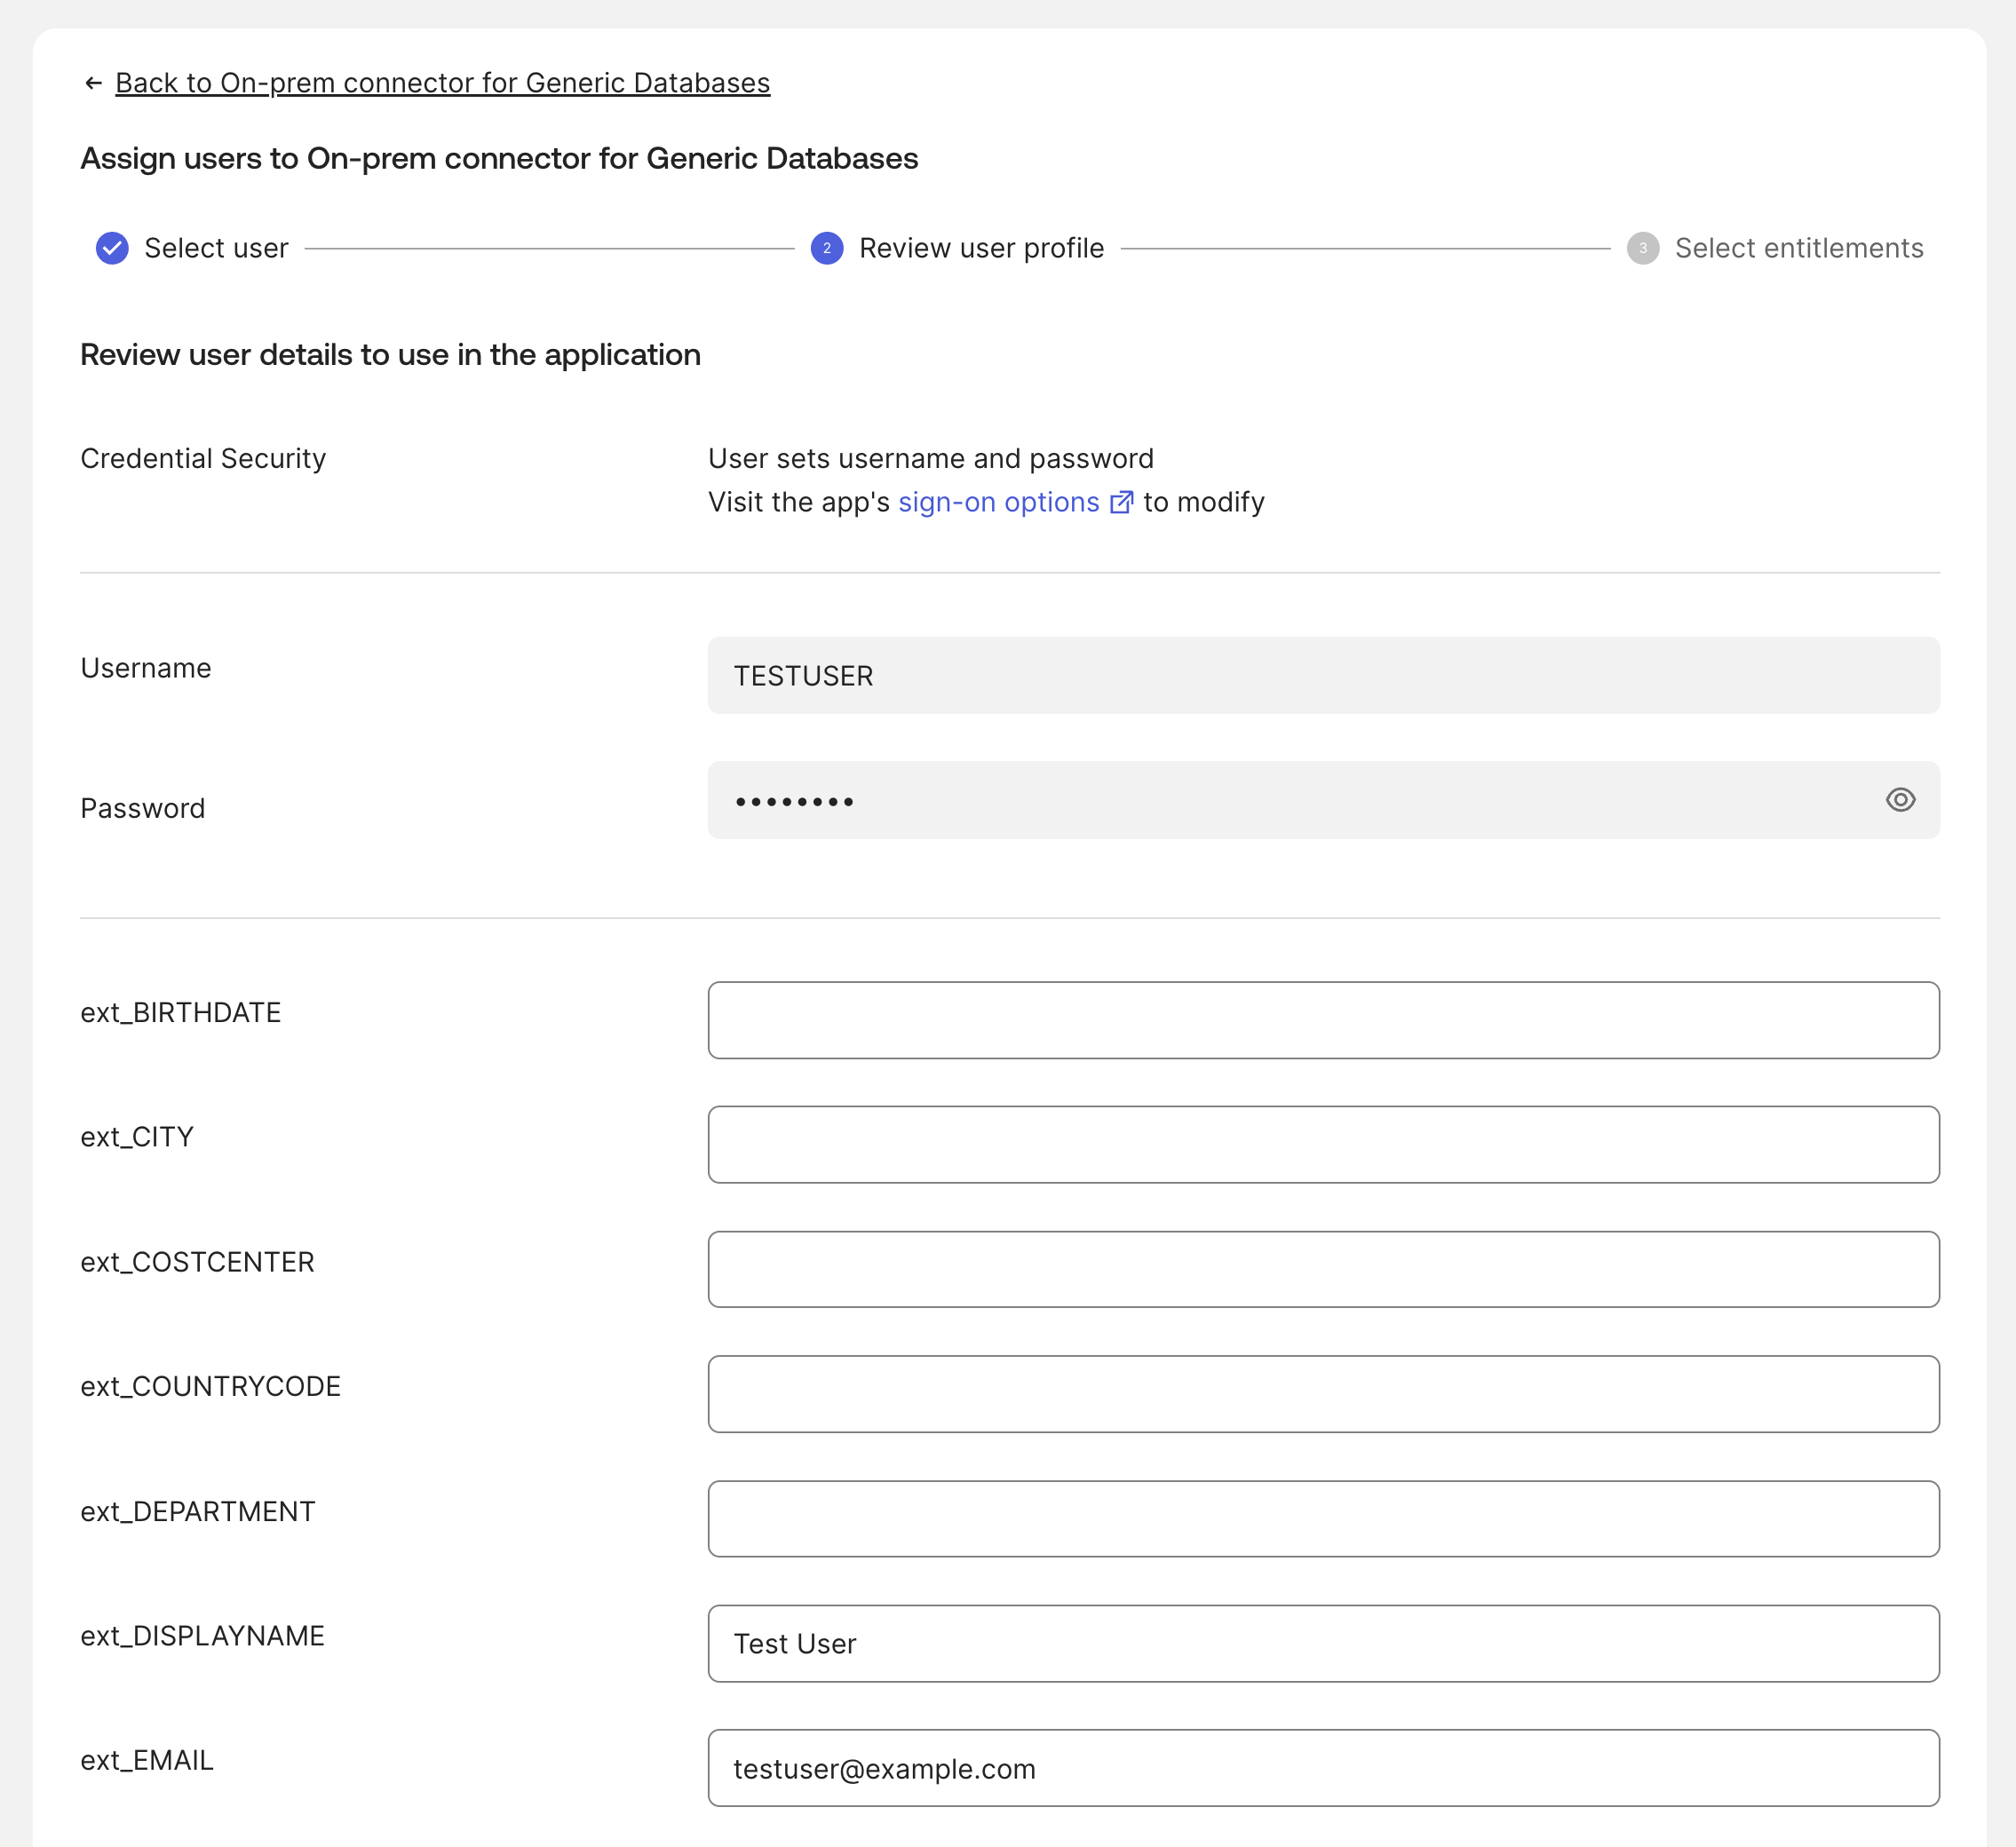
Review User Details
- The application auto-populates custom attribute values based on your mappings
- Review and adjust values as needed - Empty fields can be manually entered
- Click Assign and Continue
-
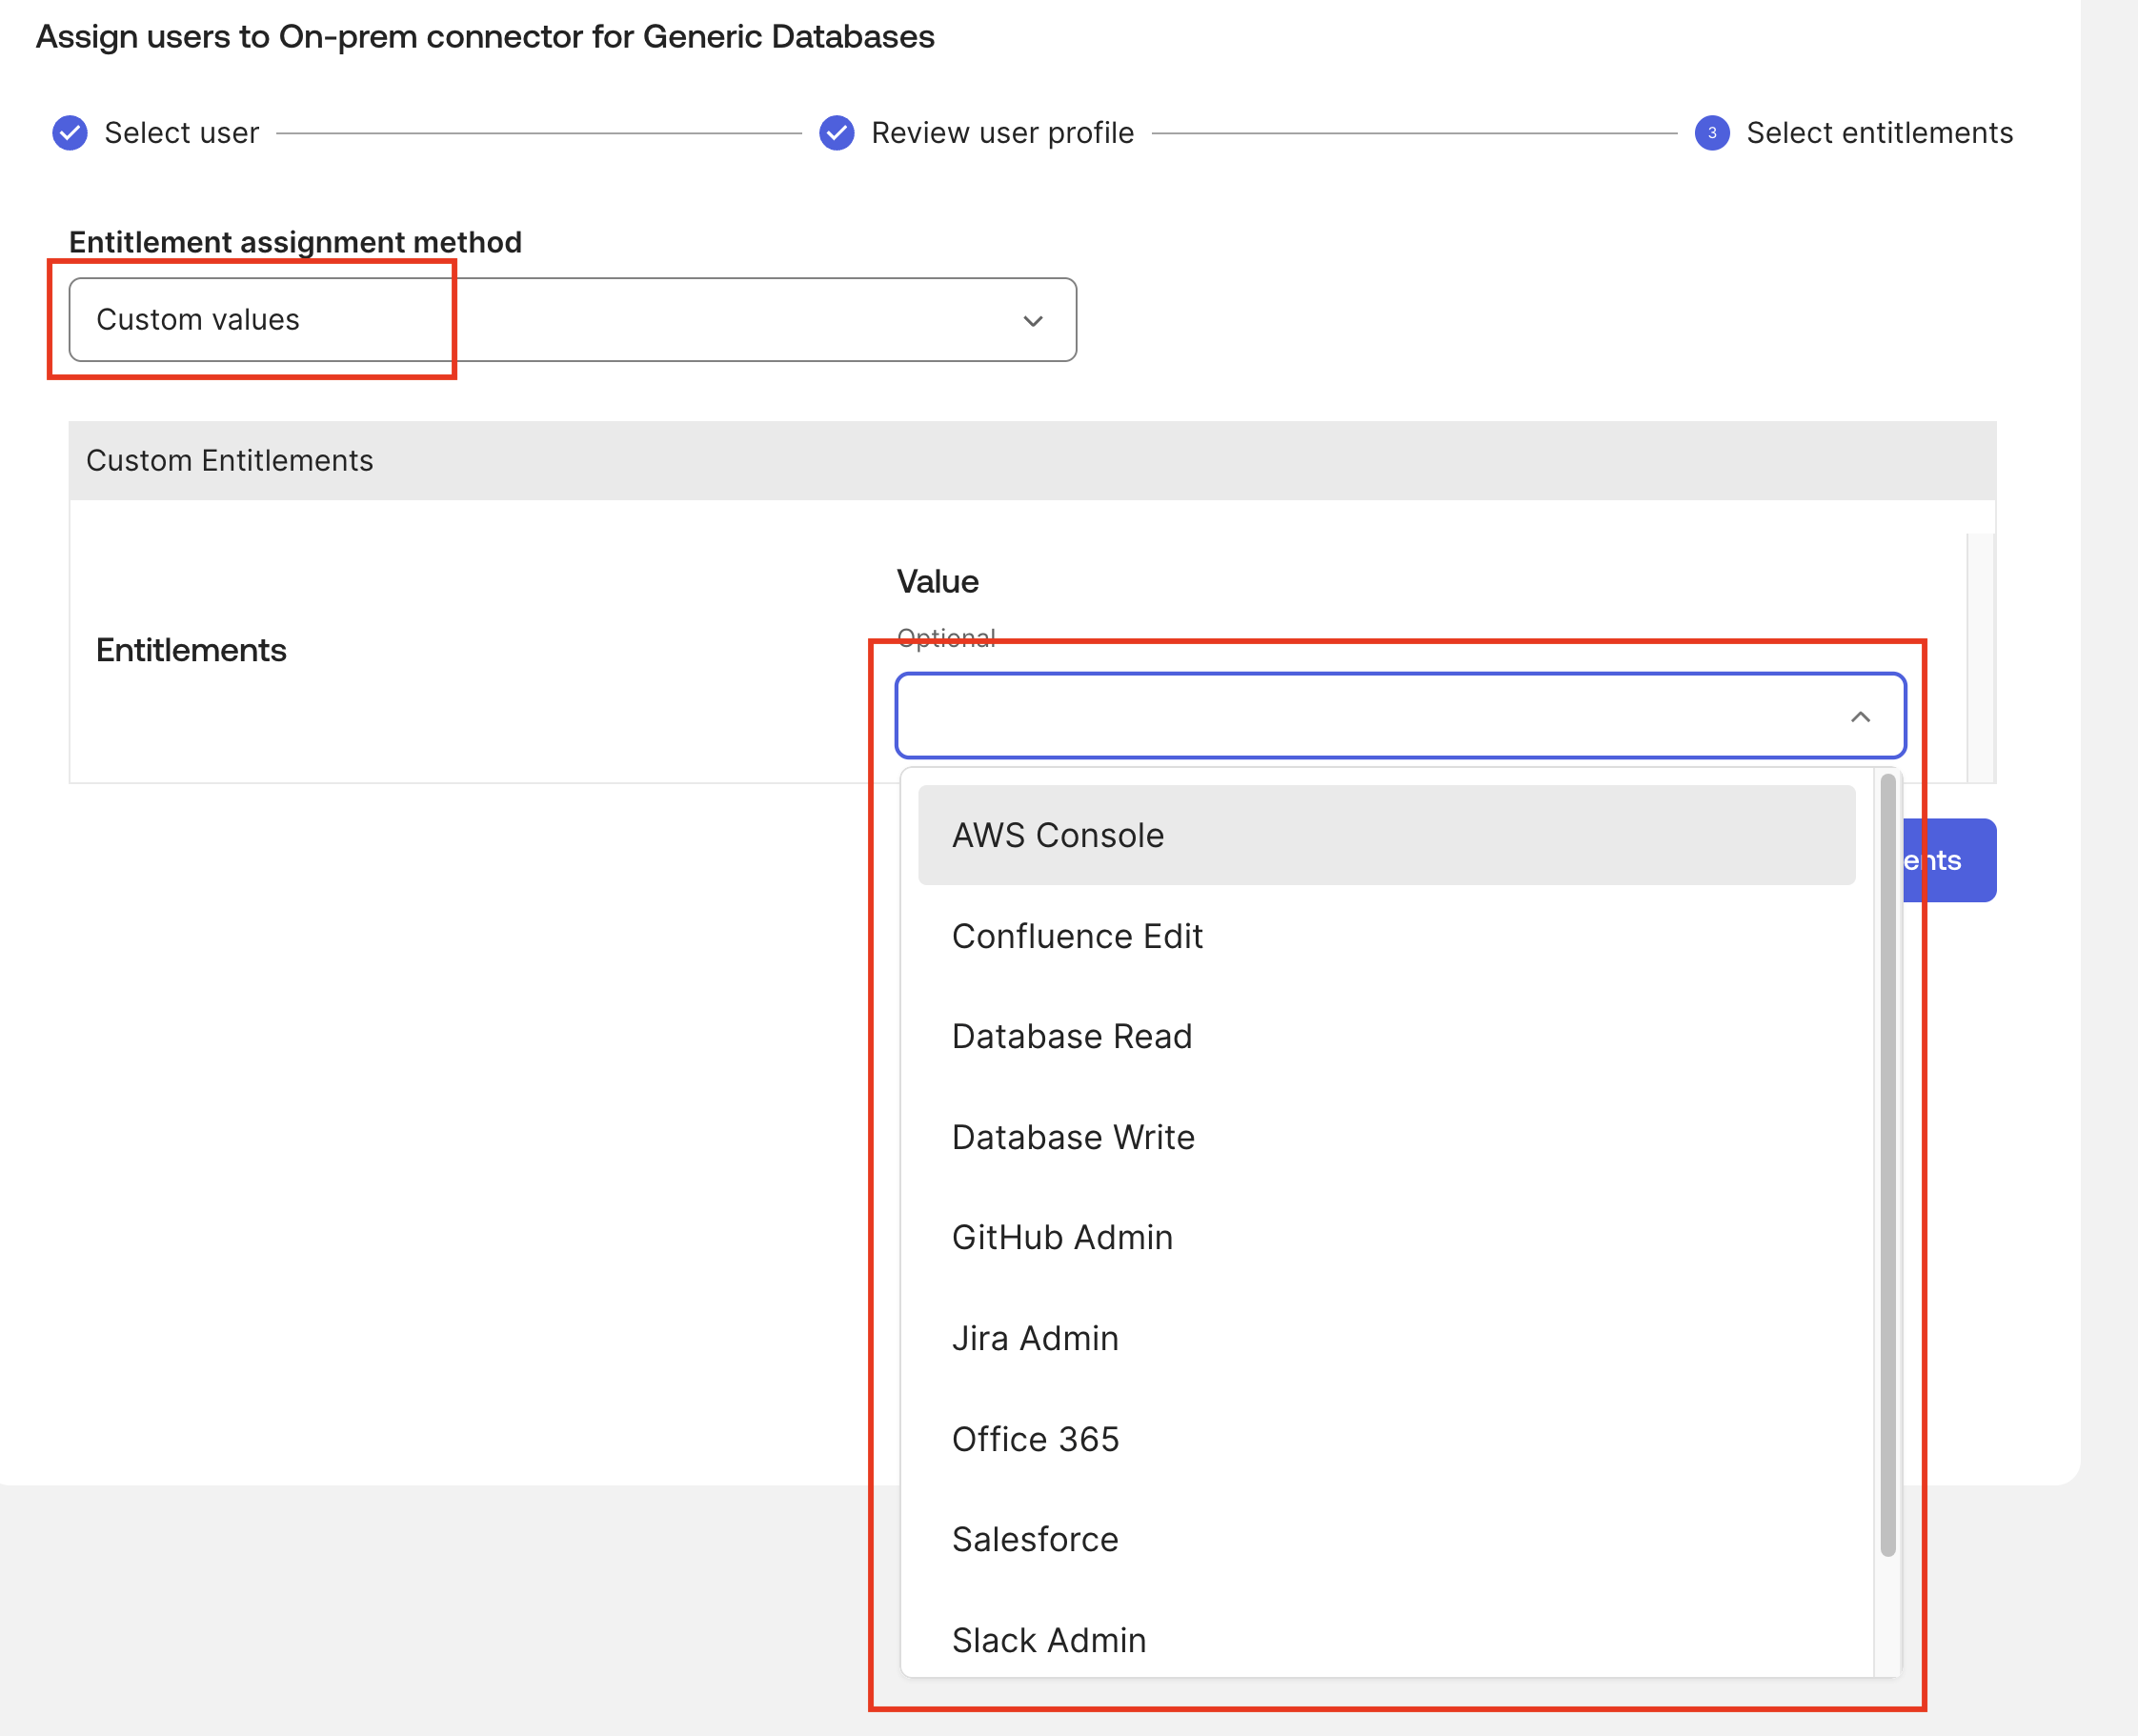
Assign Entitlements
- In the Select Assignment section, select Custom Values from the Entitlement assignment method dropdown
- Under Entitlements, select desired entitlements (e.g., “VPN Access”, “GitHub Admin”)
- Click Save
-
Verify in Okta
- The user should now appear under the Assignments tab
- Click the menu button (three vertical dots) next to the user
- Select View access details to see assigned entitlements
-
Verify in Database
-
Check that the user was created in the database:
docker compose exec db mariadb -u oktademo -poktademo oktademo -e "SELECT USER_ID,USERNAME,FIRSTNAME,LASTNAME,EMAIL FROM USERS WHERE EMAIL='testuser@example.com';"

# SAMPLE OUTPUT
#  +----------------------+-----------+-----------+----------+----------------------+
# | USER_ID              | USERNAME  | FIRSTNAME | LASTNAME | EMAIL                |
# +----------------------+-----------+-----------+----------+----------------------+
# | testuser@example.com | test.user | Test      | User     | testuser@example.com |
# +----------------------+-----------+-----------+----------+----------------------+
You can also verify with DBGate UI, by opening the
USERStable.
-
-
Verify Entitlements in Database
-
Check that entitlements were assigned:
docker compose exec db mariadb -u oktademo -poktademo oktademo -e "CALL GET_USER_ENTITLEMENT('testuser@example.com');"You can also verify with DBGate UI, by opening the
USERENTITLEMENTStable or thev_userentitlementsview.
-
Test #3: User Attribute Update #
Test that attribute changes in Okta are synchronized to the database.
Steps:
-
Update User in Okta
- Navigate to Directory → People
- Find and select a user (e.g.,
testuser@example.com) - Click Profile → Edit
- Change an attribute (e.g.,
title,department) - Click Save
-
Verify in Database
-
Check that changes were synced:
docker compose exec db mariadb -u oktademo -poktademo oktademo \
  -e "SELECT USER_ID, TITLE, DEPARTMENT, EMAIL FROM USERS WHERE EMAIL='testuser@example.com';"
You can also verify with DBGate UI, by opening the
USERStable.
-
Test #4: User Deactivation #
Test that unassigning a user from the application deactivates them in the database.
Steps:
-
Unassign User
- Navigate to Applications → Generic Database Connector → Assignments
- Find the user and click the menu button
- Select Unassign
- Confirm the action
-
Verify Deactivation in Database
-
Check that the user’s
IS_ACTIVEflag is set to0:docker compose exec db mariadb -u oktademo -poktademo oktademo \ -e "SELECT USER_ID, EMAIL, IS_ACTIVE FROM USERS WHERE EMAIL='testuser@example.com';"You can also verify with DBGate UI, by opening the
USERStable or thev_inactive_usersview.
-
Test #5: Check Okta and Local Logs #
To better understand the process and the link between all the components, you can also check the Okta and local logs.
Okta Logs #
You can check the Okta System Logs to see the events related to user provisioning and entitlement management. Look for events such as:
- User’s entitlements updated successfully (
resource.user_entitlements.update): This event indicates that a user’s entitlements were updated in Okta, which should trigger the provisioning flow to sync changes to the database. - Push new user to external application (
application.provision.user.push): This event indicates that Okta is attempting to provision a new user to the database via the On-Prem SCIM Agent. - Successfully pushed new user account to app" (
app.user_management.push_new_user_success): This event confirms that the user account was successfully created in the database, and the entitlements were assigned. - Sync user in external application (
application.provision.user.sync): This event indicates that Okta is attempting to sync user changes to the database, which can be triggered by attribute updates or entitlement changes.
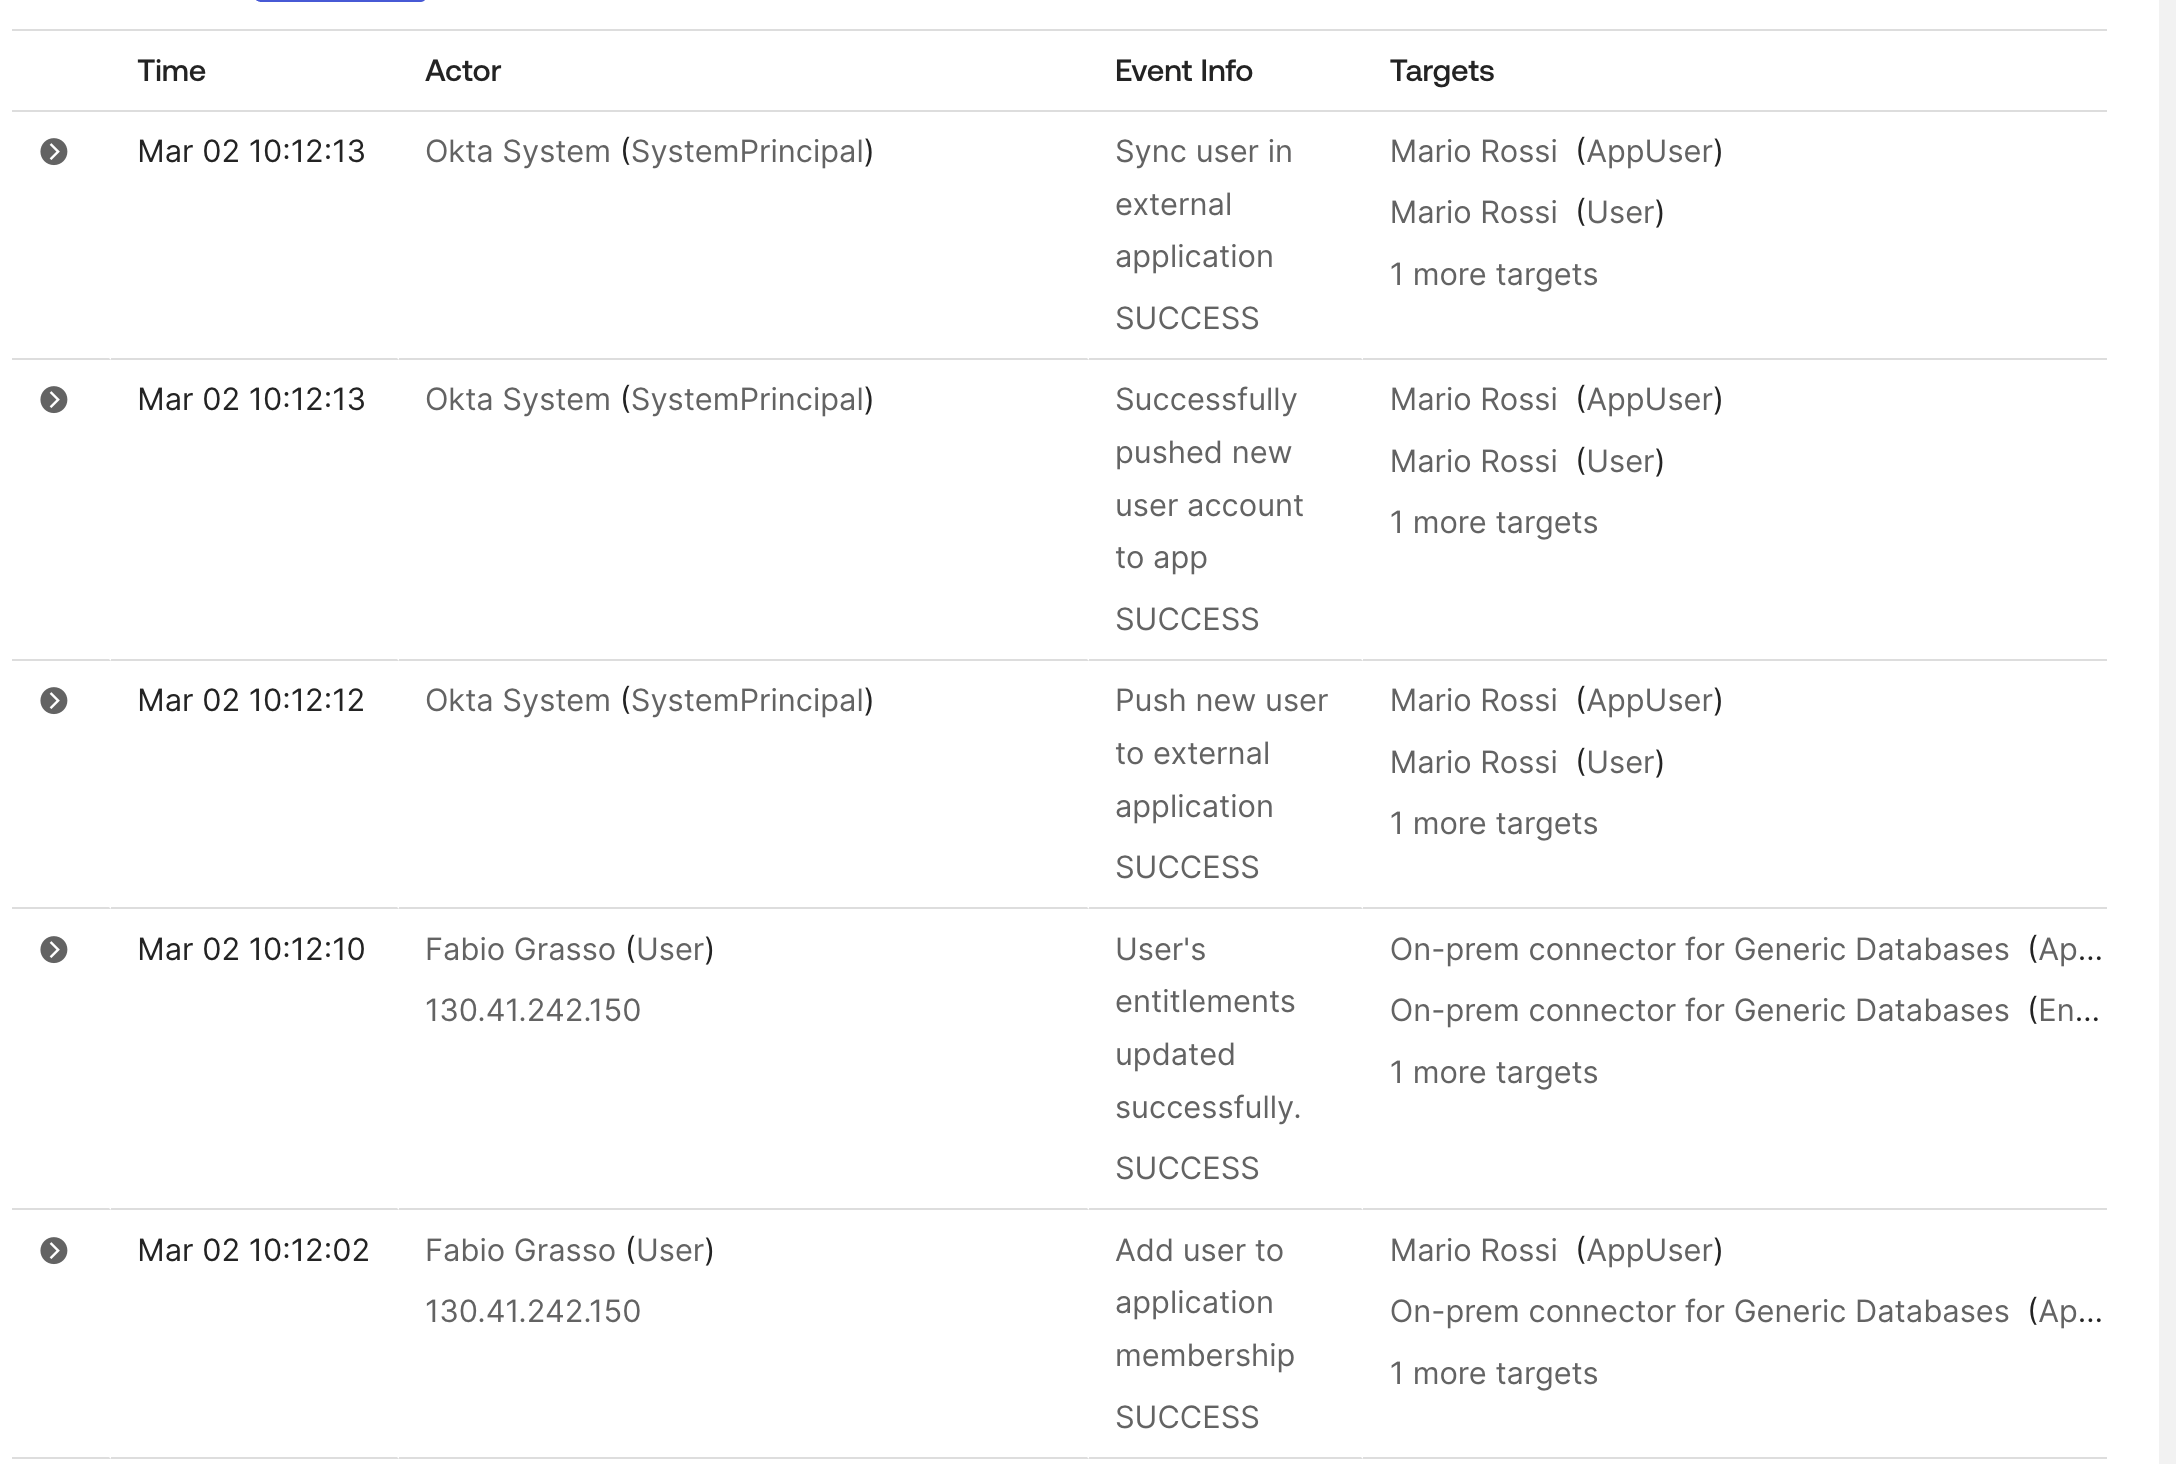
Even if they aren’t verbose, these logs can help you understand when provisioning actions are triggered and if they succeed or fail. And you can use them to get the timestamp of an event and correlate it with the On-Prem SCIM Agent logs.
On-Prem SCIM Agent Logs #
You will find the agent logs mounted in the local folder ./data/okta-scim/logs/*.log.
Beyond Basic Provisioning: Identity Governance #
Once you have the Generic Database Connector operational, you can explore advanced identity governance use cases:
-
Entitlements Policies: Define policies in Okta to govern how entitlements are assigned based on user attributes (e.g., department, location). Documentation: Okta Help - Create an Entitlement Policy.
-
Access Requests: Use Okta’s Access Request feature to allow users to request entitlements, with approval workflows and automated provisioning. Documentation: Okta Help - Access Requests.
-
Access Certification Campaigns: Implement one time or periodic access reviews for entitlements to ensure compliance and recertification. Documentation: Okta Help - Access Certification.
These governance features transform the Generic Database Connector from a simple provisioning tool into a comprehensive identity governance solution.
Production Considerations #
Deployment Architecture #
With the consolidated agent, deployment is simpler than before—there’s just one process to install and register, wherever you choose to run it (on the same host as the database, or on a separate one). The main architectural decision left is where the agent itself runs relative to the database, not how many agent processes to manage.
Using Different Databases #
To use PostgreSQL instead of MariaDB:
-
Update
docker-compose.yml:db: image: postgres:16 # Use official PostgreSQL image # Update environment variables accordingly -
Change sql mountpoint to load appropriate initialization scripts for PostgreSQL
-
Place appropriate JDBC driver in
./docker/okta-scim/packages/:
Other JDBC Drivers #
For other databases (Oracle, SQL Server, etc.):
- Download appropriate JDBC driver
- Place
.jarfile in./docker/okta-scim/packages/ - Rebuild the container:
make rebuild - Configure the agent with database-specific connection string
Note: MySQL Connector/J 9.6.0 is automatically downloaded from Maven Central during build. All .jar files in ./docker/okta-scim/packages/ are copied to /opt/OktaOnPremSCIMAgent/userlib/ during container build.
Connecting to Multiple Databases #
A single On-Prem SCIM Agent deployment can manage up to 8 databases simultaneously:
- Each database requires a separate Generic Database Connector application instance in Okta
- All databases can be different types (e.g., MySQL, PostgreSQL, Oracle, SQL Server)
- Useful for managing users across multiple applications, environments (prod/staging), or organizational units
- All JDBC drivers must be present in
./docker/okta-scim/packages/before building the container or in/opt/OktaOnPremSCIMAgent/userlib/if you are not using this Docker setup
For detailed configuration instructions, see doc/Okta_Provisioning_Configuration.md.
Production Best Practices #
When moving from lab to production:
Security:
- Use strong, unique passwords (never use defaults like
oktademo) - Create dedicated service accounts with minimal permissions
- Use firewall rules to restrict database access
- Periodically review the agent’s OAuth grant in your Okta org
High Availability:
- The Admin Console’s agent list explicitly supports registering multiple operational agents for redundancy—install at least two for failover
- Implement database replication/clustering
- Configure health monitoring and alerting
Performance:
- Optimize stored procedures and add appropriate indexes
- Monitor query performance and connection pool usage
Monitoring:
- Enable appropriate logging levels (i.e., INFO for production, DEBUG for troubleshooting)
- Set up centralized log aggregation
- Monitor Okta System Logs for provisioning events
- Create alerts for authentication failures and errors
- Track provisioning success/failure rates
Troubleshooting Common Issues #
Here are the most common issues you might encounter:
ValidationException: executeCall not allowed / execute not allowed #
If you see this error:
Error code: 400, error: . Errors received from SCIM server by the connector :
{"schemas":["urn:ietf:params:scim:api:messages:2.0:Error"],"scimType":"INVALID_SYNTAX",
"detail":"statement=CALL ACTIVATE_USER(?), errors=[ValidationException: executeCall not allowed.,
ValidationException: execute not allowed.]","status":400}
The operation is configured as “SQL Statement” instead of “Execute Stored Procedure”.
- Go to Okta Admin Console → Applications → Generic Database Connector
- Navigate to the Provisioning tab → To App / To Okta → Edit
- For each operation that calls a stored procedure, ensure Operation Type is set to “Execute Stored Procedure” (NOT “SQL Statement”)
Stored Procedure Not Found #
- Verify procedures are installed:
docker compose exec db mariadb -u oktademo -poktademo oktademo -e "SHOW PROCEDURE STATUS WHERE Db='oktademo';" - Reinitialize database if needed (see README.md)
Parameter Mismatch #
- Ensure parameter count matches the stored procedure definition
- Check parameter types (DATABASE_FIELD, CURSOR, etc.)
- Review
sql/stored_proc.sqlfor exact signatures
Connection Timeout #
- Verify the On-Prem SCIM Agent is running:
docker compose ps okta-scim - Check database connectivity:
docker compose exec okta-scim mysql -h db -u oktademo -poktademo oktademo -e "SELECT 1;"
Entitlement Operations Failing #
- Verify ENT_ID exists:
SELECT * FROM ENTITLEMENTS; - Check foreign key constraints
- Review USERENTITLEMENTS table structure
Advanced Troubleshooting #
The GitHub repository README contains comprehensive troubleshooting documentation including:
- Build errors with SSL certificate issues
- Database query logging (enable/disable/monitor)
- Agent log analysis
- Certificate warnings and VPN configurations
- Performance monitoring and optimization
For detailed troubleshooting steps, debug mode configuration, and performance tuning, refer to the complete troubleshooting guide in the repository.
Conclusion #
This comprehensive guide has walked you through deploying a complete Okta database provisioning solution using the new consolidated Okta On-Prem SCIM Agent, from initial Docker setup to advanced testing workflows. You now have a fully functional environment that demonstrates:
- Simplified Bridge Architecture: How a single On-Prem SCIM Agent connects Okta cloud to on-premises databases without inbound firewall rules, and without the bearer-token/certificate dance the old two-agent model required
- User Lifecycle Management: Automated create, update, activate, and deactivate operations
- Entitlement Management: Sophisticated role and permission assignment through database-backed entitlements
- Stored Procedure Abstraction: Clean, secure, and maintainable provisioning logic
- Real-time Synchronization: Bidirectional data flow between Okta and your database
Whether you’re evaluating Okta for a database provisioning use case, building a proof of concept, or learning the integration workflow, this lab environment provides a solid foundation. The Docker-based approach accelerates setup and experimentation, while the configuration steps apply equally to manual installations on production systems.
Remember that while Docker simplifies the learning process, production deployments should follow official Okta documentation and best practices for supported operating systems, security hardening, and high availability.
Next Steps #
- Explore Advanced Features: Test access requests, entitlement policies, and certification campaigns
- Customize for Your Use Case: Adapt the stored procedures and schema to match your application’s data model
- Scale the Environment: Add multiple databases or integrate with other on-premises applications
- Plan Production Deployment: Review the architecture options and production considerations for your organization
Questions or feedback? #
- Leave a comment to this article
- Contribute to the GitHub repository
- Follow me on LinkedIn for updates on Okta and identity management topics
- Explore the additional documentation:
Technical Documentation #
- Okta Provisioning Configuration Guide - Step-by-step Okta Admin Console setup instructions
Official Documentation #
- On-premises Connector for Generic Databases
- Install the Okta On-Prem SCIM Agent
- Okta 2026.09.0 Release Notes - Announcement of the SCIM Server → SCIM Agent consolidation
SCIM Protocol #
Okta Community #
Disclaimer #
This is a demonstration laboratory environment designed for testing, learning, and demonstration purposes. It is not officially supported by Okta for production use.
The MySQL Connector/J driver is automatically downloaded during Docker build from Maven Central (Oracle’s official distribution). Licensed under GPL v2 with the Universal FOSS Exception. The driver is NOT included in the Git repository or any published Docker images—only the Dockerfile build instructions are shared.